
Most ice makers that stop producing are victims of one of five fixable problems: the arm or switch got bumped off, the water filter is overdue, the fill tube froze solid, the freezer is running too warm, or the water line has a kink. Check the on/off switch and try the water dispenser first. If the dispenser works and the switch is on, the fix is usually further down the water line, not in the ice maker itself. Give any fix 12 to 24 hours before judging whether it worked.
TL;DR:
- Most ice maker failures are caused by simple issues like a bumped control arm, an overdue water filter, or a frozen fill tube, not complex parts.
- Confirm the ice maker is on, check water flow and filter status, and inspect the fill tube and freezer temperature before advanced troubleshooting.
- Resetting the ice maker or running a test cycle can often identify if the motor, valve, or module are functioning properly.
- DIY repairs are limited to basic tasks like replacing filters, thawing frozen tubes, and clearing kinks; electrical or sealed system problems require professional help.
- Calling a technician is recommended if the ice maker remains inactive after 24 hours of troubleshooting or if there are signs of electrical issues or leaks.
Table of Contents
- Why Is My Ice Maker Not Working? Quick Checks First
- How Do I Diagnose the Exact Cause of the Problem?
- How Do You Reset and Test an Ice Maker?
- What’s Safe to Fix Yourself and What Isn’t?
- When Should You Call a Technician Instead?
- How Do You Prevent This From Happening Again?
- What Should You Actually Expect From This Process?
- Sources
Why Is My Ice Maker Not Working? Quick Checks First
Before you touch a tool or unplug anything, run through these checks in order. Each one takes under a minute, and together they clear a large majority of the calls a technician gets for a silent ice maker.
- Confirm the ice maker is actually on. Look for a control arm in the raised (off) position, a power switch set to off, or a digital display showing “ice off.” A raised bail arm is the single most common reason an ice maker sits idle for weeks without anyone noticing.
- Test the water dispenser. If water flows normally from the dispenser, your supply line and inlet valve are probably fine, and the problem is isolated to the ice maker assembly.
- Check the bin position. Make sure the ice bin is seated all the way back and hasn’t tilted, which can trip the shutoff sensor even when everything else works.
- Pull the fridge out and inspect the line. Look at the water supply line behind the unit for kinks, especially if the fridge was recently moved, and confirm the shutoff valve under the sink or behind the wall is fully open.
- Look for frost around the fill tube. A patch of ice or frost where water enters the tray is a strong sign of a frozen fill tube, one of the most common single points of failure.
- Read the freezer thermometer. If you have a built-in display or a spare thermometer, check that the compartment sits in a range that supports ice production.
- Break up clumped ice. If cubes have fused into a solid block, that alone can jam the ejector arm and stop new batches from dropping.
- Check the filter’s age. If you can’t remember the last swap, treat it as overdue and replace it, since an overdue or clogged filter commonly restricts water flow and reduces ice production.
Pro Tip: Keep a sticky note with the install date on your water filter housing. It sounds low tech, but it’s the fastest way to rule out the most common cause in one glance instead of guessing how many months it’s been.
How Do I Diagnose the Exact Cause of the Problem?
Once the quick checks are done, you need to isolate which of five systems is failing. This is where most people either fix the problem themselves or realize it’s time to call someone.
Water supply issues. If the dispenser produces no water or only a weak trickle, the inlet valve isn’t getting adequate pressure. Confirm the shutoff valve behind the fridge is turned fully counterclockwise (open), and check that the supply line isn’t pinched behind the unit. A weak stream usually points to partial valve blockage or low household water pressure, while a complete absence of flow suggests the valve itself has failed electrically. KitchenAid’s troubleshooting guidance lists restricted water supply as one of the primary causes worth checking before anything else.
Water filter problems. A clogged filter starves the ice maker slowly, so you’ll often notice smaller cubes or slower production before it stops completely. Replace the filter, but don’t stop there. After swapping it, flush several quarts of water through the dispenser to clear trapped air and sediment before judging whether the fix worked, since skipping the flush step is the most common reason people think a new filter “didn’t help.”
- Cloudy or oddly shaped cubes often mean sediment buildup, not a mechanical fault.
- A filter that’s more than six months old should be replaced on sight, even without obvious symptoms.
- Some units need a specific reset after a filter change to clear an error code.
Frozen fill tube. This is the small tube that delivers water into the ice tray, and it’s prone to freezing when freezer temperature swings or a door seal leaks cold air unevenly. Look for a visible ice plug or frost collar right where the tube enters the tray. To thaw it safely, unplug the fridge, remove the ice bin, and aim a hair dryer on its lowest heat setting at the tube for a few minutes, or use a turkey baster with warm tap water. Never use an open flame or a heat gun. Once thawed, dry the area completely before restoring power, since residual moisture just refreezes.
Inlet valve and pressure issues. A buzzing or humming sound from behind the fridge when the ice maker tries to cycle usually means the valve is receiving power but isn’t opening properly, often due to mineral buildup or a failed solenoid. Whirlpool’s guide identifies a defective water inlet valve as one of the five most common failure points, alongside filter, temperature, arm position, and frozen tube issues. Household water pressure below the manufacturer’s minimum threshold (usually around 20 psi) can also prevent the valve from opening fully even when it’s mechanically sound. Confirming actual voltage at the valve requires a multimeter and basic electrical testing, which is where DIY should generally stop.
Module, motor, or thermostat failures. If the ice maker cycles (you hear the motor try to run) but nothing happens, or if it’s completely silent and unresponsive, you’re likely looking at a failed module, worn gear assembly, or bad thermostat. A grinding or clicking noise during what should be a quiet cycle is an early warning sign of mechanical failure in the motor or gear train, and technicians treat that noise as a strong signal that professional attention is coming next rather than a simple fix. Thermostat continuity testing is possible with a multimeter, but it should be done by someone comfortable working around live components, since misreading a healthy part as failed leads to unnecessary part replacement, and the evaporator coil replacement cost on top of an unnecessary module swap can turn a $150 fix into a $600 mistake.
How Do You Reset and Test an Ice Maker?
A reset clears minor glitches without touching any parts, and it’s the fastest way to confirm whether you’re dealing with electronics or hardware.
- Turn off the ice maker or raise the control arm, then leave it off for a full minute.
- Alternatively, unplug the refrigerator entirely for 30 seconds, then restore power.
- Turn the ice maker back on and wait. Most units need 24 hours to complete a full harvest cycle after a reset, and LG’s support documentation recommends waiting up to 24 hours after a reset or fresh installation before assuming the fix failed.
- If your model has a test button (common on LG, Whirlpool, and KitchenAid units), press and hold it for a few seconds until you hear a chime or see a light change.
Test mode forces the ice maker through its motions, water fill, harvest, and ejector cycle, without waiting for a natural cycle to occur. This matters because OEM test modes let you confirm the motor and valve are physically operating before you spend money on parts.
Listen closely during the test:
- A steady hum followed by a click means the motor and ejector arm are cycling normally.
- A buzz with no water entering the tray points to the inlet valve.
- Total silence with no movement or sound usually means the module itself has failed.
What’s Safe to Fix Yourself and What Isn’t?
Homeowners can safely handle a short list of tasks: checking and resetting the control arm, swapping the water filter, thawing a frozen fill tube with low heat, and clearing a kinked supply line. Each of these involves no exposed wiring and no risk of flooding if you follow basic precautions.
Some tasks cross into territory better left to a licensed technician:
- Testing live voltage at the inlet valve or control module with a multimeter.
- Replacing the water inlet valve itself, which involves shutting off water lines correctly and working near electrical connections.
- Any sealed-system or refrigerant work, which is regulated and requires EPA certification to handle legally.
- Disassembling the ice maker module to inspect internal gears or motor windings.
Before doing anything, unplug the refrigerator, shut off the water supply behind it, and make sure the area is completely dry before restoring power. Opening a sealed component or attempting electrical repairs on a unit still under manufacturer warranty can also void that coverage, so check your warranty terms before reaching for a screwdriver.
Pro Tip: If you’re not sure whether a part is under warranty, check the role warranty plays in appliance repairs before you open anything. A five-minute check can save you from paying for a repair the manufacturer would have covered.
When Should You Call a Technician Instead?
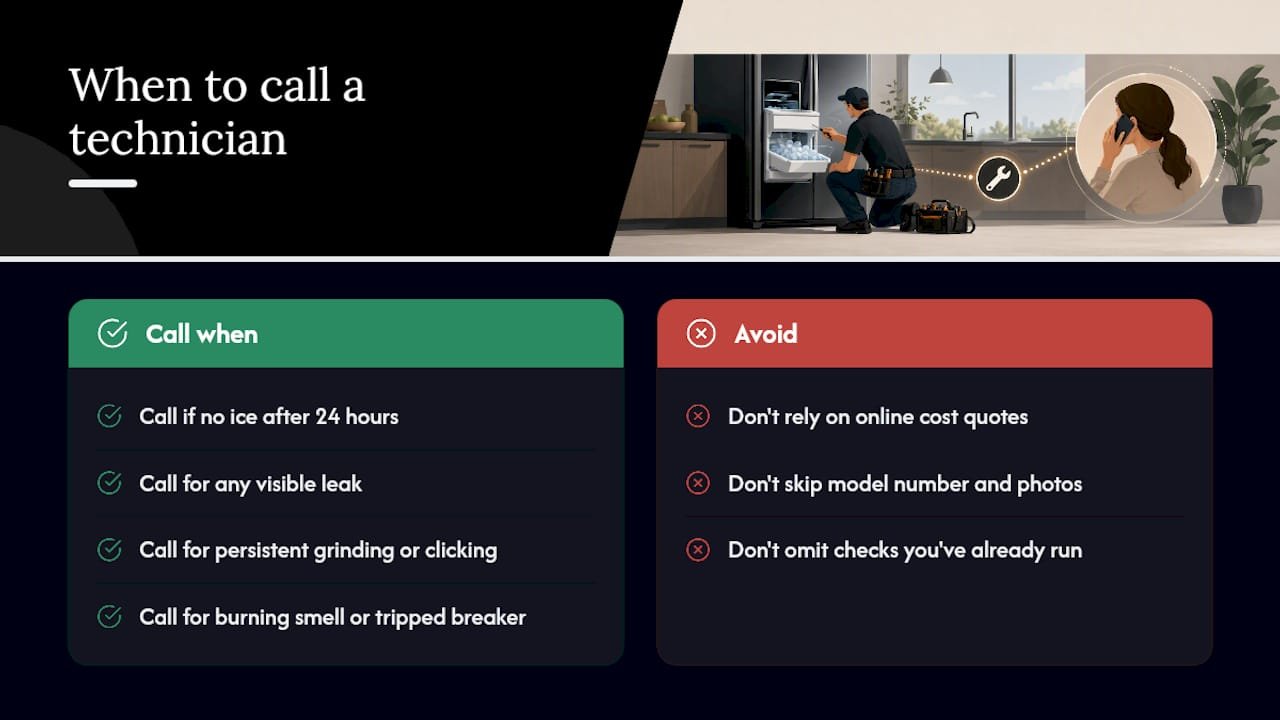
Call for professional help when you’ve confirmed water flow and the arm is on, but you still have no ice after 24 hours. Also call for any visible leak, a persistent grinding or clicking noise, signs of an electrical malfunction like a burning smell or tripped breaker, or a failed OEM test that shows the motor or valve isn’t responding.
A technician’s visit typically starts with checking power and resistance at the inlet valve, confirming the module actually engages when triggered, and ruling out sealed-system problems that would explain warm freezer temperatures. Reputable techs give you a written estimate before starting any work, so you know the cost before parts get ordered. Service call fees and common part costs vary a fair amount by region and by which component fails, so treat any number you see online as a rough range rather than a quote.
Before the visit, have a few things ready: your refrigerator’s model number (usually inside the fridge on a side panel), photos or a short video of the ice maker not working, and a written list of the checks you’ve already run. That last part matters more than people expect. Technicians who know a homeowner already ruled out the filter, the arm, and the fill tube can skip straight to valve and module diagnostics instead of repeating steps you’ve already covered, and the ice maker repair page outlines what that in-home diagnostic process typically covers.
How Do You Prevent This From Happening Again?
Most repeat failures trace back to the same handful of maintenance gaps. Fixing them once tends to keep the ice maker running for years.
- Replace the water filter regularly according to manufacturer recommendations, and flush the line afterward rather than waiting for symptoms to show up.
- Keep the freezer between 0°F and 5°F for reliable production. Too warm and the harvest cycle won’t trigger; too cold and cubes come out hollow or oddly shaped.
- Check that the refrigerator sits level and has a few inches of clearance around the back and top for airflow, since poor airflow raises internal temperature unevenly.
- After any new installation or a filter change, prime the line by running the dispenser for a minute, then give the system sufficient time, often about a day, before expecting full ice production.
- After a vacation or a move, expect the first batch or two of ice to look or taste slightly off as the line re-primes. That’s normal and resolves within a day.
What Should You Actually Expect From This Process?
Here’s the part most troubleshooting guides skip: the order you check things in matters almost as much as what you check. Most people jump straight to worrying about a burned-out motor when the real problem is a control arm someone bumped while loading groceries, or a filter that’s been overdue for four months. The five common causes covered here aren’t equally likely. Power and arm position, filter condition, and frozen fill tubes account for the overwhelming majority of “my ice maker stopped working” calls, while motor and module failures are the minority.
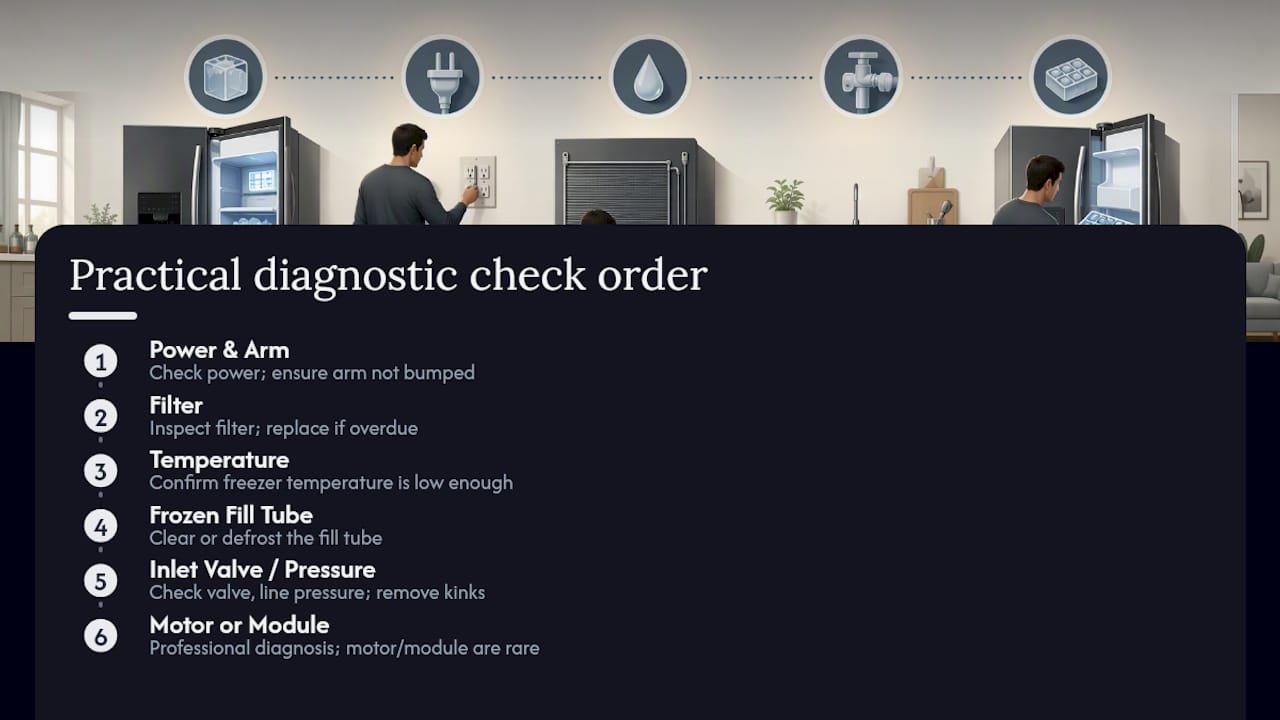
The mistake we see most often isn’t skipping steps. It’s skipping the order. Someone hears a buzzing sound and assumes the worst, orders a new inlet valve, installs it, and the ice maker still doesn’t work because the actual problem was a kinked line restricting pressure to a perfectly healthy valve. Testing in sequence, cheapest and simplest first, saves money more reliably than any single diagnostic trick.
The other pattern worth naming: people give up too early on the wait time. A fix that’s genuinely correct can still look like a failure if you check the bin two hours later instead of giving it the full 24 hours a harvest cycle actually needs. Patience isn’t a virtue here so much as a diagnostic requirement.
— MDTECH
Sources
- Ice Maker Troubleshooting: How to Fix an Ice Maker — Maytag
- LG Refrigerator – Why is my refrigerator not making ice? — LG USA Support
- Refrigerator ice maker troubleshooting — KitchenAid
- Ice maker troubleshooting: how to fix an ice maker — Whirlpool
- Common refrigerator ice maker problems and solutions — Sears PartsDirect