
Clean reusable mini split filters monthly, more often if you have pets or heavy dust, and replace disposable filters on the schedule your manual lists. Book at least one professional tune-up every year, and consider twice-yearly service if your system runs hard in both seasons. Stop any DIY work and call a certified technician the moment you notice leaks, ice buildup, loud noises, or a drop in cooling or heating power.
TL;DR:
- Before opening the indoor cabinet, switch off the unit and cut breaker power; rinse reusable filters gently, then air dry them completely.
- Keep 12 to 24 inches of clearance around the outdoor unit, remove debris, and avoid pressure washers that can bend fins or damage electrical parts.
- For a sluggish condensate drain, try a shop vacuum at the exterior outlet or a gentle vinegar flush, but stop if the clog remains.
- Refrigerant work requires EPA Section 608 certification, and technicians should correct airflow or coil problems before adjusting the charge to avoid misdiagnosis.
- Ask the technician to demonstrate filter removal and provide a written service record with part numbers and recommended cleaning frequency for future maintenance.
Table of Contents
- Why routine care protects efficiency, comfort, and equipment life
- How to clean your filters and indoor head step by step
- Caring for the outdoor unit through the seasons
- Checking the condensate drain for clogs
- Your weekly-to-annual maintenance checklist
- When a problem needs a certified technician, not a DIY fix
- What a thorough technician visit actually looks like
- How we think about mini split maintenance
- Book a professional mini split tune-up with MDTECH
- FAQ
- Sources
Why routine care protects efficiency, comfort, and equipment life
A dirty filter chokes airflow before you ever notice weaker cooling. Dust and pet hair build up on the mesh, the fan works harder to push air through it, and the coil behind it collects grime that insulates it from the refrigerant doing the actual heat exchange. The EPA’s heat pump guidance lists monthly filter care and annual professional service as the two pillars of keeping a ductless system running the way it was designed to.
Skipping this work has real consequences:
- Reduced airflow forces the compressor to run longer, raising energy bills over time.
- Neglected coils and clogged drains create conditions for refrigerant leaks and compressor strain.
- Lapsed maintenance can affect warranty claims if a manufacturer requires documented service.
- Regular care extends the years you get from a system before replacement becomes the better option.
A maintenance checklist built around these basics keeps small problems from becoming expensive ones.
How to clean your filters and indoor head step by step
Before touching the indoor unit, switch it off at the wall control and cut power at the breaker if you’re doing anything beyond a quick filter check. ENERGY STAR’s maintenance checklist specifically calls for powering down before opening the cabinet, both for safety and to avoid damaging the fan or sensors while you work.
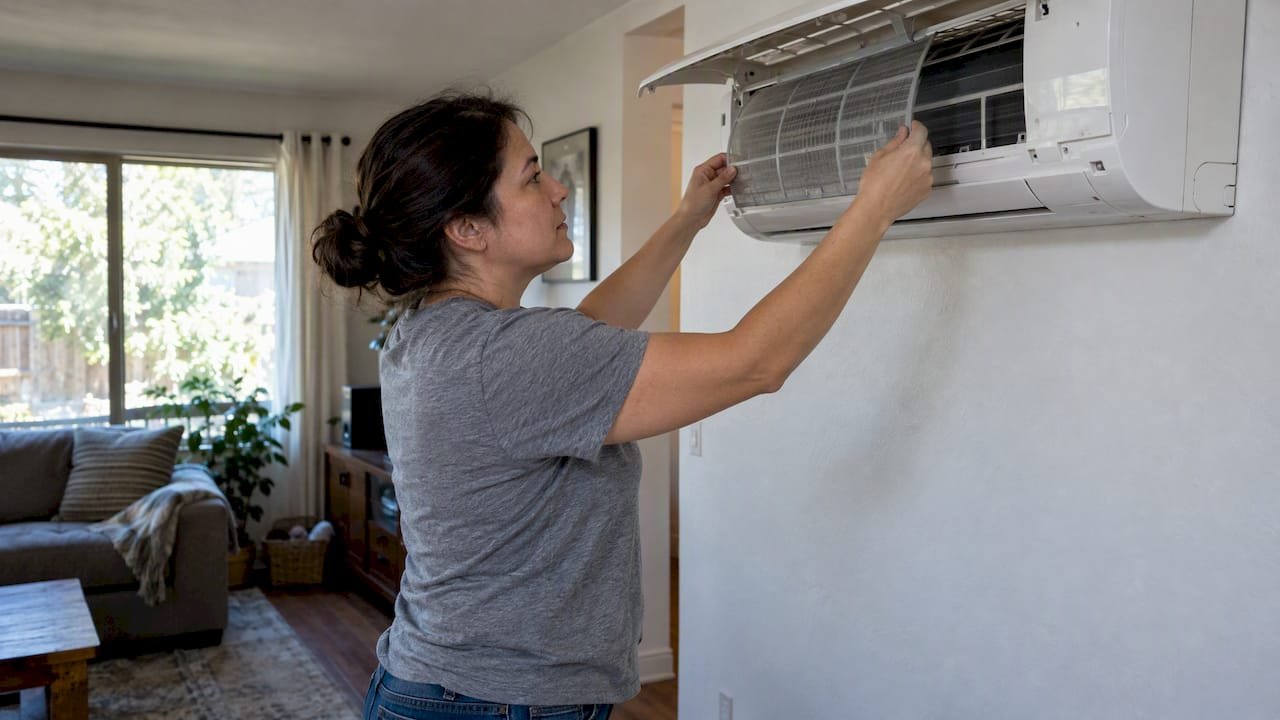
- Open the front panel and slide out the reusable filters, noting which side faces out.
- Vacuum loose dust with a soft brush attachment, then rinse under lukewarm water.
- Wash stubborn grime with mild dish soap and a soft cloth. Avoid scrubbing hard enough to tear the mesh.
- Shake off excess water and let filters air dry completely before reinstalling. Trapped moisture invites mold.
- Wipe the visible coil fins and interior housing with a dry or barely damp cloth. Skip bleach, ammonia, or strong solvents, which can corrode coil fins and plastic housings.
- Reinstall the filters in their correct orientation and close the panel firmly.
While you have the unit open, jot down the filter model and size, and note where any disposable replacement filters are stored. Check for tears or warping, since a damaged filter lets dust bypass straight to the coil.
Pro Tip: Snap a photo of the filter label before you remove it the first time. It saves a search through the manual every time you need a replacement size.
Caring for the outdoor unit through the seasons
The outdoor condenser does the heavy lifting, and most of what it needs from you is simple clearance and the occasional rinse. Crowding it with shrubs, furniture, or stacked firewood restricts the airflow it depends on to reject heat.
- Keep 12 to 24 inches of open space around the unit and remove leaves, grass clippings, and spiderwebs from the housing.
- Rinse light surface dirt with a garden hose and a soft brush, working from the top down.
- Skip pressure washers. The force can bend fins or push water into electrical components, and never open the refrigerant circuit yourself.
- In snow-prone areas, use a manufacturer-approved stand or deflector if your installation allows one, keeping the unit above expected snow depth.
- If fins look bent or crushed, a fin comb can straighten light damage. For heavier damage, call a technician rather than risk puncturing a fin and the tubing behind it.
This kind of outdoor unit upkeep is one of the simplest ways to keep a system breathing properly between professional visits.
Checking the condensate drain for clogs
Condensate drains are easy to forget until water starts pooling where it shouldn’t. A slow or blocked drain line lets water back up into the drain pan, and from there it can stain ceilings or walls below an indoor head.
- Look at the drain pan and any visible section of condensate line for standing water, slime, or a slower-than-usual drip during operation.
- If drainage seems sluggish, try a wet-dry shop vac at the exterior drain outlet to pull out loose debris, or flush the line gently with a cup of water mixed with a small amount of vinegar.
- If the clog doesn’t clear after a gentle attempt, stop. Forcing it can crack fittings or push the blockage further into the line.
- Persistent musty odors or dark staining around the pan point to microbial growth or physical damage, both of which need a professional look rather than repeated home fixes.
Your weekly-to-annual maintenance checklist
Breaking maintenance into a rhythm makes it easier to stick with than a vague “clean it sometime” reminder.
- Weekly: Glance at the indoor head for weak airflow, odd smells, or any sign of water dripping where it shouldn’t.
- Monthly: Clean reusable filters, more often with pets or heavy dust, and wipe down visible indoor surfaces.
- Seasonal: Clear the outdoor unit of debris, check that mounting brackets are secure, and confirm the condensate line drains freely before the system sees heavy use.
- Annual (technician): A full tune-up covering refrigerant leak checks, coil cleaning, electrical connection inspection, and a written record of the visit for your files.
This split mirrors the approach in a broader practical homeowner’s guide to HVAC upkeep, with homeowner tasks kept light and frequent, and technical work handled on a yearly cadence.
When a problem needs a certified technician, not a DIY fix
Some symptoms mean it’s time to stop troubleshooting and pick up the phone. Ice forming on the refrigerant lines, a hissing or oily residue near connections, a burning electrical smell, grinding or banging from the compressor, or a steady loss of cooling or heating capacity all point to issues beyond filter cleaning and drain checks.
- Refrigerant leaks and recharging require a technician certified under EPA Section 608, since adding or removing refrigerant is federally regulated.
- Diagnosing airflow and coil condition has to happen before anyone adjusts refrigerant charge. ASHRAE’s technical guidance warns that charging a system without first fixing airflow or coil problems leads to misdiagnosis and repeat service calls.
- A certified visit typically covers leak diagnosis, evacuation and recharge procedures, electrical inspection, and coil restoration beyond what a garden hose can reach.
A system with a persistent refrigerant leak often gets recharged repeatedly instead of repaired, which the EPA notes drives up both environmental impact and lifetime cost. Fixing the leak once avoids the cycle of repeat visits.
When you book a visit, having your model and serial numbers, installation or service history, a description of symptoms, and clear access to both indoor and outdoor units ready speeds up the diagnosis.
What a thorough technician visit actually looks like
A solid maintenance visit leaves you with more than a quieter system. Field protocols from the DOE Building America program recommend that technicians demonstrate filter removal and cleaning directly to the homeowner and leave behind a written note of part numbers and recommended cleaning frequency, rather than just doing the work out of sight.
- A technician should walk you through filter removal once, so you can repeat it confidently on your own.
- Keep your installation paperwork, a photo of the outdoor unit’s location, and its model and serial number together for warranty claims or future service calls.
- Licensed technicians follow this same demonstrate-and-document approach on every HVAC visit.
How we think about mini split maintenance
Every tune-up is a chance to leave you better equipped, not just a system that runs for another season. Technicians move quickly, but slow down long enough to show what was checked and why.
A routine visit from us includes a filter demonstration, a written checklist of what was serviced, and a recommended follow-up date based on how hard your system works.
— MDTECH
Book a professional mini split tune-up with MDTECH
You’ve seen what filter care, drain checks, and outdoor unit cleaning involve, and where DIY work has to stop. We handle the certified side of that list: refrigerant diagnostics, coil restoration, electrical inspection, and the Section 608 work that homeowners legally can’t do themselves.
Before you book, have a few things ready:
- Your system’s model and serial numbers, usually on a sticker inside the indoor unit panel.
- A short note on symptoms: weak airflow, odd noise, ice, or rising bills.
- Clear access to both the indoor head and outdoor condenser for the visit.
Request a visit through our air conditioning repair and installation services page, and we’ll get a licensed technician scheduled.
FAQ
Do mini splits need routine maintenance?
Yes. The EPA recommends cleaning or replacing filters monthly and scheduling professional service at least once a year to keep efficiency and performance steady. Skipping this allows dust buildup that reduces airflow and strains the compressor over time.
What is the average lifespan of a ductless mini split AC?
Lifespan varies by brand, climate, and how consistently a system is maintained, so there’s no single industry-wide figure we can cite here. Regular filter cleaning, annual professional tune-ups, and prompt attention to leaks or airflow problems all support getting the most years out of a unit.
How much does it cost to maintain a ductless mini split system?
Published pricing for a maintenance visit isn’t listed publicly, since costs depend on the system, location, and what the visit includes. You can request a quote directly through our appliance and HVAC repair services page.
Can I service my mini split myself?
You can safely handle filter cleaning, wiping the indoor head, clearing debris around the outdoor unit, and checking the condensate drain for minor clogs. Refrigerant handling and electrical repairs require a technician certified under EPA Section 608, since that work is federally regulated.
Sources
- EPA — Heat pumps (Burnwise / homeowner guidance)
- ENERGY STAR — Maintenance checklist (heating & cooling)
- DOE Building America — Field Monitoring Protocol: Mini-Split Heat Pumps
- ASHRAE interpretation IC 180-2008-1