
Most refrigerator door leaks come down to four things: a dirty or obstructed gasket, a gasket that has lost its shape, a misaligned hinge, or a fridge that is not level. Start by clearing obstructions, cleaning the gasket, running a dollar-bill test around the whole door, and checking that the unit sits level. Replace the gasket only if it is cracked, brittle, or permanently flattened after those steps. If the seal still fails or the fridge stays above 40°F, call a licensed technician.
TL;DR:
- Most leaks stem from a dirty or obstructed gasket, a warped or cracked rubber seal, or a misaligned and unlevel fridge.
- Cleaning the gasket and adjusting the fridge’s level can fix most sealing issues without replacing parts.
- A dollar-bill test at multiple points around the door quickly identifies non-sealing areas, which can be fixed in many cases.
- Gasket replacement is recommended only if the rubber is cracked, brittle, or permanently deformed after cleaning and leveling.
- Persistent temperature issues above 40°F often indicate deeper, sealed-system problems requiring professional diagnosis.
Table of Contents
- A quick priority checklist for a leaking fridge door
- Inspect and clean the gasket before you touch anything else
- Fix hinge alignment and level the refrigerator
- When and how to replace the refrigerator door gasket
- Confirm the fix actually restored a safe temperature
- What MDTECH technicians flag before recommending a repair visit
- When DIY makes sense and when it does not
- Get a refrigerator door or gasket fixed without the guesswork
- FAQ
- Sources
A quick priority checklist for a leaking fridge door
Work through these steps in order before assuming you need a new gasket. Most sealing problems get solved in the first three steps, without tools or parts.
- Open the door and check for anything blocking it: a shifted shelf, a tall container in the door bin, or ice buildup in the freezer.
- Run the paper test: close the door on a dollar bill or a sheet of paper at several points around the frame and pull. If it slides out easily, that spot is not sealing.
- Look for frost lines, water droplets, or visible gaps along the gasket, since these often mark exactly where air is getting in.
- Place an appliance thermometer inside the fridge and watch it while you troubleshoot. If the reading stays above 40°F, treat the problem as urgent.
Manufacturer support pages from brands like Whirlpool walk through this same sequence before recommending a service call, which tells you something: most sealing complaints are fixable without replacing parts. Mark any weak spots you find with a sticky note so you know exactly where to focus when you get to the gasket or the hinges.
Inspect and clean the gasket before you touch anything else
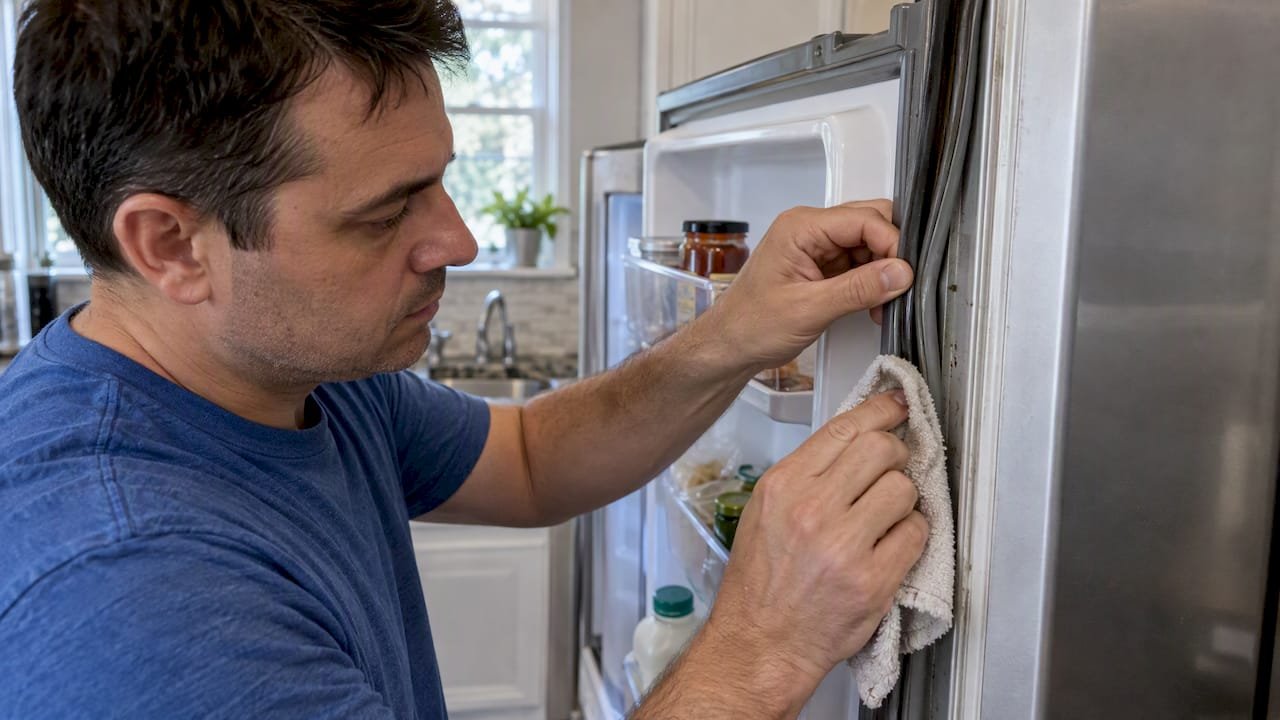
Pull the gasket gently away from the door liner and look closely at its full length, not just the section facing you when the door is open.
- Cracks, tears, or a permanently flattened line mean the rubber has lost its memory and will not reseal on its own.
- Brittleness, where the gasket feels stiff or crumbles slightly when pinched, usually points to age rather than dirt.
- Warping, where the gasket sits at an angle instead of flat against the frame, often comes from heat exposure or years of door slamming.
If the gasket looks intact but grimy, mix warm water with a tablespoon of baking soda and work it into the rubber with a soft cloth or an old toothbrush, then rinse and dry completely. This combination is recommended by GE because it lifts residue and neutralizes odors without attacking the rubber. Skip bleach and ammonia entirely, since both break down rubber over time. For sticky residue that will not lift, a hair dryer on its lowest setting can soften the gasket enough to wipe clean, an approach echoed in general door seal maintenance guidance for weatherproofing rubber seals. A thin layer of petroleum jelly can help some gaskets grip better, but check your model’s manual first since not every gasket material responds the same way.
Pro Tip: Clean the gasket before you blame it. A sticky or dirty seal often mimics the symptoms of a worn one, and cleaning costs nothing.
Fix hinge alignment and level the refrigerator
If the gasket looks fine but the door still does not seat evenly, the problem is probably the refrigerator’s position rather than the rubber itself.
- Place a level on top of the fridge, checking side to side and then front to back, since most units should sit slightly higher in front so the doors swing shut on their own.
- Adjust the leveling feet or rollers at the base, turning them a quarter turn at a time, and recheck with the level after each adjustment.
- If the door hangs unevenly, loosen the top hinge screws slightly, reposition the door by hand, hold it in place, and retighten before testing the seal again.
- Repeat the paper test after each adjustment so you know whether the change actually helped.
Whirlpool’s leveling guidance notes that even small leveling changes can resolve persistent gaps, which is worth remembering before you assume a part has failed. If the hinge itself is bent or the frame around it is cracked, stop here. That kind of structural damage usually needs a technician rather than a screwdriver.
When and how to replace the refrigerator door gasket
Replace the gasket once cleaning and leveling fail to close the gap, or if you already spotted cracks, tears, brittleness, or warping during inspection. Two designs account for most refrigerators on the market.
- Press-fit gaskets snap into a channel around the door and are generally within reach for a confident DIYer.
- Glued-in gaskets are bonded to the door panel and often require special tools or professional service to remove cleanly.
For a press-fit gasket, the general replacement workflow runs like this: unplug the refrigerator, pull the old gasket free from its track, clean the channel thoroughly, then seat the new gasket section by section. Warming the new gasket slightly before installation helps smooth out shipping creases, and a thin coat of petroleum jelly can make it easier to seat into tight corners. Once it is in place, run the paper test again at every edge. If you are not confident the gasket is glued rather than pressed, or if the replacement does not seat evenly after a couple of attempts, that is the point to call a freezer or refrigerator door seal specialist rather than force it.
Confirm the fix actually restored a safe temperature
A gasket that looks sealed is not the same as a fridge that is actually cold enough. Put an appliance thermometer on the middle shelf and give it time to settle.
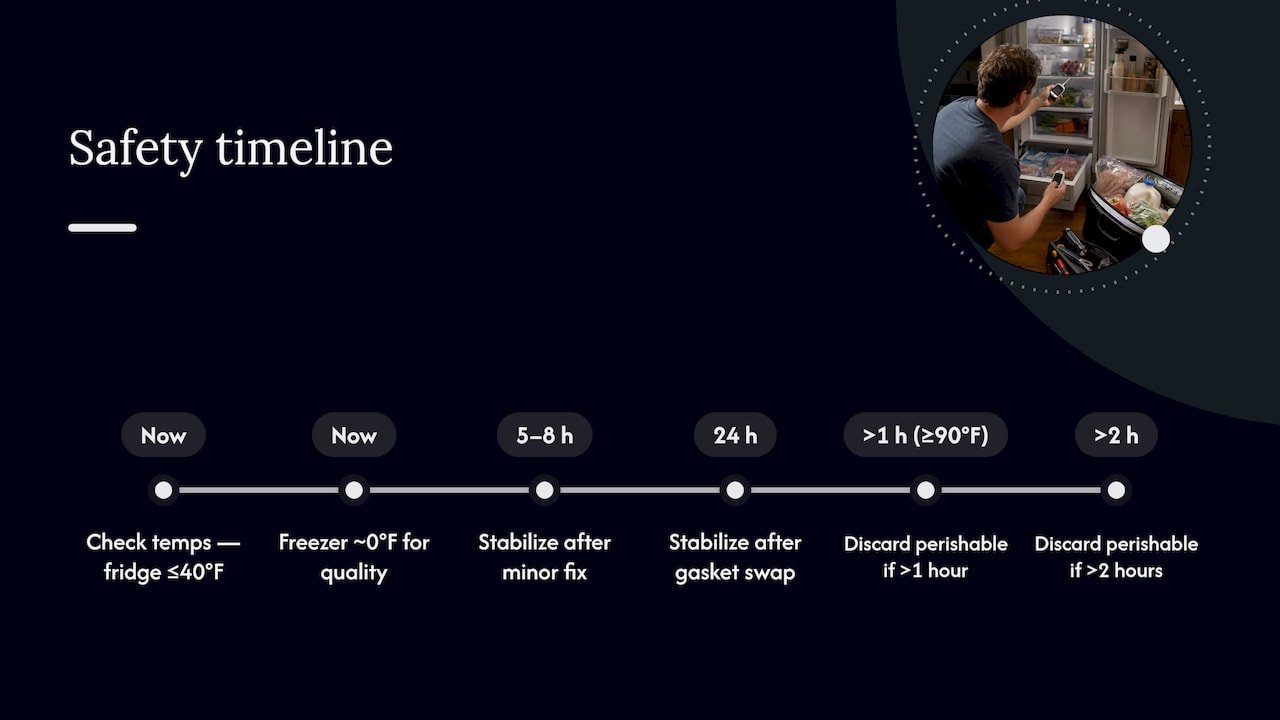
Appliance thermometers should read 40°F (4°C) or below for the refrigerator section, with the freezer closer to 0°F for best quality. Between 40°F and 140°F is the range the USDA calls the “danger zone,” where bacteria can double in as little as 20 minutes.
Give the thermometer 5 to 8 hours to stabilize after a minor adjustment, or closer to 24 hours after a bigger repair like a gasket swap. If food sat above 40°F for more than 2 hours (or just 1 hour when room temperature is above 90°F), the USDA’s guidance is to discard it rather than risk it. While you wait for the fix to prove itself, keep the door closed as much as possible and tuck an ice pack next to anything perishable.
What MDTECH technicians flag before recommending a repair visit
Some sealing problems are not worth tackling solo, and knowing which ones saves time and prevents a bigger repair bill later.
- Glued-in gaskets, bent hinge frames, or a compressor that keeps running nonstop after you have tried everything above usually call for a technician’s tools and diagnostic equipment.
- Persistent temperature problems, where the thermometer will not settle under 40°F despite a clean, aligned seal, often point to a sealed-system issue beyond the gasket.
- Before booking, jot down your model number, the fridge’s age, what the paper test showed at each point around the door, and where you noticed frost or condensation.
- Clear a path to the unit and move anything fragile out of the way so the technician can work without delay.
When DIY makes sense and when it does not
Cleaning the gasket, adjusting hinges, and swapping a press-fit gasket are all reasonable weekend projects with low risk if you follow the manufacturer’s steps. Glued-in gaskets, bent door frames, or a fridge that will not hold temperature after every fix above are different: the risk of making things worse, or missing a sealed-system problem, outweighs the savings. Age matters too. An older refrigerator nearing the end of its expected life may be cheaper to replace than to keep repairing. For the stubborn cases, a licensed technician can diagnose what a dollar-bill test cannot.
— MDTECH
Get a refrigerator door or gasket fixed without the guesswork
A leaking door that keeps creeping back above 40°F costs more in spoiled groceries than most repairs do. Technicians handle gasket replacement, hinge repair, and full diagnostic visits across local service areas.
- Technicians diagnose whether the issue is the gasket, the hinge, the leveling, or something inside the sealed system, rather than guessing from a checklist.
- Our refrigeration services page covers everything from gasket replacement to full refrigerator repair for both glued-in and press-fit designs.
- Our refrigerator repair page explains what to expect from a visit, including an estimate before work begins and straightforward guidance on repair versus replacement when a unit is older.
If your fridge still will not hold 40°F after trying the fixes above, book a visit through our refrigerator repair services page and get it sorted before anything in the fridge goes to waste.
FAQ
Does Vaseline help refrigerator seals?
A thin layer of petroleum jelly can help some gaskets seat more snugly against the frame, but it is not a fix for cracked or torn rubber. Check your model’s manual first, since not every gasket material is compatible with it.
What is a refrigerator door seal?
A refrigerator door seal, also called a gasket, is the flexible rubber strip lining the inside edge of the door that creates an airtight connection with the cabinet frame. When it is clean, flexible, and properly aligned, it keeps cold air inside and prevents the 40°F danger zone from creeping into the fridge.
How can I make my refrigerator door gasket seal better?
Clean the gasket with a warm water and baking soda solution, check that the refrigerator is level front to back and side to side, and adjust the hinges if the door hangs unevenly. Run the paper test after each change to confirm the gap is closed.
How do you fix the rubber on a refrigerator door?
If the rubber is just dirty or sticky, clean it with a baking soda solution and a soft brush, then dry it thoroughly. If it is cracked, torn, or permanently warped, the gasket needs replacement rather than cleaning, following the removal and installation steps for your gasket’s specific design.
Sources
- Danger zone: 40°F to 140°F (USDA FSIS)
- Care and cleaning of interior and gasket (GE Appliances support)
- Door not sealing (Whirlpool product help)
- How to replace a door gasket (SearsPartsDirect DIY guide)