TL;DR:
- A plumbing emergency workflow is a set of actions homeowners take immediately to stop water flow, prevent damage, and get a plumber quickly. Knowing how to locate shutoff valves and having necessary tools prepared can save thousands of dollars in repairs. Proper preparation and clear communication with emergency services help homeowners handle crises efficiently and minimize risks.
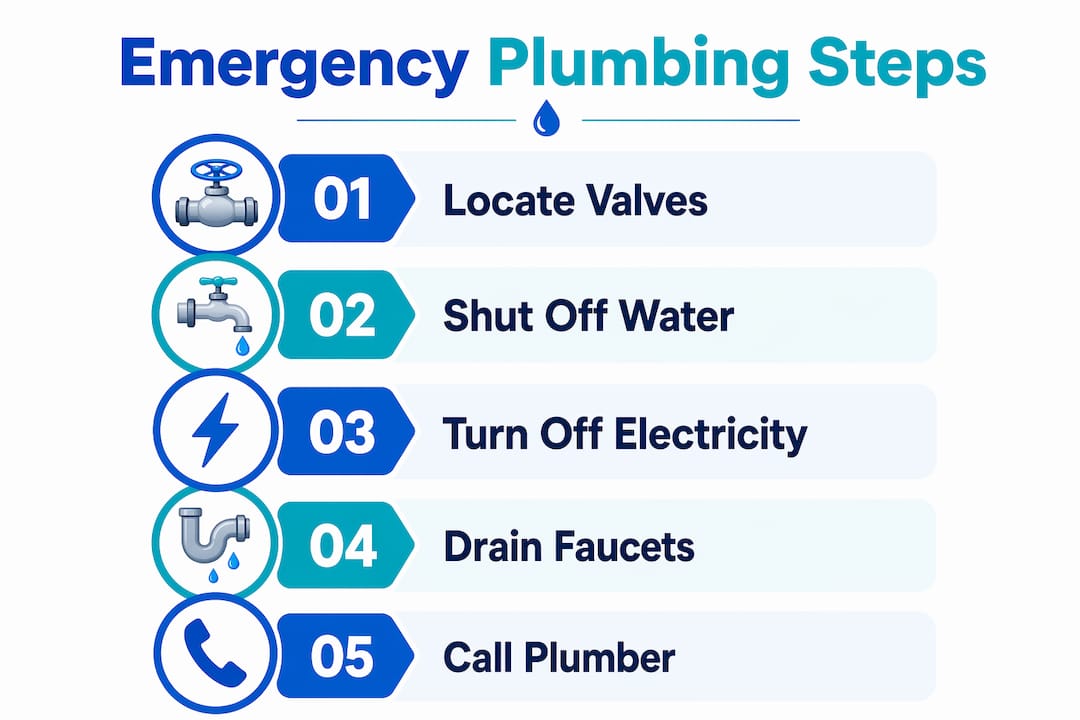
A plumbing emergency workflow is a structured series of actions you take immediately to stop water damage, protect your safety, and get a licensed plumber on site fast. Most homeowners freeze when a pipe bursts or a toilet overflows. That freeze costs money. Acting within the first 2–5 minutes to shut off water supplies dramatically limits structural damage and repair costs. The steps below give you a clear, prioritized plan so you never waste those critical minutes searching for a valve or guessing what to do next.
What is a plumbing emergency workflow?
A plumbing emergency workflow is the industry term for the ordered set of actions that control water, eliminate hazards, contain damage, and coordinate professional repair. Plumbers and dispatch teams use this term internally. As a homeowner, knowing the same framework puts you on the same page as the professionals you call. The workflow has three phases: immediate response, containment, and professional handoff. Each phase has specific tasks, and skipping one creates problems in the next.
What equipment and information do you need before an emergency?
Preparation is the difference between a $200 repair and a $5,000 restoration bill. You need the right tools and the right knowledge before anything goes wrong.
Tools to keep accessible
- Adjustable wrench and pipe wrench
- Several large buckets and absorbent towels
- Waterproof flashlight
- Duct tape and plumber’s tape for temporary sealing
- Wet/dry vacuum if you own one
These items belong in a single, labeled bin under the sink or in a utility closet. Searching for a wrench while water pours across your floor wastes the minutes that matter most.
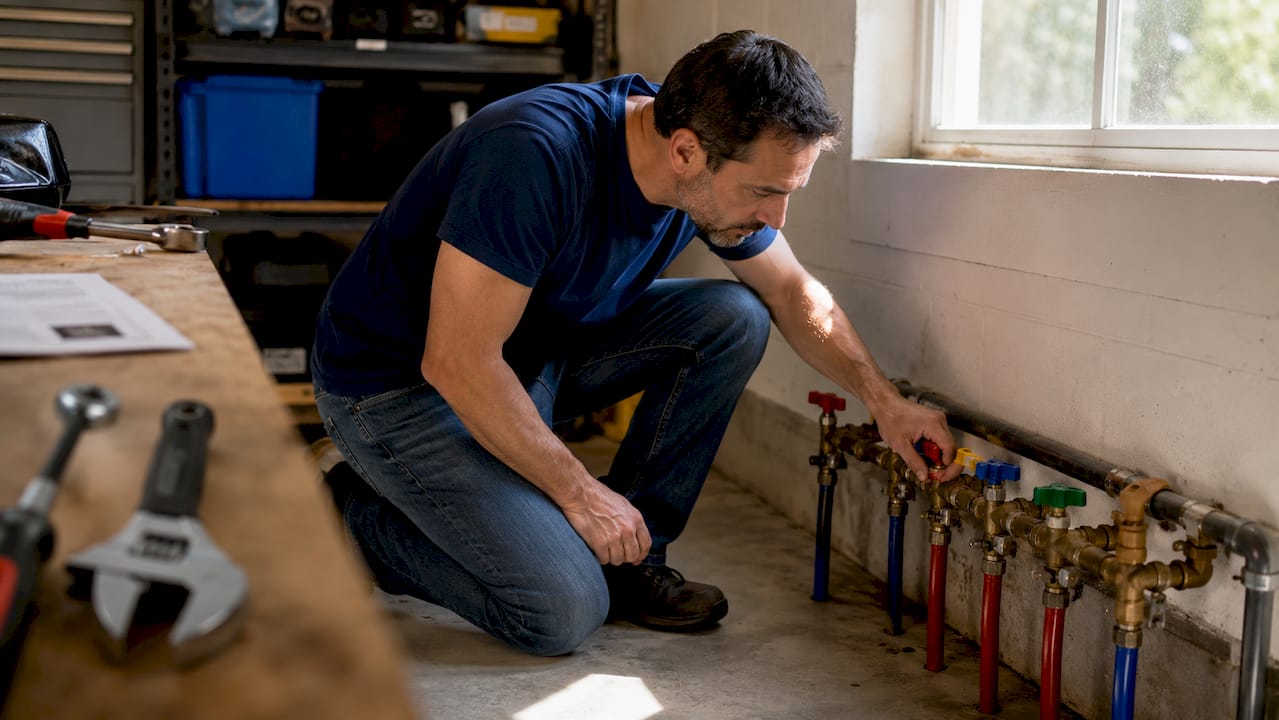
Know your shutoff valves
Locating all water shutoff valves ahead of time is the most effective way to reduce panic and damage during a crisis. There are two types you must know.
| Valve type | Location | Controls | When to use |
|---|---|---|---|
| Fixture shutoff valve | Behind toilet, under sink, behind washer | Single fixture only | Isolated leak at one fixture |
| Main shutoff valve | Near water meter, garage, or utility room | Entire home water supply | Burst pipe, unknown source, major flood |
Fixture valves let you isolate a problem without cutting water to the whole house. The main valve is your last resort when a fixture valve fails or the source is unclear. Homeowners must distinguish fixture shutoff valves from the main water shutoff to control water flow precisely and avoid unnecessary full-house water loss.
Also locate your electrical breaker panel. Water near outlets or appliances creates an electrocution risk, and you need to know which breaker controls which zone.
Pro Tip: Walk through your home once and photograph every shutoff valve location. Save those photos in a shared family album so anyone in the house can act fast, not just you.
Step-by-step workflow for immediate response
When water is actively flooding, follow these steps in order. Do not skip ahead.
- Locate and close the nearest shutoff valve. Start with the fixture valve. If that does not stop the flow, go straight to the main shutoff. Stopping water flow within the first 2–5 minutes prevents thousands of dollars in structural damage.
- Cut electrical power if water is near outlets, appliances, or your breaker panel. Water near electrical panels requires immediate power shutoff to prevent life-threatening hazards before any water mitigation begins. Go to your breaker panel and shut off the affected zone or the whole panel if you are unsure.
- Relieve system pressure. After closing the main valve, open faucets throughout the house and flush toilets. Opening faucets and flushing toilets after shutoff relieves pressure and prevents additional leaks from building up in the lines.
- Contain the water. Lay towels at doorways to stop water from spreading to adjacent rooms. Place buckets under active drips. Move rugs, electronics, and furniture out of the wet area.
- Document the damage. Take clear photos and videos of the leak source, affected walls, floors, and any visible pipe damage. Taking clear photos of leaks helps dispatchers send technicians with the right parts, avoiding delays and repeat trips.
- Call an emergency plumber. Give the dispatcher your address, a description of the leak type, the pipe material if visible, and whether you have already shut off the water. Clear details from homeowners improve dispatch effectiveness and help the team prioritize urgency correctly.
- Stay off wet floors near appliances. Wait for the technician in a dry area. Do not attempt to reconnect water until the plumber has assessed the situation.
Pro Tip: After shutting off the main valve, open the lowest faucet in your home first. This drains residual water from the lines faster and reduces the chance of a secondary drip from a weakened joint.
How do modern emergency plumbing services manage their workflow?
Understanding what happens on the professional side helps you set realistic expectations and communicate better when you call.
Advanced automated dispatch has reduced emergency response workflow from customer call to technician dispatch to under 90 seconds. That speed comes from software that matches your job to the nearest available technician with the right skills and equipment. You are not waiting for a human to flip through a schedule.
Standard emergency response times range from 30 to 90 minutes in metro areas, depending on technician availability and geographic coverage. In dense urban areas like Los Angeles County, that window tends to be shorter. In suburban or rural zones, expect the higher end of that range.
| Workflow stage | Automated dispatch | Traditional manual dispatch |
|---|---|---|
| Call to dispatch | Under 90 seconds | 5–15 minutes |
| Technician matching | Proximity, skills, and parts | Availability only |
| ETA communication | Real-time updates to homeowner | Estimated window only |
| First-visit success rate | Higher, due to pre-loaded job details | Lower, due to incomplete prep |
Transparent, real-time ETA updates from plumbing services help homeowners manage expectations and reduce stress during the wait. When you call, ask directly: “Will I get a text or call when the technician is on the way?” A good service answers yes without hesitation.
Sharing photos of the leak type and pipe material with dispatch prior to technician arrival shortens repair time and improves first-visit success. Send those photos the moment you hang up the phone.
Common mistakes homeowners make during plumbing emergencies
Knowing what not to do is just as important as knowing the right steps. These are the errors that turn a manageable leak into a major restoration project.
- Panicking and wasting the first two minutes. Panic-driven confusion is the top mistake homeowners make. Preparation with knowledge of valve locations reduces crisis impact significantly. Rehearsing the workflow once a year eliminates most of this risk.
- Using only the main valve when a fixture valve would do. Shutting off the whole house when a toilet valve would have solved it is unnecessary. It disrupts everyone in the home and delays normal function after the repair.
- Ignoring electrical hazards. Water and electricity together pose a deadly risk, and prioritizing power shutdown is lifesaving advice every homeowner must know. Never step into standing water near an outlet without cutting power first.
- Cleaning up before documenting. Mopping floors and removing wet items before photographing the damage destroys your insurance claim evidence. Document first, then clean.
- Giving vague information to the dispatcher. Saying “there’s a leak” is not enough. Name the location, describe what you see, and confirm whether the water is off. Vague calls result in technicians arriving unprepared.
- Not having an emergency plumber’s number saved. Searching for a plumber while water floods your kitchen adds five to ten minutes to your response time. Save a trusted number now, before you need it.
Check your types of plumbing emergencies knowledge regularly. Knowing what qualifies as a true emergency versus a non-urgent repair helps you make faster, calmer decisions when something goes wrong.
Key takeaways
A clear plumbing emergency workflow requires knowing your shutoff valves, cutting power near water hazards, documenting damage before cleanup, and communicating specific details to your emergency dispatcher.
| Point | Details |
|---|---|
| Act within 2–5 minutes | Shutting off water in the first 2–5 minutes prevents thousands in structural damage. |
| Know both valve types | Fixture valves isolate one problem; the main valve controls the whole house. |
| Cut power near water | Shut off the breaker before touching water near outlets or appliances. |
| Document before you clean | Photos and videos protect your insurance claim and speed technician triage. |
| Communicate clearly | Give dispatchers your location, leak description, and pipe material for faster, better-prepared response. |
What I’ve learned from watching homeowners handle plumbing crises
Most homeowners I talk to assume they will know what to do when a pipe bursts. They are usually wrong. The problem is not intelligence. It is that no one rehearses this. You rehearse a fire drill. You do not rehearse finding your main shutoff valve in the dark while water soaks your drywall.
The single most effective thing I have seen homeowners do is walk their home once a year, locate every shutoff valve, and take a photo. That one habit eliminates the panic that causes most of the expensive mistakes. It takes fifteen minutes. The homeowners who do it handle emergencies calmly. The ones who skip it are the ones calling me in a full panic, having already let the water run for ten minutes.
Documentation is the second habit that saves people money. I have watched homeowners mop up a flood, call their insurer, and then have no evidence of the damage. The insurer needs photos taken before cleanup. That is not optional. Take the photos first, every time, no matter how urgent it feels to start drying things out.
My honest advice: save your emergency plumber’s number in your phone contacts today. Not when you need it. Today. And review your plumbing repair guide at least once so the steps feel familiar before a crisis hits.
— MDTECH
How Appliancesrepairmdtech can help when emergencies strike
Appliancesrepairmdtech serves homeowners across Orange County and Los Angeles County with fast, licensed plumbing and appliance repair services. When a pipe bursts or a fixture fails, the team responds quickly with technicians matched to your specific job.

Appliancesrepairmdtech offers emergency plumbing repair for burst pipes, severe leaks, and fixture failures throughout Southern California. The team communicates ETAs clearly and arrives prepared, thanks to detailed job intake at the time of your call. Whether you need urgent pipe repair or want to schedule a preventive check, Appliancesrepairmdtech is the local resource Orange County and Los Angeles homeowners trust. Contact the team or book online at appliancesrepairmdtech.com to get help fast.
FAQ
What is the first step in a plumbing emergency?
Close the nearest shutoff valve immediately. If you cannot identify the source, go straight to the main shutoff valve to stop all water flow to the home.
How long does emergency plumbing response take?
Standard emergency response times range from 30 to 90 minutes in metro areas. Services using automated dispatch can reduce the time from your call to technician dispatch to under 90 seconds.
Should I turn off electricity during a plumbing emergency?
Yes, if water is near outlets, appliances, or your breaker panel. Water near electrical panels creates a life-threatening hazard, and cutting power must happen before any water mitigation begins.
What information should I give an emergency plumber when I call?
Give your address, describe the leak location and type, name the pipe material if visible, and confirm whether you have already shut off the water. Clear details help dispatchers send the right technician with the right parts.
How do I prevent panic during a plumbing emergency?
Walk your home once a year and locate every shutoff valve. Photograph each one and save the images somewhere accessible. Knowing valve locations ahead of time is the most effective way to stay calm and act fast when a crisis hits.