
When a dishwasher overflows, cut power at the breaker, shut off the water supply under the sink, and soak up standing water with towels or a wet/dry vacuum. The most likely culprits are over-sudsing from the wrong detergent, a blocked drain or air gap, or a stuck fill valve or float. If water keeps pooling after you contain it, stop running the machine and call a technician.
TL;DR:
- Over-sudsing from hand soap or excessive detergent is the most common cause of foam overflow, requiring immediate draining and switching to proper dishwasher detergent.
- A stuck fill valve or flood float can cause continuous filling and should be checked by lifting the float and inspecting the inlet valve, but often needs professional replacement.
- Drain blockages, including clogged filters, improper air gaps, or disposer backflow, are frequent causes that can usually be cleared without parts.
- Front leaks often originate from worn door gaskets or misaligned spray arms, which can be fixed by cleaning or reseating seals and leveling the unit.
- Persistent overflow issues after basic checks indicate internal pump, seal, or tub cracks, and require professional diagnosis and repair.
Table of Contents
- Common causes of dishwasher overflows and how each puts water on your floor
- Step-by-step immediate actions to stop an active overflow
- How to inspect and clear the drain path, air gap, high loop, and disposer
- Checking the inlet valve and the fill float without opening a repair ticket
- Door gasket, spray arm, leveling and loading checks for front leaks
- How to handle over-sudsing and stop it from happening again
- When you should call an appliance repair pro or plumber
- Assessing damage and cleaning up after an overflow
- What technicians see as easy fixes versus real repairs
- How MDTECH Appliance Repair handles dishwasher overflows
- Sources
- FAQ
Common causes of dishwasher overflows and how each puts water on your floor
Most overflow calls trace back to a handful of repeat offenders, and knowing which one you’re dealing with saves time before you open a single panel.
Over-sudsing happens when someone grabs hand dish soap instead of automatic dishwasher detergent, or simply uses too much. Suds build past the tub’s capacity and push out around the door or through the vents. A sticking water inlet valve or a stuck flood float can let the unit keep filling past its normal shutoff point, and once the water level climbs high enough, it finds the nearest gap to escape. According to Whirlpool’s troubleshooting guidance, leaks near the door typically relate to gaskets or over-sudsing, while leaks behind or under the cabinet often stem from hose connections, inlet valves, or drain lines.
A clogged drain path, a blocked air gap, or backflow from the garbage disposal can send water back into the tub instead of out to the sink. Door gasket wear and misdirected spray arms cause a different pattern: water creeping out along the front rather than pooling underneath. Less common but more serious are internal failures like worn pump seals, a cracked tub, or a faulty motor or diverter, which tend to show up as leaks from the bottom or rear of the unit.
- Suds overload: wrong detergent or too much of the right one, pushing foam past the door seal.
- Fill problems: a stuck inlet valve or flood float that won’t stop water from entering.
- Drain blockages: clogged filters, a dirty air gap, or disposer backflow.
- Door and spray arm issues: worn gaskets or arms aimed at the wrong angle.
- Internal wear: pump seals, tub cracks, or diverter faults that need parts and labor.
Step-by-step immediate actions to stop an active overflow
Once you see water where it shouldn’t be, speed matters more than diagnosis. Work through these steps in order before you try to figure out why it happened.
- Turn off the dishwasher and cut power at the circuit breaker or the wall switch that feeds it.
- Shut off the water supply line, usually located in the cabinet under the kitchen sink.
- Crack the door open slowly to release pressure, watching for steam or suds spilling over the edge.
- Soak up standing water with towels or a wet/dry vacuum, working from the door outward to protect the floor and cabinet base.
- If suds are the problem, pour in a gallon of cold water to help the foam collapse, then run the drain or pump-out cycle once the suds settle.
- Photograph any visible damage and hold off on running more cycles until you know what caused the overflow.
Pro Tip: Keep a shallow baking pan and a stack of old towels under the sink specifically for appliance leaks. Grabbing them takes seconds and can be the difference between a quick mop-up and a soaked cabinet floor.
How to inspect and clear the drain path, air gap, high loop, and disposer
Drain-side problems are some of the most common overflow triggers, and most are fixable without buying a single part.
If your sink has an air gap (the small chrome cylinder near the faucet), unscrew the cap and clear out any trapped food or debris. Air gaps prevent contaminated drain water from siphoning back into the dishwasher, and a clogged one is often the first place to check when the tub isn’t draining properly. Check that the drain hose forms a high loop behind the cabinet, or confirm the air gap is doing that job instead, since either one stops sink water from flowing backward into the machine.
If your dishwasher drains through the garbage disposal, run the disposer to clear anything lodged inside, then check how quickly the sink itself drains. Slow drainage at the sink, even when the dishwasher isn’t running, points to a plumbing clog rather than an appliance problem.
- Remove and rinse the air gap cap to clear trapped debris.
- Confirm the drain hose has a proper high loop or functioning air gap.
- Run the disposer for several seconds if the dishwasher drains through it.
- Watch for repeated sink backups or slow drainage, which usually mean a plumber is needed rather than an appliance repair.
For a closer walkthrough of clearing these blockages yourself, see these drain fixes for homeowners.
Checking the inlet valve and the fill float without opening a repair ticket
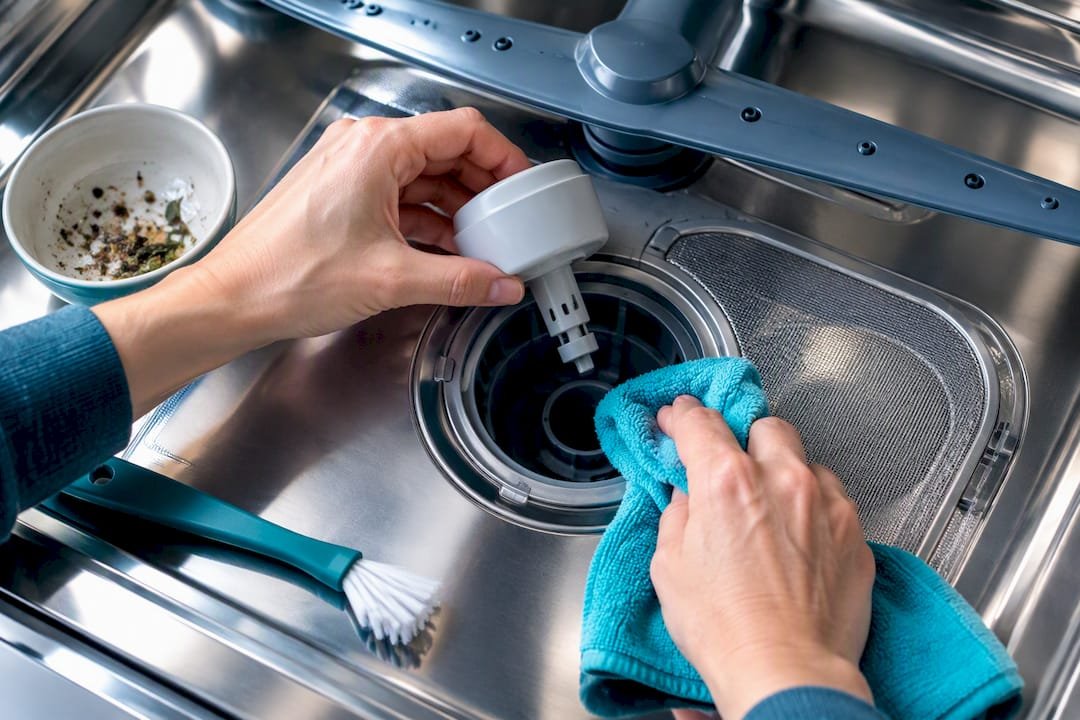
The flood float sits in the sump at the bottom of the tub and acts as a safety switch that tells the machine when to stop filling. Cut power to the dishwasher first, then remove the fine filters covering the sump and lift the float straight up to confirm it moves freely.
- Locate the float in the sump area and lift it to check for smooth, unrestricted movement.
- Clear away any food debris or mineral buildup sitting in the float well.
- If the float moves freely but the dishwasher keeps filling, the water inlet valve or control board is the more likely suspect.
- Avoid forcing the float or bending its arm, since a damaged float has to be replaced rather than repaired.
Instructions from GE’s flood float guidance note that lifting the float and removing filter debris is a straightforward homeowner check that often rules out a mechanical overfill.
Pro Tip: If cleaning the float well doesn’t stop the continuous filling, don’t keep running test cycles. Repeated overfilling stresses the inlet valve and increases the odds of a bigger leak later.
Replacing the inlet valve itself usually means shutting off water lines, disconnecting hoses, and confirming voltage at the control board, which is why most homeowners hand this one to a technician.
Door gasket, spray arm, leveling and loading checks for front leaks
Water creeping out along the bottom of the door often has nothing to do with drains or valves. Run your finger along the door gasket looking for cracks, flat spots, or hardened food residue that keeps it from sealing.
- Wipe the gasket clean and gently reseat any section that’s pulled away from its track.
- Check spray arms for clogged holes or obstructions from oversized dishes that redirect water straight at the door seal.
- Set a level on the dishwasher’s floor and adjust the leveling feet so the door closes evenly on all sides.
- Replace the gasket when it’s cracked, flattened, or no longer springs back after you press it, since a worn seal won’t hold regardless of how well you clean it.
How to handle over-sudsing and stop it from happening again
Hand dish soap and laundry detergent are built to create foam, and a dishwasher has no way to control that foam once it starts climbing past the tub’s capacity. According to GE’s support guidance on suds overflow, the most common cause is using the wrong detergent or simply using too much of the correct one.
- Stop the cycle immediately and open the door to let the suds settle rather than letting the pump churn through them.
- Add a gallon of cold water directly into the tub to help collapse the foam.
- Run the drain or pump-out cycle once the suds have visibly reduced, repeating if needed.
- Switch to automatic dishwasher detergent only, measuring the recommended amount rather than eyeballing it.
- Store detergent powder in a dry, sealed container, since clumped or damp powder often gets overdosed to compensate.
If suds keep returning even after you’ve switched detergents and measured carefully, a drainage or pump issue may be trapping residue that keeps generating foam.
When you should call an appliance repair pro or plumber
Some symptoms are worth a quick DIY check, but a few point straight to parts and labor you shouldn’t tackle solo.
- The dishwasher keeps filling after you’ve confirmed the float moves freely and cleared the drain path, which usually points to the inlet valve or control board.
- You see active water under the cabinet, behind the unit, or visible damage to the pump or sump seals.
- The tub is cracked, seals are corroded, or you notice any signs of an electrical fault, in which case stop using the appliance entirely.
- Repeated sink backups or slow drainage suggest the issue sits in the home’s plumbing rather than the appliance itself.
When you book service, have the model and serial number ready along with a description of when the leak happens and, if possible, a few photos. That combination speeds up diagnosis considerably before a technician even arrives.
Assessing damage and cleaning up after an overflow
Once the water’s stopped, the next few hours matter almost as much as the fix itself. Set up fans and, if you have one, a dehumidifier around the base cabinets, and pull toe-kick panels or baseboards if water pooled behind them so trapped moisture can dry out fully.
- Dry the cabinet floor and surrounding baseboards thoroughly, removing panels if water pooled behind them.
- Document any warped cabinetry or flooring with photos in case you need them for an insurance claim.
- Hold off on running the dishwasher again until you’ve identified and fixed the actual cause.
- If water soaked into subfloor or drywall, professional water-damage remediation is worth the cost to prevent mold.
Standing water and mineral buildup can also affect the dishwasher’s internal components over time; our guide on hard water damage to dishwashers covers what prolonged exposure does to seals and hardware.
What technicians see as easy fixes versus real repairs
Cleaning filters, clearing air gaps, fixing detergent mistakes, reseating gaskets, and leveling the unit are jobs most homeowners handle fine on their own. Inlet valve swaps, pump or sump seal repairs, and tub or plumbing rework are different: document what you’re seeing and book a technician once you hit that line.
— MDTECH
How MDTECH Appliance Repair handles dishwasher overflows
A dishwasher that keeps overflowing isn’t a project to keep testing on your own time, and that’s exactly where a scheduled visit pays off. A professional appliance repair service dispatches technicians who check inlet valves, pump seals, drain connections, and the plumbing tie-ins that often get blamed on the appliance when the real issue sits upstream.
A typical diagnostic visit covers a full inspection of the fill and drain systems, containment of any active leak, and a clear estimate for parts and labor before any repair begins. Before you book, gather your model and serial number and snap a few photos of where the leak shows up, since that information lets the technician arrive with the right parts on the first trip.
- Diagnosis covers inlet valve, float, pump seals, and drain path connections.
- You get a parts and labor estimate before repair work starts.
- Technicians cover appliance, plumbing, and related HVAC issues.
| Visit step | What it covers |
|---|---|
| Inspection | Inlet valve, float, gasket, pump, and drain connections |
| Leak containment | Immediate steps to stop active water damage |
| Estimate | Parts and labor cost before repair begins |
Check out kitchen appliance repair services or the full list of appliance repair services to see current coverage and book a visit.
Sources
For model-specific steps and diagrams, Whirlpool’s leak troubleshooting guide and GE’s flood float support page cover the same core checks described here. Always confirm part numbers against your unit’s manual before ordering anything.
- Dishwasher Leaking Troubleshooting Guide – Product Help | Whirlpool
- GE Appliances support content — suds/overflow guidance
FAQ
Is it normal for water to come out of a dishwasher air gap?
A small trickle at the air gap during a cycle can be normal, but steady water shooting out usually means the drain line or disposer connection is clogged. Clear the air gap cap and check the drain path before assuming the appliance itself is at fault.
Why does my dishwasher overflow at the bottom of the base?
Overflow at the base often comes from a stuck flood float, a failing inlet valve, or worn pump seals letting water escape below the tub. Cutting power and checking the float well first is the quickest way to rule out the simpler cause.
What to do when the dishwasher overflows with bubbles?
Stop the cycle, crack the door to let the suds settle, and pour in a gallon of cold water to help collapse the foam before running the drain cycle. This almost always traces back to using hand dish soap or too much regular detergent, according to GE’s suds overflow guidance.
What are the common causes of a dishwasher flooding?
The most frequent causes are over-sudsing from the wrong detergent, a stuck inlet valve or flood float, a blocked drain or air gap, and worn door gaskets. Less often, flooding points to internal failures like pump seals or a cracked tub, which call for a licensed technician.