
Most homeowners can flush a tankless water heater themselves if the unit already has service or isolation valves with service ports installed. Without those valves, the job usually calls for a licensed technician to add them safely first. A licensed technician can perform the flush or install the missing valves if your setup needs either.
TL;DR:
- Homeowners with existing service valves can typically perform a flush, but units without valves require a licensed technician to add them first.
- The recommended circulation time for descaling is 45 to 60 minutes using a small pump and a descaler like vinegar or citric acid, with thorough rinsing afterward.
- Regular flushing, ideally once a year or every two to three years, depends on water quality and usage, with harder water demanding more frequent maintenance.
- Equipment needed includes hoses, a small pump, a bucket of descaler, and safety gear, while failing to shut off power and gas safely is a common mistake to avoid.
- A professional technician can handle complex cases, install isolation valves, and perform comprehensive inspections to prevent damage and extend unit lifespan.
Table of Contents
- Step-by-step flushing procedure for your tankless unit
- Tools, parts, and descaler options to prepare first
- Safety checklist and warranty cautions you must not skip
- Checking your work: post-flush verification and troubleshooting
- How often to flush your tankless water heater
- When we send a technician and what we check on-site
- Book a professional flush and inspection with MDTECH
- Manuals and technical guides worth consulting
- Sources
- FAQ
Step-by-step flushing procedure for your tankless unit
Before touching anything, shut off the electrical power at the breaker and, on a gas unit, close the gas supply valve. Confirm the unit is fully depressurized before you open any connection.
- Turn off power and gas, then check that no electrical current reaches the unit.
- Locate the isolation valves, usually mounted where the cold inlet and hot outlet lines meet the heater; each has a service port for connecting a hose.
- Close both valves to isolate the heater from the household plumbing, then open the service ports.
- Connect a hose from each port to a small pump, then run both hoses into a bucket holding 3 to 4 gallons of descaling solution.
- Run the pump to circulate the solution through the heat exchanger.
- Stop the pump, drain the solution, then flush with fresh water before restoring the valves and power.
Circulation typically runs 45 to 60 minutes, which the Building America measure guideline identifies as a common manufacturer-accepted window for clearing calcium deposits from residential heat exchangers. A small submersible pump moving at a moderate, steady flow is enough. You’ll know it’s working if you see a light, continuous stream returning to the bucket without sputtering or air pockets.
Once the circulation finishes, follow this rinse sequence:
- Disconnect the pump and drain any remaining descaler from the hoses.
- Open the cold inlet valve briefly to flush fresh water through the system for several minutes.
- Remove and rinse the inlet filter or strainer before reinstalling it.
- Close the service ports, then reopen both isolation valves fully.
Restore power (and gas, if applicable), run the water heater at its normal set temperature, and check the display for error codes. Walk around the unit and check the connections you touched for drips. The Building America guideline notes that this rinse-and-restart sequence, running fresh water, cleaning the strainer, and monitoring for faults, is the standard way manufacturers expect owners to bring a unit back online after a flush.
Pro Tip: Keep a small notebook or phone note logging the date of each flush and any codes you saw. It makes the next service call, DIY or professional, much faster.
Tools, parts, and descaler options to prepare first
Gather everything before you start so you’re not searching for a hose fitting mid-flush.
- A portable submersible pump or a dedicated tankless circulation pump with a modest, steady flow rate.
- Two washing-machine-style hoses with 3/4 inch NPT adapters and clamps to match your service ports.
- A 5-gallon bucket, rated for chemical use, to hold the descaling solution during circulation.
- Descaler: undiluted food-grade white vinegar is commonly accepted by manufacturers, citric acid powder mixed with water is a milder alternative, and commercial tankless descalers offer a premixed option when you want consistency.
- Rubber gloves, splash goggles, and a spare inlet filter or O-ring seals in case the old ones are worn.
Vinegar tends to be the cheapest and most available option, citric acid is gentler on rubber seals over repeated use, and commercial descalers save you from measuring but cost more per flush.
Safety checklist and warranty cautions you must not skip
Skipping the power and gas shutoff is the most common mistake homeowners make, so verify with a non-contact voltage tester that the unit has no live current before opening anything.
- Confirm gas is off and there is no odor of gas near the unit before starting work.
- Check your model’s manual before using anything other than the manufacturer’s recommended descaling agent.
- Stop and call a licensed technician if you see visible corrosion, smell gas, or the unit has no service valves at all.
- Work in a ventilated space when handling vinegar or citric acid, and pour used solution down a drain rather than onto soil or storm drains.
Manufacturers may not cover damage from lime buildup under warranty, which is why technical guidance on combination water heating systems stresses following the model manual precisely rather than improvising a descaling method.
Checking your work: post-flush verification and troubleshooting
Run a hot tap for a few minutes after restarting the unit and watch for steady flow and stable temperature. Listen for unusual popping or rattling, which can mean scale is still present in the heat exchanger.
- Confirm flow rate feels normal at multiple fixtures, not just the closest one.
- Check that the temperature holds steady rather than swinging hot and cold.
- Inspect every hose connection and valve you touched for slow drips over the next 24 hours.
- If flow stays weak, the inlet strainer may still be partly clogged and worth pulling again.
Persistent low flow after a proper flush often points to the inlet strainer, a struggling pump connection, or, in older units, damage to the heat exchanger itself. If the display still shows an LC or scale-related code after a restart, a second, longer flush sometimes clears it. Clogged flow sensors from scale are a known cause of these fault codes, according to DOE technical guidance on combination systems, which recommends inlet strainers specifically to protect those components. When a repeat flush doesn’t clear the code, that’s the point to book a technician rather than keep guessing. Our types of water heater problems guide covers more fault patterns worth recognizing.
How often to flush your tankless water heater
Flushing frequency isn’t the same for every household. The Building America guideline puts the typical range at about once a year to once every two to three years, depending on the model and local water quality.
- Harder water pushes you toward the annual end of that range, while naturally soft water can stretch the interval.
- A recirculation loop that keeps water moving through the unit around the clock accelerates scale buildup and shortens the interval.
- Heavy daily usage, such as a large household running multiple showers back to back, also calls for more frequent flushing.
Pro Tip: Keep a simple log of flush dates and any error codes. If you’re flushing more than once a year and still seeing scale, a whole-house prefilter or water conditioner may be worth discussing with a plumber, though your model manual should guide how much softening is appropriate.
When we send a technician and what we check on-site
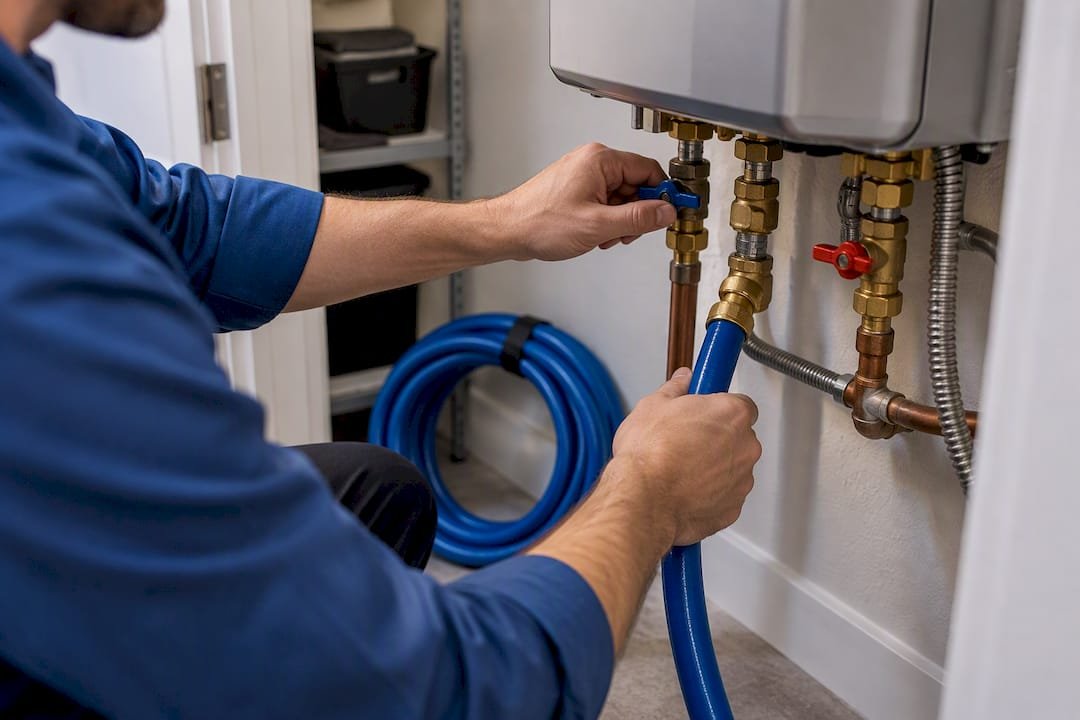
We recommend calling in a licensed technician when a unit has no isolation valves, when there’s any sign of corrosion around the fittings, or when you’re not confident about closing off gas and power correctly. On a service visit, our technicians check for leaks at every connection, verify proper venting, inspect the inlet strainer, and handle descaling chemicals with the ventilation and disposal care the job requires.
We also install isolation valve kits for homeowners whose units were never fitted with them, which turns future flushes into a straightforward job instead of a plumbing project. It’s a small upfront job that saves a lot of DIY trouble down the road.
— MDTECH
Book a professional flush and inspection with MDTECH
If you’d rather not deal with hoses, buckets, and shutoff valves, a professional service can handle the whole process for you: flushing the heat exchanger, cleaning the inlet filter, checking every connection for leaks, and clearing error codes before leaving.
- A typical visit includes the descaling circulation, a filter cleaning, and a full leak check around the unit.
- Expect a technician to walk you through what they found and any parts, like a strainer or seal, that needed replacing.
- If your unit lacks isolation valves, we can install them during the same visit so future maintenance is simpler.
You can book a visit or request a quote through our appliance repair services page.
Manuals and technical guides worth consulting
- Your unit’s specific model manual for exact valve locations, descaler restrictions, and reset steps.
- Building America’s tankless water heater measure guideline for general flushing and maintenance principles.
- MDTECH’s water heater maintenance guide for homeowner-focused upkeep steps.
Sources
- Measure Guideline: Tankless Water Heaters (Building America / EERE)
- Expert meeting report: Recommendations for Applying Water Heaters in Combination Space and Domestic Water Heating Systems (U.S. DOE)
FAQ
Can I flush a tankless water heater myself?
Yes, if your unit has isolation valves with service ports already installed, you can connect a pump and circulate a descaling solution yourself following the manufacturer’s steps. If those valves are missing or you’re unsure how to isolate the unit safely, a licensed technician should handle it or install the valves first.
How much should it cost to flush a tankless water heater?
Pricing depends on your location and the technician you book, so MDTECH doesn’t publish a flat rate. You can request a quote for your specific unit through our appliance repair services page.
Is it necessary to flush a tankless water heater regularly?
Yes. Manufacturers and technical guidance recommend flushing roughly once a year to once every 2 to 3 years to prevent calcium scale from reducing efficiency and damaging the heat exchanger, as detailed in the Building America measure guideline. Skipping flushes can also affect warranty coverage if lime buildup causes damage.
Can I use 30% vinegar to flush a tankless water heater?
Most manufacturers accept undiluted food-grade white vinegar circulated for about 45 to 60 minutes; check your model’s manual for specifics, per the Building America measure guideline. Check your specific model manual before using anything other than the manufacturer’s suggested concentration or agent.