
If your heat pump won’t defrost, the most likely culprits are a faulty defrost control board, a bad coil sensor, restricted outdoor airflow, or low refrigerant. Start by clearing debris from the outdoor unit and confirming your thermostat is set to Heat with the fan on Auto, then check your breakers. Call a technician immediately if you see thick ice that won’t clear, an electrical burning smell, or oily residue near the refrigerant lines.
TL;DR:
- A faulty defrost control board, damaged wiring, or refrigerant leaks are the most common reasons your heat pump may not defrost properly.
- During normal conditions, the system reverses into cooling mode to melt ice, with auxiliary heat preventing cold indoor air, and failure points often involve sensors or the reversing valve.
- Simple DIY checks include clearing debris, verifying thermostat and fan settings, and manually forcing defrost to confirm if the unit responds correctly before calling a technician.
- Technicians diagnose issues through fault-code readings, control voltage tests, and sensor resistance checks, often requiring repairs or component replacements for electrical, sensor, or refrigerant problems.
- Immediate professional help is needed if ice persists after clearance, if there are burning smells, refrigerant leaks, sparking, or if manual resets do not resolve the defrost malfunction.
Table of Contents
- How the Heat Pump Defrost Cycle Is Supposed to Work
- Common Causes of a Heat Pump That Won’t Defrost
- Quick DIY Checks Before You Call for Help
- Electrical and Control Diagnostics a Technician Will Run
- When to Call a Professional (and Safety Warnings)
- What Years of Defrost Calls Have Taught Us
- Getting a Technician on Your Defrost Problem Fast
- Sources
- FAQ
How the Heat Pump Defrost Cycle Is Supposed to Work
A heat pump growing a thin layer of frost on its outdoor coil isn’t a malfunction. It’s physics. Every air-source heat pump accumulates frost on that outdoor coil whenever outdoor temperatures drop into the 20s and 30s Fahrenheit with enough humidity in the air. The system is designed to handle this on its own, and it does so by briefly running backward.
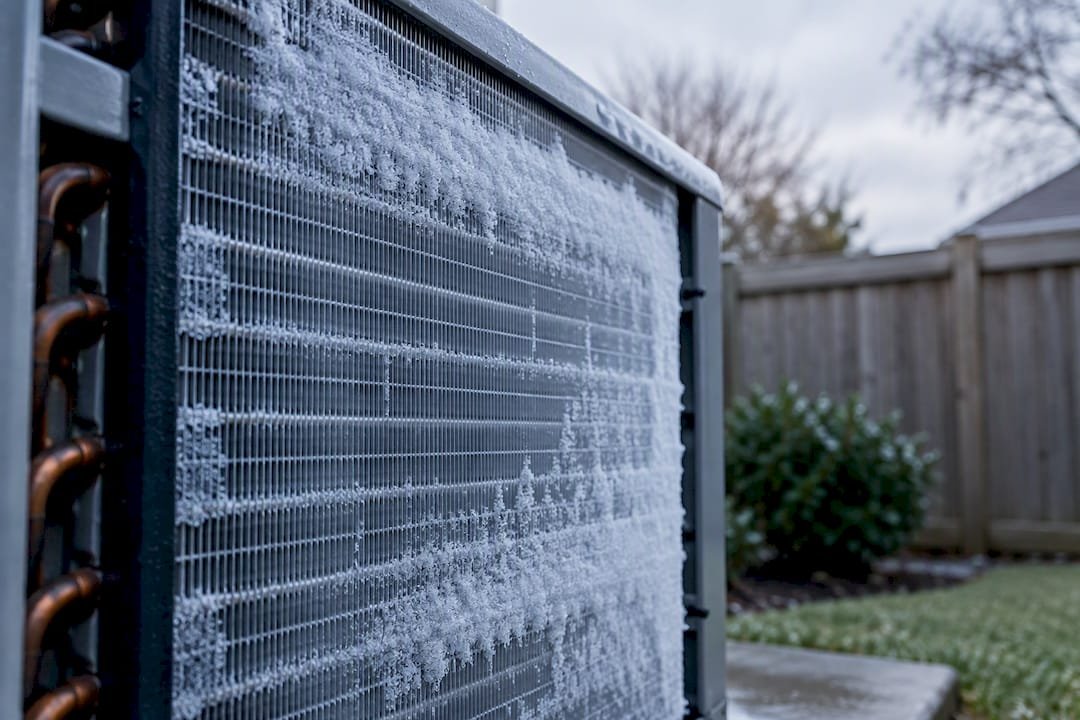
During a normal defrost cycle, the unit reverses into air-conditioning mode for a few minutes. The reversing valve switches, hot refrigerant flows through the outdoor coil to melt the ice, and the outdoor fan shuts off so it doesn’t blow cold air across the melting frost. Because the system is technically in cooling mode, it would blow cold air inside your house if left unchecked, so auxiliary heat (usually electric resistance strips) kicks in to keep your supply air warm. You might notice the air feels slightly cooler for a moment or hear a whooshing sound as the valve shifts. That’s normal.
Manufacturers use one of two strategies to decide when defrost should happen:
- Time/temperature defrost: The board checks the coil temperature at fixed intervals (often every 30, 60, or 90 minutes) and triggers defrost if the coil is cold enough.
- Demand defrost: Sensors measure the temperature difference between the outdoor coil and outdoor air, triggering defrost only when actual ice buildup is detected, which saves energy but depends on healthy sensors and wiring.
A properly working cycle typically runs a few minutes and terminates once the coil sensor reads a set temperature within a manufacturer-specified range. Official ENERGY STAR test procedures define these cut-in and cut-out temperatures precisely because defrost timing directly affects heating performance ratings. Researchers at the Department of Energy and NREL are actively studying how much energy these cycles consume, because poorly tuned defrost logic can quietly drag down a system’s seasonal efficiency even when it’s technically “working.”
Common Causes of a Heat Pump That Won’t Defrost
When a heat pump gets stuck in defrost mode, or never enters it at all, the cause almost always traces back to one of seven areas. Here’s how each one shows up in the real world.
Defrost control board faults. The board is the brain of the operation, timing cycles and reading sensor input. When it fails, you’ll often see a heat pump stuck in defrost, running the reversing cycle endlessly without ever terminating, or the opposite: it never initiates defrost at all despite heavy ice. Many boards flash an LED fault code you can cross-reference against the manufacturer’s manual before calling anyone.
Coil sensor issues and damaged wiring. The defrost sensor (a thermistor clipped to the outdoor coil) tells the board when ice has formed and when it’s melted. A sensor that’s slipped off the coil, corroded, or reading incorrectly because of chewed wiring is one of the most common failure points technicians find. Rodents love the insulation on these low-voltage wires, and a single nicked wire can mimic a full sensor failure.
Dirty, blocked, or snow-buried outdoor coil. If snow has piled up against the unit, leaves are packed into the fins, or a fence panel is blocking airflow, the coil can ice over faster than the defrost cycle can keep up. This is one of the simplest fixes and one of the most overlooked causes.
Low refrigerant or a slow leak. A system running low on charge gets colder than it should during normal heating, which can trigger nonstop frost formation the defrost cycle can’t outpace. This is also one of the few causes that genuinely requires a licensed technician, since diagnosing and repairing refrigerant issues involves recovery equipment and EPA-regulated handling.
Reversing valve failures. If the valve is stuck or its solenoid coil has burned out, the unit physically cannot switch into the cooling mode needed to melt the ice, even if the board is telling it to. This often presents as ice that keeps building indefinitely with zero defrost attempts.
Timer or demand-defrost parameter issues. On time/temperature boards, incorrect dip switch settings can space defrost cycles too far apart for your climate. On demand-defrost systems, a miscalibrated differential sensor may never see enough of a gap to trigger a cycle.
Fan motor problems. The outdoor fan is supposed to stop during defrost. If a failing motor or stuck relay keeps it running, it blows cold outdoor air directly onto the coil while it’s trying to melt, defeating the entire cycle.
Pro Tip: Take a photo of the ice pattern before you touch anything. Ice concentrated at the bottom often points to drainage or airflow blockage, while ice covering the entire coil evenly usually points to a control or refrigerant issue. That detail alone can save a technician diagnostic time.
Quick DIY Checks Before You Call for Help
Before assuming the worst, work through this sequence. It resolves a surprising share of heat pump ice buildup complaints without any tools beyond a flashlight.
- Cut power if anything looks unusual. If you smell burning, hear grinding, or see sparking, shut off power at the outdoor disconnect and the breaker before doing anything else.
- Never chip or scrape the ice off the coil. It feels like the obvious fix, but a screwdriver or ice scraper will bend the thin aluminum fins and can puncture refrigerant tubing, turning a $150 sensor problem into a full coil replacement.
- Confirm the thermostat is set to Heat, not Emergency Heat, and the fan is on Auto, not On. Fan set to “On” keeps it running continuously, which can interfere with the defrost fan-off step.
- Try a manual forced defrost if your unit supports it. Many boards have a small button or jumper pins labeled “test” or “defrost.” Pressing it for 5 seconds (check your model’s manual for the exact hold time) should force the unit into defrost mode within a minute so you can watch whether the fan stops and the valve engages.
- Clear physical obstructions. Shovel snow at least 18 inches back from all sides of the unit, trim shrubs, and remove leaves or debris packed into the coil fins.
- Check for refreezing water sources. A gutter downspout draining onto the unit, or meltwater from the roof dripping onto the coil, will refreeze the moment temperatures drop and can mimic a defrost failure that isn’t really one.
- Replace a dirty air filter and confirm the indoor blower is running. Restricted indoor airflow raises the load on the whole system and can accelerate outdoor icing.
- Check the breaker panel and outdoor disconnect switch. A tripped breaker to just the outdoor unit, while the indoor air handler still runs, will produce exactly the “heat works but defrost doesn’t” symptom pattern.
- Watch a full cycle if you can. Once power and settings are confirmed, note how long defrost runs and whether it terminates on its own. Carrier’s own troubleshooting guidance recommends this same sequence before assuming a component has failed.
Pro Tip: If forcing a manual defrost causes the unit to stay stuck running in cooling mode with no fan shutoff, stop and call a technician. That behavior usually points to the reversing valve or board, not something a DIY reset will solve.
Electrical and Control Diagnostics a Technician Will Run
If the quick checks don’t resolve it, the next layer of diagnosis involves a multimeter and the fault-code documentation for your specific board. This is worth understanding even if you’re not the one holding the meter, because it tells you what a fair diagnostic visit should actually cover.
Technicians typically start by reading the defrost board’s fault code history, since most boards log the last several faults with a blinking LED pattern that cross-references to a chart in the installation manual. From there, the standard voltage checks include:
- 24V between R and common at the low-voltage terminal block, confirming the transformer and control circuit have power at all.
- 24V present on the O terminal (reversing valve) and the W terminal (auxiliary heat) once defrost initiates, confirming the board is actually sending the commands it should.
- Y terminal and common behavior, since a compressor contactor that won’t pull in during defrost will short-circuit the whole cycle before it starts.
Sensor testing looks different depending on the design. Thermistor-style coil sensors get checked with an ohmmeter against a resistance-versus-temperature chart from the manufacturer. Older snap-action mechanical defrost thermostats get checked more simply as open or closed at a given temperature. A sensor reading infinite resistance, or a reading wildly out of range for the current coil temperature, usually means a $30 to $80 part replacement rather than a board swap.
A board typically gets replaced when it fails to respond to a forced-defrost test despite confirmed 24V control power and good sensors. Wiring and sensor repairs come first because they’re cheaper and far more common. Refrigerant charge problems show up as consistently cold coil temperatures paired with normal control voltages, and this is the one diagnostic step that legally requires an EPA-certified technician with recovery equipment, since intentionally venting refrigerant is prohibited.
When to Call a Professional (and Safety Warnings)
Call a licensed technician right away if you notice any of the following after working through the safe DIY steps:
- Ice that keeps building back within an hour or two of clearing, even after confirming airflow and settings are correct
- Any smell of burning plastic or ozone near the outdoor unit or air handler
- Visible sparking, arcing, or a breaker that trips again immediately after resetting
- Oily residue or hissing sounds near refrigerant lines, both signs of a possible leak
Refrigerant work, reversing valve replacement, and sealed-system repairs require licensed handling under EPA regulations, and manufacturer documentation like Daikin’s installation manuals explicitly warns against non-recommended cleaning or defrost-acceleration methods that can void warranties or damage the coil. A typical diagnostic visit runs about one to two hours and usually identifies whether you’re looking at a sensor swap, a board replacement, or a refrigerant issue, with sensor and wiring repairs generally resolving faster and cheaper than a full board or valve replacement.
What Years of Defrost Calls Have Taught Us
When our technicians triage a defrost complaint, airflow and controls get checked first, before anyone even considers the sealed refrigerant system. That order isn’t arbitrary. Blocked coils, bad sensors, and dirty filters cause the overwhelming majority of the frozen heat pump calls we see, and they’re the cheapest problems to fix. The mistake homeowners make most often is waiting through an entire cold snap on a unit that’s icing over daily, assuming it will “work itself out.” It won’t. A defrost cycle that fails once tends to fail again within days, and each cycle it misses adds strain that eventually reaches the compressor.
— MDTECH
Getting a Technician on Your Defrost Problem Fast
A local appliance repair service provides homeowners a faster path to a fix than guessing your way through board fault codes alone. Licensed technicians can run the diagnostic sequence covered above: control board fault-code review, sensor resistance checks, reversing valve testing, and refrigerant diagnosis when the simpler causes are ruled out.
Before your visit, jot down what you’ve already tried (thermostat settings, breaker checks, any forced-defrost test) and clear a path around the outdoor unit so the technician can access it immediately. Our HVAC repair team handles exactly this kind of defrost cycle failure, and if the unit ends up needing a part swap, our appliance repair services page covers scheduling and what to expect from the visit. Book online and describe the ice pattern and any fault codes you’ve spotted. It helps us bring the right parts on the first trip.
Sources
- Measured Performance of a Low Temperature Air Source Heat Pump
- ENERGY STAR test method for room heat pumps (Nov 2024)
- Heat pump defrost troubleshooting tips – HVAC School
- Daikin outdoor unit manual (installation & maintenance guidance)
- Heat pump troubleshooting – Carrier
FAQ
How Do You Force a Heat Pump Into Defrost?
Most defrost control boards have a small test button or jumper pins, often labeled “test” or “defrost,” inside the outdoor unit’s control panel. Holding it for the duration specified in your model’s manual (commonly around 5 seconds) should trigger defrost within a minute, with the fan stopping and the reversing valve engaging.
How Long Should a Heat Pump Take to Defrost?
A normal defrost cycle usually runs a few minutes before terminating once the coil sensor reaches its target temperature. If your unit runs defrost much longer than normal, or the cycle repeats frequently without fully clearing the ice, that points to a control board, sensor, or reversing valve problem worth having checked.
Why Does My Heat Work but Not the Defrost Cycle?
This pattern almost always means the heating side (compressor, indoor blower, auxiliary heat) is functioning normally while the defrost control circuit specifically has failed, often due to a bad coil sensor, a tripped breaker isolated to part of the outdoor unit, or a board that isn’t sending the right signal to the reversing valve. Airflow blockages can also cause this if the coil is icing faster than an otherwise-healthy defrost cycle can clear it.
How Do I Know if My Defrost Control Board Is Bad?
A failing board typically shows itself through a blinking fault-code LED that doesn’t match a normal cycle, a heat pump stuck in defrost with the reversing valve engaged indefinitely, or a unit that never attempts defrost despite obvious ice buildup. Confirming 24V control power is present but the board still won’t respond to a forced-defrost test is the clearest sign the board itself needs replacement rather than a sensor or wiring repair.