Installing a new washing machine might seem straightforward until water pools on your laundry room floor or strange grinding noises wake you at midnight. Improper washer installation causes leaks, excessive vibration, and premature appliance failure, problems that plague homeowners across Orange County and Los Angeles County every year. You need clear, reliable guidance to ensure your washer operates safely and efficiently from day one. This comprehensive workflow walks you through every critical step, from removing your old unit to running your first test cycle, giving you the confidence to tackle washer installation correctly in 2026.
Table of Contents
- Preparing Your Laundry Area For Washer Installation
- Step-By-Step Washer Installation Workflow
- Common Mistakes And Troubleshooting Tips
- Permits And When To Hire A Professional In Orange And Los Angeles Counties
- Professional Washer Installation And Repair Services In Orange County
- Frequently Asked Questions
Key takeaways
| Point | Details |
|---|---|
| Complete workflow | This guide covers removal, site preparation, connections, leveling, and testing for proper washer installation. |
| Prevent common failures | Proper leveling and new stainless steel hoses stop leaks and reduce damage risk significantly. |
| Know permit requirements | New plumbing or electrical work may require permits in Orange and Los Angeles counties. |
| Avoid critical mistakes | Remove shipping bolts and connect hoses correctly to prevent drum damage and inefficiency. |
| Test before regular use | Running an empty test cycle confirms correct installation and catches issues early. |
Preparing your laundry area for washer installation
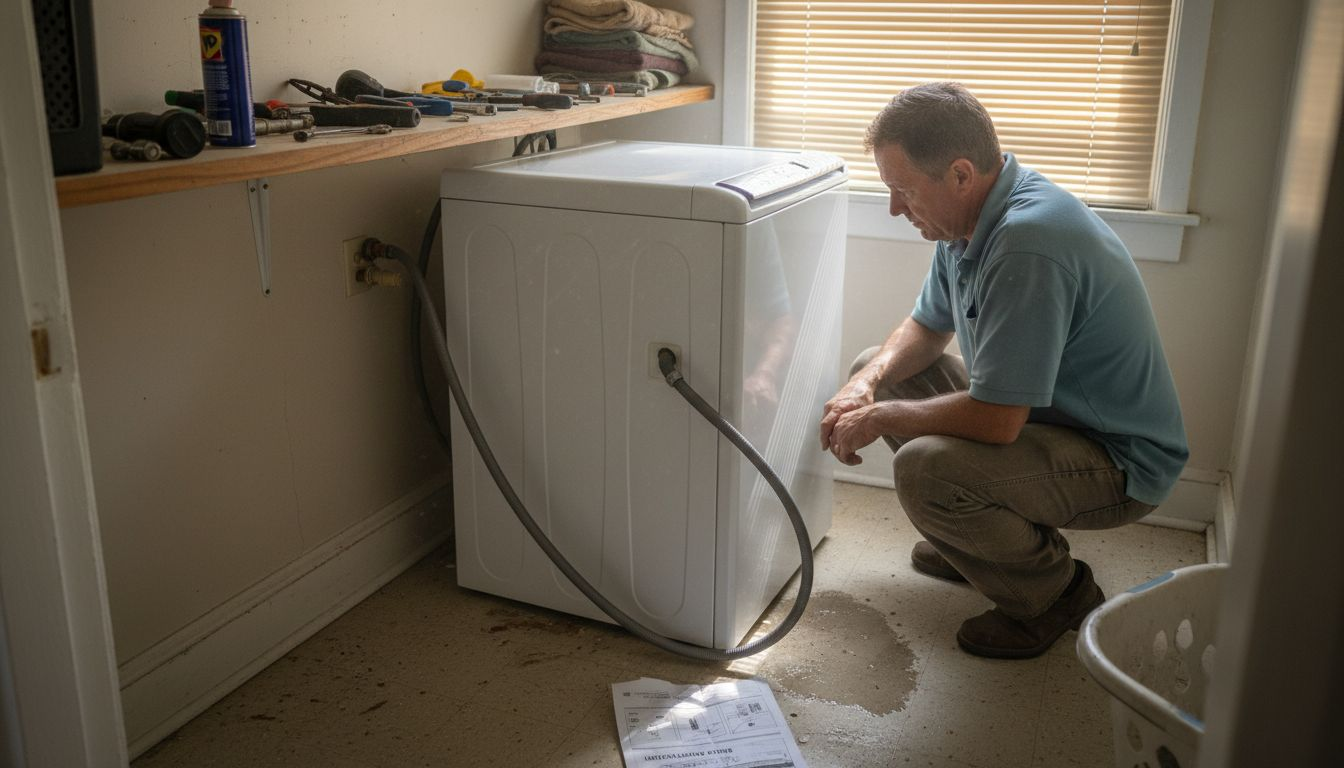
Before your new washer arrives, you must remove the old unit and prepare a clean, stable installation site. Standard washer installation workflow includes removing old washer, disconnecting power, water, and drain, and preparing a clean, level floor. Start by unplugging your existing washer from the electrical outlet, then turn off the hot and cold water supply valves behind the unit. Disconnect the water supply hoses and drain hose carefully, keeping a bucket and towels nearby to catch residual water.
Pull the old washer away from the wall gently, checking for any floor damage or water stains that indicate previous leaks. Clean the floor thoroughly, removing lint, debris, and any mineral deposits left behind. This step prevents contamination and gives you a clear view of the installation area. Inspect the floor for levelness using a carpenter’s level, placing it in multiple directions across the space where your new washer will sit.
If your floor slopes noticeably, you may need to add shims or adjust subflooring before proceeding. Uneven floors cause washers to vibrate excessively, walk across the room during spin cycles, and wear out suspension components prematurely. Check existing plumbing and electrical connections for wear, corrosion, or damage. If you plan to add new water lines, install a different outlet location, or modify drain plumbing, permits may apply in Orange County and Los Angeles County.
Pro Tip: Keep your old hoses as reference guides when installing new ones, helping you remember correct hot and cold orientations and proper drain hose height.
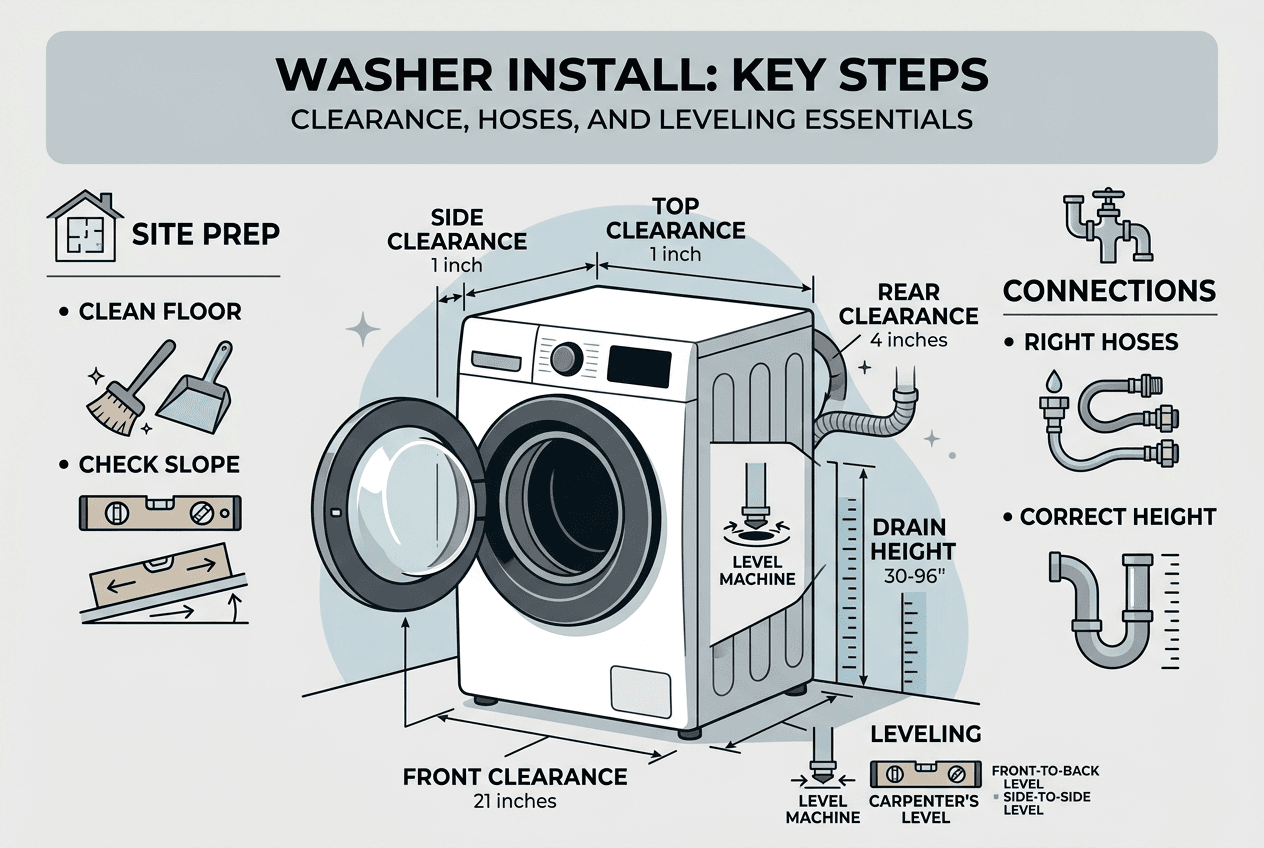
Review your new washer’s installation manual for specific clearance requirements, typically 1 inch on sides and 4 inches at the back for proper ventilation and hose connections. Measure your laundry space to confirm adequate room, especially if you are upgrading to a larger capacity model. Gather necessary tools before starting: adjustable wrench, level, pliers, bucket, towels, and potentially a dolly for moving the washer. Having everything ready streamlines the process and prevents mid-installation trips to the hardware store. For additional guidance on maintaining your washer after installation, explore our washing machine care tips for long-term performance.
Step-by-step washer installation workflow
With your laundry area prepared, follow this detailed workflow to install your washer correctly and safely. Each step builds on the previous one, creating a systematic approach that prevents common errors.
-
Unbox and remove shipping bolts: Carefully remove all packaging materials from your new washer, then locate and remove shipping bolts that secure the drum during transport. The installation steps include removing shipping bolts, connecting water hoses with rubber washers hot to hot, cold to cold, drain hose to standpipe 34 to 40 inches high, leveling washer using adjustable feet, plugging into grounded 120V outlet, and running test cycle. Most washers have three to four bolts on the back panel. Failing to remove these bolts causes severe drum damage, loud grinding noises, and immediate warranty voidance. Store the bolts and spacers in case you move the washer later.
-
Install water supply hoses: Attach new water supply hoses to the washer’s inlet ports, ensuring hot connects to hot and cold connects to cold, usually marked with red and blue indicators. Hand-tighten each connection first, then use pliers to turn an additional quarter turn. Insert rubber washers into each hose end before connecting to prevent leaks. Connect the opposite hose ends to your wall-mounted water supply valves using the same technique. Never reuse old hoses, as rubber degrades over time and increases burst risk.
-
Connect drain hose: Insert the drain hose into your standpipe or laundry sink, positioning the end 34 to 40 inches above the floor to prevent backflow and siphoning. Secure the hose with a plastic tie or clamp if your setup includes one, but avoid creating an airtight seal that restricts proper drainage. The drain hose should curve smoothly without kinks or sharp bends that impede water flow. Some installations require a standpipe with a P-trap for proper venting and code compliance.
-
Level the washer: Use a carpenter’s level placed on top of the washer, checking front to back and side to side. Adjust the leveling feet at each corner by turning them clockwise to raise or counterclockwise to lower until the bubble centers perfectly in both directions. Most washers have front feet that adjust easily and self-leveling rear feet. Once level, tighten the lock nuts on adjustable feet to prevent shifting during operation. Proper leveling eliminates walking, reduces vibration noise, and extends bearing life.
-
Connect electrical power: Plug your washer into a grounded 120V electrical outlet on a dedicated circuit. Never use extension cords or multi-outlet adapters, as washers draw significant current during heating and spinning cycles. If your laundry area lacks a proper outlet, hire a licensed electrician to install one before proceeding. Electrical modifications typically require permits in Orange and Los Angeles counties.
-
Run a test cycle: Turn on both water supply valves fully, then run a complete wash cycle without any laundry inside. Watch carefully for leaks at hose connections, around the door seal, and beneath the washer. Listen for unusual noises that might indicate shipping bolts left in place or uneven leveling. Check that the washer drains completely and spins without excessive vibration. This test cycle confirms proper installation before you trust the machine with your clothes.
| Component | Specification | Notes |
|---|---|---|
| Drain standpipe height | 34 to 40 inches | Prevents backflow and siphoning |
| Water supply hose type | Stainless steel braided | More durable than rubber |
| Electrical requirement | 120V grounded outlet | Dedicated circuit recommended |
| Leveling tolerance | Bubble centered both directions | Prevents vibration and walking |
Pro Tip: Use stainless steel braided hoses instead of standard rubber hoses for superior burst resistance and longer service life, typically lasting 5 to 10 years versus 3 to 5 years for rubber.
For professional assistance with any installation step, our washer installation guide provides expert support throughout Orange and Los Angeles counties. Additional resources on washing machine installation steps offer supplementary technical details for complex setups.
Common mistakes and troubleshooting tips
Even experienced DIYers make installation errors that compromise washer performance and longevity. Recognizing these mistakes helps you avoid costly repairs and safety hazards.
Typical mistakes include not leveling causing noise, reusing old hoses causing bursts, wrong hose hookups, drain hose too deep or airtight causing backflow, and using extension cords creating safety hazards. Skipping the leveling step ranks as the most common error, leading to excessive vibration that damages internal components and creates unbearable noise during spin cycles. You might notice your washer walking across the floor or shaking violently, clear signs of improper leveling.
Reusing old rubber hoses seems economical but dramatically increases burst risk. Rubber deteriorates from constant pressure changes, temperature fluctuations, and mineral deposits, developing weak spots invisible to the eye. A burst hose can release hundreds of gallons before you notice, causing extensive water damage to floors, walls, and adjacent rooms. Always install new hoses with every washer replacement.
Confusing hot and cold connections wastes energy and damages certain fabrics. Your washer’s internal sensors and wash programs assume correct hookups, so reversed connections cause inefficient heating, poor cleaning results, and potential shrinkage of delicate items. Double-check color coding and labeling before tightening connections.
Drain hose positioning errors create frustrating problems. Pushing the hose too deep into the standpipe or creating an airtight seal causes siphoning, where water drains continuously during fill cycles. Your washer never reaches proper water levels, extending cycle times and triggering error codes. Conversely, positioning the drain hose too low allows dirty water to back-siphon into the clean tub.
Using extension cords or power strips with washers violates electrical codes and creates serious fire hazards. Washers draw 10 to 15 amps during operation, exceeding most extension cord ratings and causing overheating. The National Electrical Code requires dedicated circuits for major appliances specifically to prevent these dangers.
Pro Tip: After completing installation, run an empty test cycle and inspect all connections while the washer operates, catching small leaks before they become major problems.
Safety Warning: Improper electrical connections, including extension cords or ungrounded outlets, pose electrocution and fire risks. Always use properly grounded dedicated outlets and consult licensed electricians for any electrical modifications.
If you discover leaks during your test cycle, identify the source immediately. Hose connection leaks usually indicate missing washers, cross-threaded fittings, or insufficient tightening. Door seal leaks suggest overloading, incorrect detergent type, or a defective gasket requiring replacement. Floor-level leaks might originate from drain hose issues or a cracked tub requiring professional diagnosis. Our washer hose maintenance guide helps you prevent connection failures and extend hose lifespan through proper care.
Permits and when to hire a professional in Orange and Los Angeles counties
Understanding local permit requirements and recognizing when professional help makes sense protects you from code violations and installation failures. Simple washer replacements using existing hookups typically require no permits, but modifications trigger regulatory oversight.
Plumbing and electrical permits may be required for new installations or modifications, with simple replacements generally exempt and electrical permit fees around $15.44 in these counties. New plumbing rough-ins that add water supply lines, drain connections, or venting systems almost always mandate permits from your local building department. These installations require tee fittings on existing supply lines, properly sized and vented P-traps, and drain pipes meeting minimum slope requirements. Professional plumbers ensure code compliance and handle permit applications, inspections, and final approvals.
Electrical modifications, including new circuits, outlet installations, or service panel upgrades, require electrical permits in both Orange County and Los Angeles County. Licensed electricians pull these permits as part of their service, protecting you from liability and ensuring work meets National Electrical Code standards. Permit fees remain modest, but inspection failures cause delays and additional costs if you attempt DIY electrical work without proper knowledge.
Straightforward washer replacements connecting to existing water supplies, drains, and electrical outlets fall outside permit requirements in most jurisdictions. You simply disconnect the old unit, install the new washer following manufacturer instructions, and resume laundry operations. This scenario represents the majority of residential washer installations.
DIY installation works well for mechanically inclined homeowners replacing washers in prepared spaces with proper hookups. You save labor costs, schedule at your convenience, and gain satisfaction from completing the project yourself. However, several situations warrant professional assistance:
- Extensive plumbing modifications requiring new supply lines, drain relocations, or vent installations
- Electrical circuit additions or outlet installations beyond simple plug replacement
- Stackable washer and dryer units requiring precise alignment and specialized mounting
- Non-standard hookups including pedestal installations or tight-space configurations
- Any installation requiring permits or inspections per local building codes
- Uncertainty about proper procedures or concerns about damaging your new appliance
Hiring licensed professionals provides warranty protection, code compliance assurance, and liability coverage if problems arise. Many appliance retailers offer installation services bundled with purchase, often at competitive rates compared to independent contractors. Professional installers complete typical jobs in 1 to 2 hours, bringing specialized tools and expertise that prevent common mistakes. They also handle old appliance removal and disposal, saving you additional effort.
Professional washer installation and repair services in Orange County
After learning the complete installation workflow, you might prefer expert assistance to ensure flawless results and protect your investment. MDTech Appliance Repair offers comprehensive professional washer installation services throughout Orange County and Los Angeles County, handling every detail from permit applications to final testing.

Our licensed technicians ensure your washer is leveled precisely, connected properly to water and electrical systems, and tested thoroughly for optimal operation. We navigate local permit requirements, perform code-compliant installations, and provide warranty protection for both labor and parts. Beyond installation, our team delivers expert maintenance services and rapid repair response to extend your washer’s lifespan and maintain peak performance. Whether you need help with complex plumbing modifications, stackable unit installations, or simply want peace of mind, our professionals bring decades of combined experience to every job. We also provide detailed guidance through our appliance parts replacement guide for homeowners tackling future maintenance tasks.
Pro Tip: Scheduling professional installation protects your appliance warranty, as many manufacturers require proper installation by qualified technicians to honor coverage for certain components and failures.
Frequently asked questions
How long does it typically take to install a washing machine?
Most straightforward washer installations take 1 to 2 hours for experienced DIYers or professional technicians. This timeframe includes removing the old washer, preparing the installation site, connecting all hoses and electrical components, leveling the unit, and running a test cycle. Complex installations requiring new plumbing, electrical work, or permit inspections extend to several hours or multiple visits.
Do I need a permit to replace my washing machine in Orange or Los Angeles County?
You usually do not need a permit for simple replacements using existing hookups, but new plumbing or electrical modifications often do require permits in both counties. Check with your local building department before starting work that involves adding water lines, installing new outlets, or modifying drain systems. Permit requirements protect you by ensuring code-compliant installations that pass safety inspections.
What are the benefits of using stainless steel water supply hoses?
Stainless steel hoses are more durable, resistant to leaks and bursts, and longer-lasting than rubber hoses. They withstand higher pressures, resist kinking and cracking, and maintain flexibility across wider temperature ranges. Most stainless steel braided hoses last 5 to 10 years compared to 3 to 5 years for standard rubber, reducing replacement frequency and catastrophic burst risk.
Why is it important to level a washing machine properly?
Leveling prevents excessive vibration, noise, and premature wear or walking of the washer across your laundry room floor. Unleveled washers stress suspension components, bearings, and drum supports, shortening appliance lifespan significantly. Proper leveling ensures smooth operation, quieter cycles, and prevents the washer from moving during high-speed spinning, which can damage water connections and electrical cords.