
Nine times out of ten, a running toilet comes down to one of four cheap parts: the flapper, the fill valve, the float, or the chain connecting them. Shut off the water at the base of the toilet first, then run a dye test to confirm which one is failing before you buy anything. If a new flapper and fill valve don’t stop it, stop tinkering and call a licensed plumber.
TL;DR:
- A dye test quickly confirms whether the leak originates from the flapper, fill valve, or other tank components, guiding whether repairs are DIY or professional.
- Most common causes include warped or mineral-scaled flappers and sediment-clogged fill valves, which typically cost $5 to $25 for parts and take under 90 minutes to fix.
- Adjusting the float or replacing the flapper frequently resolves leaks, but persistent issues after two DIY attempts signal the need for a licensed plumber.
- Replacing the entire fill valve or addressing a cracked flush valve seat is often necessary if cleaning or adjusting fails to stop the leak.
- Regular dye tests and replacing flappers every five years can prevent recurring problems, and ignoring a running toilet risks thousands of gallons of water waste daily.
Table of Contents
- What You Need Before You Touch the Tank
- How Do You Diagnose a Running Toilet?
- Step-by-Step Fixes for Each Culprit
- When Should You Call a Plumber Instead?
- How Do You Stop It From Happening Again?
- What Our Technicians See in the Field
- The Real Lesson Here Isn’t About Toilets
- Book a Plumbing Pro When DIY Hits Its Limit
- Sources
- FAQ
What You Need Before You Touch the Tank
Turn the shutoff valve behind the toilet clockwise until it stops, then flush to drain most of the tank. A few tools cover almost every repair:
- Screwdriver (flathead and Phillips)
- Adjustable wrench for the supply line nut
- Pliers for stubborn chain links or nuts
- A bucket and old towel to catch leftover water
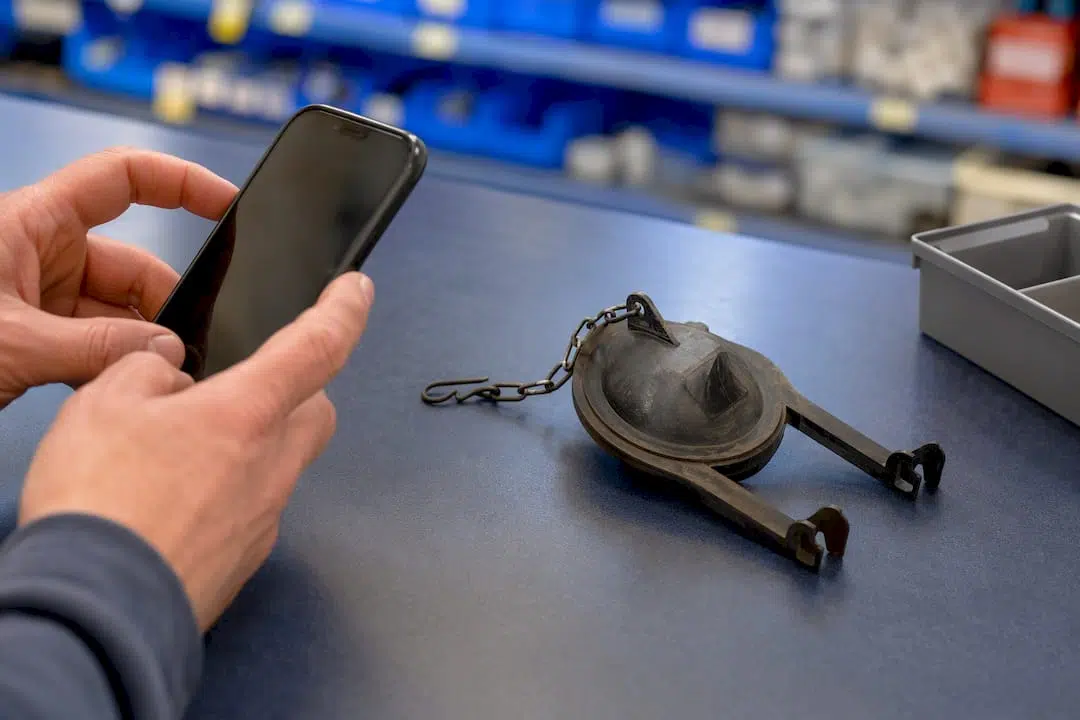
Keep a universal flapper, a fill valve kit, and a replacement chain on hand. Skip in-tank chemical tablets. They soften and crack rubber flappers over time, which turns a $10 fix into a repeat visit. Set the tank lid on the towel instead of the tile. Porcelain chips easily and a hairline crack there is a repair no DIY guide can undo.
Pro Tip: Photograph your old flapper before tossing it. Sizes vary by brand, and matching it at the hardware store saves you a second trip.
How Do You Diagnose a Running Toilet?
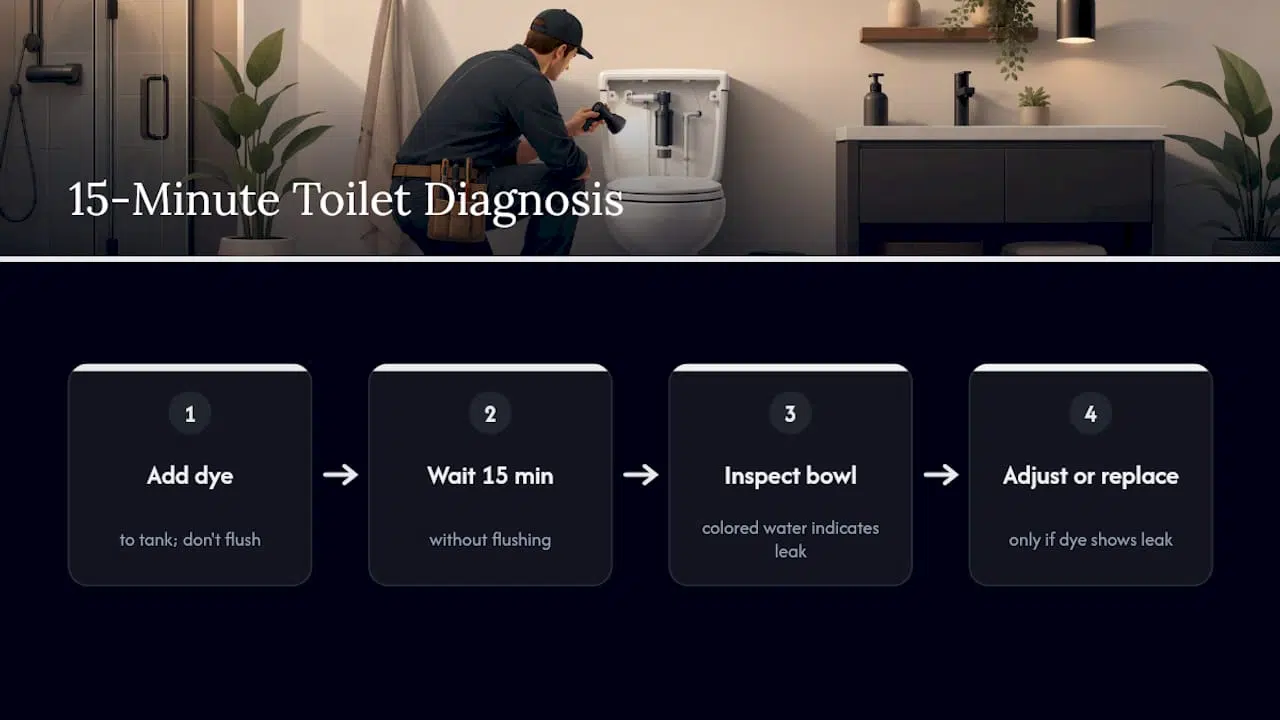
A dye test takes fifteen minutes and tells you almost everything. Here’s the order to work through it:
- Add a few drops of food coloring or a dye tablet to the tank water, not the bowl.
- Wait 10 to 15 minutes without flushing.
- Check the bowl. Color in the bowl means water is leaking past the flapper or flush valve seal, per the EPA’s leak test protocol.
- Listen for “ghost flushes,” short refill cycles every 20 to 60 minutes with nobody touching the handle. That pattern almost always points to a slow flapper leak, an insight repair guides consistently flag.
- If the toilet never stops running at all, rather than cycling, suspect the fill valve or float instead.
- Pop the lid and check water level against the overflow tube. It should sit about an inch below the top. Water audibly flowing into the tube means the float isn’t shutting the valve off.
- Look at the flapper for warping, stiffness, or a ring of mineral scale, and check the chain for slack or snags.
A leaking fill valve isn’t a minor drip. In extreme cases it can push 3 to 5 gallons per minute, which adds up to thousands of gallons in a single day if it runs unnoticed overnight.
Step-by-Step Fixes for Each Culprit
Most of these repairs run $5 to $25 in parts and take 30 to 90 minutes start to finish, even for someone who’s never opened a toilet tank before.
Flapper repair or replacement:
- Remove the tank lid and set it aside on a towel.
- Inspect the flapper for warping, stiffness, or scale buildup around the seal.
- Wipe off light mineral deposits and test the seal by hand.
- If it’s cracked, misshapen, or still leaking after cleaning, unhook it and install a universal replacement, matching size against the old one.
Chain and trip lever:
- Leave a half inch to one inch of slack in the chain. Too tight and the flapper never fully closes; too loose and it won’t lift enough to flush.
- Free any links caught on the flapper’s frame.
- Make sure the trip lever moves smoothly without binding.
Float adjustment:
- Ball-style float: bend the arm downward slightly to lower the shutoff point.
- Cup-style float: use the adjustment screw or twist the collar down along the fill valve stem.
- Target a water level about an inch below the overflow tube either way.
Fill valve cleaning or replacement:
- Shut off the water supply again before opening anything.
- Remove the valve cap and flush out sediment. Kohler’s own troubleshooting guidance notes that debris trapped in the cap is a leading cause of a valve that won’t fully shut off.
- If the valve still runs with water off, or won’t stop even at a low float position, replace the whole assembly. Most kits fit standard toilets with a few basic adjustments.
Pro Tip: After any fix, run three or four full flush cycles and watch the tank refill each time. A one-time success doesn’t rule out an intermittent leak.
When Should You Call a Plumber Instead?
Some symptoms mean the problem is bigger than a $15 part. Call a professional if:
- The toilet keeps running after you’ve replaced both the flapper and fill valve.
- The flush valve seat itself looks cracked or corroded, since flappers can’t seal against damaged porcelain.
- Multiple fixtures in the house are leaking, or your water meter’s leak indicator spins with everything turned off.
- The repair means disconnecting the tank from the bowl, and the bolts or supply line look rusted solid.
At that point, continued DIY attempts usually cost more in wasted water and repeat trips to the hardware store than a single service call. Detecting leaks across the rest of your home before you call helps a technician diagnose faster, too.
How Do You Stop It From Happening Again?
A running toilet you fixed once can absolutely come back, usually from the same wear patterns. A short routine keeps it from becoming a recurring headache:
- Run a dye test every few months, and plan to replace flappers roughly every five years even if they still look fine.
- Skip the blue in-tank tablets. WaterSense guidance confirms the chemicals in them degrade rubber flappers faster than plain water ever would.
- Recheck the toilet after any nearby plumbing work or a pressure surge. Sediment shaken loose elsewhere in the system often lodges in the fill valve first.
- Glance at your water bill each winter. A jump with no obvious cause is one of the most reliable signs of a hidden leak, according to utility guidance from Denver Water.
Pro Tip: If a brand-new fill valve still runs, don’t assume it’s defective. Flush the supply line briefly before final installation. Trapped debris from old pipes is a common repeat offender.
What Our Technicians See in the Field
Across service calls, flappers and fill valves account for the overwhelming majority of running-toilet complaints, with mineral scale and post-plumbing-work sediment as the usual triggers behind a fill valve that won’t seat. Our technicians reach for cleaning or a valve flush first, since it resolves more calls than people expect, and move to full replacement only when the valve keeps failing after a clean install. If you’re already past two DIY attempts, that pattern is worth knowing before you buy a third part.
The Real Lesson Here Isn’t About Toilets
Most running-toilet advice buries the diagnosis under ten paragraphs of plumbing history before telling you to check the flapper. That’s backwards. The dye test takes fifteen minutes and rules out or confirms the single most common cause before you spend a dollar on parts, so it should always be step one, not step five.
The bigger blind spot is how people treat “adjust” and “replace” as the same decision. They’re not. A float that’s slightly high is an adjustment, free, five minutes. A flapper with visible scale or warping is a replacement, because cleaning a degraded seal just buys you another month before it fails again. Conflating the two is why so many people fix the same toilet three times in a year.
If there’s one habit worth adopting, it’s the periodic dye test EPA recommends, not just when something’s obviously wrong. Catching a slow flapper leak at the ghost flush stage beats catching it on a water bill that’s suddenly $40 higher.
— MDTECH
Book a Plumbing Pro When DIY Hits Its Limit
Some plumbing services offer licensed technicians who diagnose flapper, fill valve, and flush valve issues efficiently, often on an early visit. If you’ve already swapped parts twice and the tank still won’t hold, or the flush valve seat itself looks damaged, that’s the point where a service call saves more water and money than another DIY attempt.
MDTECH covers plumbing repair services across Orange County, and booking takes a few minutes online. If your toilet’s specifically the problem, the toilet repair page for Orange County shows availability and lets you schedule a technician directly. Check open slots today and get it fixed properly the first time.
Sources
For anyone who wants to verify the numbers here, the EPA’s Fix a Leak Week page covers the dye test and water-waste figures directly, while Kohler’s troubleshooting guide explains fill valve debris issues from a manufacturer’s side.
- WaterSense Labeled Homes Technical Sheet: Free of Water Leaks (EPA)
- Toilet Constantly Leaking or Running | Kohler Assist
- Running Toilet: How to Diagnose and Fix It | AlertPlumber
FAQ
How Do You Fix a Toilet That Keeps Running?
Run a dye test to identify the leaking part, then adjust or replace the flapper, fill valve, float, or chain based on what you find. Most fixes cost $5 to $25 in parts and take under 90 minutes.
What Happens if You Ignore a Running Toilet?
A running toilet can waste hundreds of gallons a day, and a leaking fill valve can push thousands of gallons in a 24 hour period in severe cases. Beyond the water bill, constant flow can wear down the flush valve seat and eventually cause bigger tank hardware failures.
What Is the Most Common Cause of a Constantly Running Toilet?
A worn, warped, or scale-covered flapper is the single most frequent cause. A failing fill valve, often clogged with sediment, ranks close behind as the second most common issue.
Why Is Water Constantly Trickling Into the Toilet Bowl?
Trickling water almost always means the flapper isn’t sealing the flush valve completely, letting tank water slowly leak into the bowl between flushes. A dye test will confirm it within 15 minutes by turning the bowl water the same color as the dye.
Should I Call a Plumber or Fix a Running Toilet Myself?
If the flapper and fill valve are still functioning correctly and just need cleaning or adjustment, most homeowners can handle it with basic tools. Call a licensed plumber if the running continues after both parts are replaced, or if the flush valve seat itself is cracked or corroded.