
Ice inside your refrigerator usually means moisture is getting in or a defrost and airflow component has failed. Start with three quick checks: confirm your temperature settings, run the dollar-bill test on the door gasket, and look for blocked vents or a frozen defrost drain. If ice comes roaring back within three to five days of a full defrost, or the compressor runs while the fridge stays warm, stop troubleshooting and call a technician.
TL;DR:
- If ice keeps forming within three to five days after defrosting, the defrost system or its components are likely faulty.
- A door gasket that slips easily with a dollar bill test indicates a gap that allows warm, humid air to cause frost buildup.
- Blocked vents or overfilled areas near airflow pathways trap moisture, leading to localized ice patches inside the refrigerator.
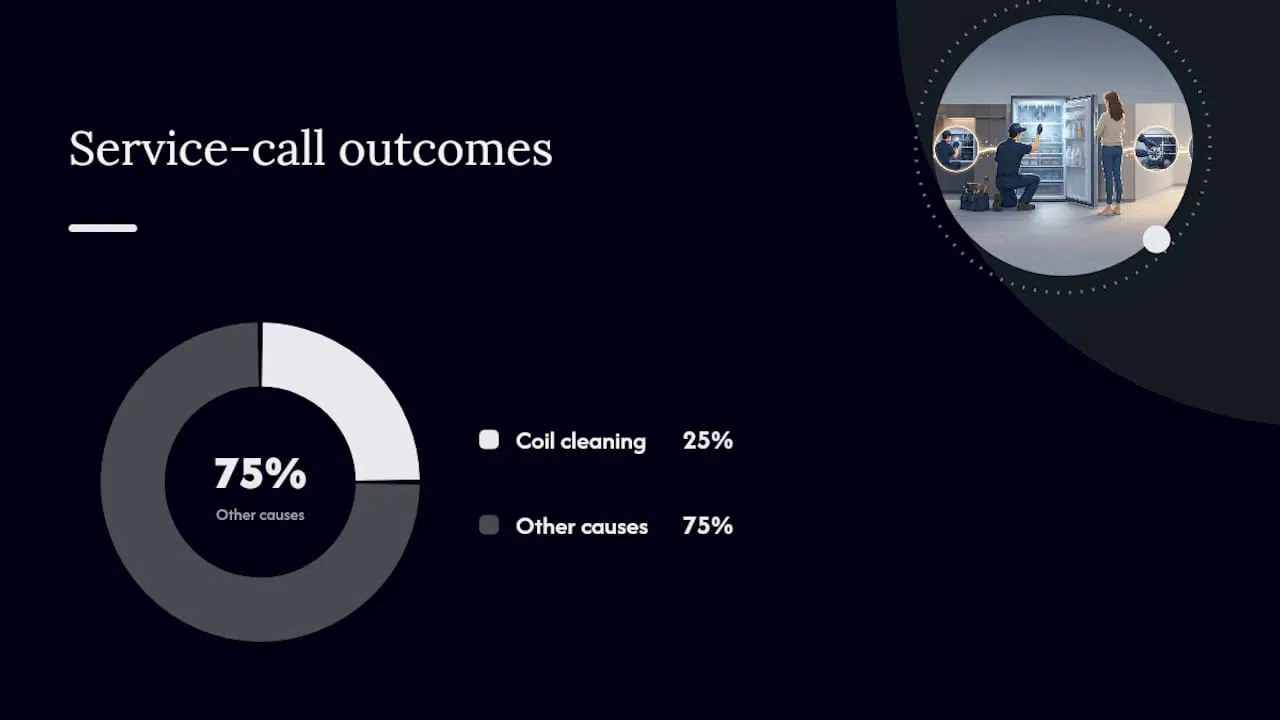
- Regularly cleaning coils and inspecting the evaporator fan resolve about 25% of icing issues, but complex failures require a technician.
- Monitoring the frost pattern during defrost and avoiding DIY repairs on sealed refrigerant lines prevent unnecessary costs and warranty voids.
Table of Contents
- What Causes Fridge Icing Up and How Do You Fix Each One?
- What Order Should You Check Things In?
- How Do You Safely Defrost and Clear the Drain?
- What Do Repairs Actually Cost and When Should You Call a Pro?
- Why Homeowners Keep Chasing the Wrong Fix First
- Book a Diagnostic Visit With MDTECH
- Sources
- FAQ
What Causes Fridge Icing Up and How Do You Fix Each One?
Frost forms when warm, humid air meets a cold surface. Every time that happens inside your refrigerator, you’re watching physics work against you. The fix depends entirely on which entry point the warm air is using, so let’s walk through each one.
Door gasket failure is the most common culprit homeowners can fix themselves. Close the door on a dollar bill so it sticks out halfway, then pull it out. If it slides free with little resistance, the seal has a gap somewhere and warm air is sneaking past it constantly. Before you order a replacement part, try cleaning the gasket with a mix of warm water and a tablespoon of baking soda, scrubbing the folds where crumbs and grime collect. A stiff or creased gasket often reshapes with gentle heat from a hair dryer on low, run a few inches away for 20 to 30 seconds at a time. Many gaskets people assume are “dead” are simply dirty or folded wrong, and cleaning and reshaping restores the seal more often than you’d expect. If the rubber is cracked, torn, or permanently deformed, replacement is the only real option, and a failed seal can raise your energy bill by 10 to 25% while it’s at it.
Warm, moist air entering the cabinet is the second big driver, and it’s often just a habit problem. Your fridge compartment should sit within the recommended cool temperature range, and your freezer at freezing point. Run warmer than that and you invite condensation; run colder and you risk freezer burn on food that shouldn’t need it. Every open door lets humid kitchen air rush in, and that moisture condenses and freezes the instant it touches the cold evaporator coil. Letting hot leftovers cool on the counter for 20 to 30 minutes before they go inside, and keeping the door open only as long as it takes to grab what you need, cuts down on how much moisture you’re feeding the system.
Blocked vents and overfilling create their own localized ice problems. Most refrigerators route cold air through vents on the back wall or ceiling of the compartment, and stacking large containers or foil-wrapped dishes against those vents traps moist air in one spot. That trapped air freezes right where it sits, which is why you’ll sometimes see a solid ice patch on one shelf while the rest of the fridge looks fine. Pull items away from the vents by at least an inch and reorganize so air can circulate around, not just past, your food.
Defrost system failure is where things stop being a five-minute fix. Every frost-free refrigerator runs a defrost heater on a timer or control board that melts frost off the evaporator coil several times a day. When the heater, thermostat, or timer fails, frost keeps accumulating unchecked until it turns into a solid ice block behind the freezer’s rear panel. You can often spot this visually: pull the panel (unplug the unit first) and look for a thick, uneven ice sheet coating the coil fins instead of light frost. If left alone, this ice insulates the coil so badly that the whole system loses cooling capacity, and food in both compartments starts to warm up.
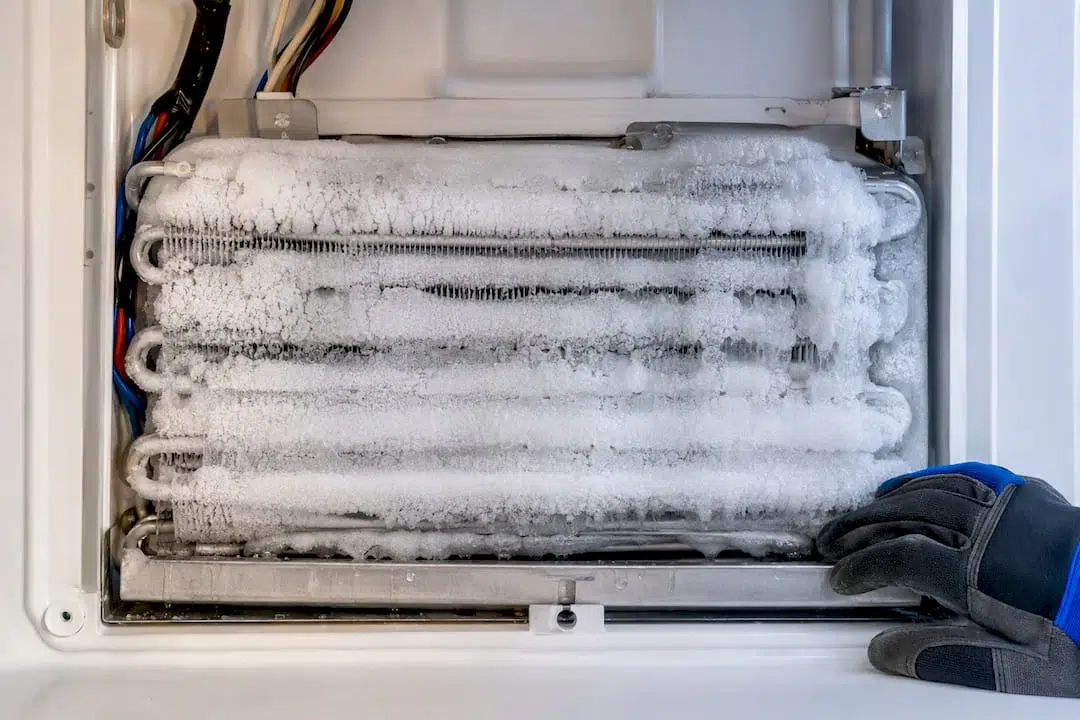
A clogged defrost drain produces a different signature: water and ice pooling at the bottom of the freezer or inside the crisper drawers rather than coating the coil. The drain tube carries melted frost down to a pan under the fridge, and when it clogs with food debris or ice, that water has nowhere to go but back into the cabinet. Clearing it is usually a homeowner-safe job with warm water flushed through the drain opening, though persistent clogs sometimes need a proper drain flush from a technician.
Dirty condenser coils and a failing evaporator fan round out the mechanical causes. Condenser coils, usually underneath or behind the unit, dump heat outside the fridge. Caked in dust and pet hair, they can’t shed heat efficiently, which forces the whole system to run harder and cool less evenly. The evaporator fan, mounted near the coil, is what actually pushes cold air through the compartments. Listen for it the next time the compressor kicks on; a silent or grinding fan means air isn’t moving, and community repair threads consistently flag the fan as an overlooked, fixable cause of uneven cooling and ice buildup.
Thermostat or thermistor errors show up as inconsistent temperatures rather than obvious ice, though the two often travel together. If your fridge swings between too cold and too warm, or the display reads a temperature that doesn’t match what a separate appliance thermometer tells you, the sensor is likely feeding bad data to the control board. That miscalibration can trigger the compressor to overcool one zone while starving another, setting up the exact humidity swings that produce frost.
Quick reference for what you’re looking at:
- Ice on one shelf only: blocked vent, not a system failure.
- Ice sheet on the evaporator coil behind the rear panel: defrost heater, timer, or thermostat.
- Water pooling at the freezer floor: clogged defrost drain.
- Loose gasket that fails the dollar-bill test: seal needs cleaning or replacing.
- Compressor runs constantly but cooling feels weak: dirty condenser coils or dead evaporator fan.
Pro Tip: Snap a photo of the ice pattern before you defrost anything. A technician can often narrow down the cause just from where the ice sits, which saves you a diagnostic visit fee.
What Order Should You Check Things In?
Chasing the wrong fix first wastes money, and refrigerator parts aren’t cheap to guess with. Technicians follow a set sequence precisely because it moves from free checks to expensive ones, and skipping ahead is how homeowners end up replacing a control board when the real problem was a $4 bag of baking soda and a hair dryer.
- Check the temperature settings. Confirm the fridge reads within the recommended temperature ranges and the freezer is set to freezing point with an independent thermometer, not just the display.
- Run the dollar-bill test on the door gasket. If it slides out easily anywhere along the seal, clean and reshape before assuming replacement.
- Inspect vents and drain for blockages. Move food away from vents; flush the drain opening with warm water if you see pooling.
- Clean the condenser coils and listen for the evaporator fan. A silent fan or coils packed with dust point to airflow, not the defrost system.
- Manually defrost the unit and observe for three to five days. If frost returns fast and heavy in the same spot, the defrost heater, thermostat, or timer is the likely failure.
- Only after steps 1 through 5 fail, suspect the sealed refrigerant system. That’s a job for a certified technician, not a home fix.
This order matters because it filters out the cheap, common problems before you spend on parts. Coil cleaning alone resolves roughly 25% of not cooling or icing service calls, which means a quarter of the people calling for a repair could have fixed it themselves with a vacuum and 15 minutes. The same diagnostic logic applies whether you’re troubleshooting solo or prepping for a technician: work through the free checks first, and only escalate once you’ve ruled them out.
The decision rule is simple: if manual defrosting clears the ice and it doesn’t come back within three to five days, you likely had a one-time moisture event, not a broken part. If it comes back fast and in the same location, that pattern points to a defrost component that needs replacing, not another round of cleaning.
How Do You Safely Defrost and Clear the Drain?
A full manual defrost takes patience, not tools. Unplug the refrigerator first. Always. Never chip at ice with a knife or ice pick, and never point a hair dryer or space heater directly at the evaporator coil. Concentrated heat can crack plastic housings or damage the coil fins, turning a $0 fix into a $300 repair.
To defrost safely:
- Remove all food and place it in a cooler.
- Line the freezer floor with old towels to catch melt water.
- Leave the door open and let the ice melt naturally, or speed it up by placing bowls of warm (not hot) water inside and swapping them every 20 minutes.
- Expect two to four hours for a heavy buildup, depending on how thick the ice sheet is.
- Wipe down all surfaces once the ice is gone, then let the interior air dry for 15 minutes before plugging back in.
To clear a clogged defrost drain:
- Locate the drain opening, usually a small hole at the back of the freezer floor or behind the kick plate.
- Use a turkey baster or large syringe filled with warm water to flush the opening.
- If water won’t pass, feed a flexible nylon tube (aquarium tubing works) gently down the drain to break up the clog.
- Repeat the warm-water flush until water drains freely into the pan below.
- If the clog won’t clear or the drain tube is cracked, a professional flush or part replacement is the next step.
Once you’ve plugged the fridge back in, watch it for three to five days. That window is the actual diagnostic test. If frost builds back up quickly and in the same spot, you’re not dealing with a one-time humidity event.
Pro Tip: Never use a metal scraper or screwdriver to chip ice off the coil. One slip punctures the refrigerant line, and that turns a defrost job into a sealed-system repair costing several hundred dollars.
What Do Repairs Actually Cost and When Should You Call a Pro?
Most icing problems fall into two cost buckets, and knowing which one you’re in changes how you should react. Cleaning condenser coils, replacing a door gasket, or swapping a defrost heater are all low-cost jobs a technician typically handles in a single visit. Sealed-system work, refrigerant leaks, or a failed compressor sit in a different category entirely, both in price and in who’s legally allowed to touch them. Costs vary by model, brand, and region, so treat any number you see online as a rough range, not a quote.
The rule of thumb we rely on: if a full manual defrost clears the ice but it comes back within three to five days in the same location, that’s a defrost system failure, not bad luck. Don’t defrost it a second and third time hoping it resolves itself.
Two signs mean it’s time to stop DIY-ing:
- The compressor runs constantly but the fridge never gets cold. That usually points to a sealed-system issue, refrigerant charge, or a failed compressor, work that legally requires an EPA-608 certified technician to handle refrigerant.
- You’ve completed the full checklist (coils, fan, gasket, drain, manual defrost) and ice still returns fast. At that point you’re likely looking at a defrost heater, thermostat, or control board failure that needs a multimeter and testing know-how.
One warranty note worth flagging: opening sealed refrigerant lines yourself, even accidentally while chipping at ice, can void a manufacturer warranty outright. If your unit is still under coverage, that’s one more reason to call a technician before reaching for a tool that wasn’t designed for the job.
Why Homeowners Keep Chasing the Wrong Fix First
The conventional advice on fridge icing treats every symptom the same way: “clean the coils and see what happens.” That’s not wrong, exactly, it’s just incomplete. Coil cleaning fixes a real quarter of cases, but treating it as the universal answer is how people end up cleaning coils three times over two months while a bad defrost thermostat keeps icing the same spot back up.
What the evidence actually supports is sequence, not a single silver-bullet fix. Cheap checks first, then homeowner-safe interventions, then a hard stop at anything involving refrigerant. The three-to-five-day monitoring window after a manual defrost is the part most guides skip entirely, and it’s the single most useful diagnostic tool a homeowner has, because it turns a guessing game into an actual test with a result.
If you take one thing from this, prioritize the free and cheap checks before you spend a dollar on parts. Most icing problems die at step three of the checklist. The ones that don’t are worth a technician’s time, not another YouTube video.
— MDTECH
Book a Diagnostic Visit With MDTECH
A technician who runs the full diagnostic sequence in one visit instead of guessing at parts one at a time can help diagnose the issue. That’s the real advantage over trial-and-error DIY: a licensed technician checks coils, fan, gasket, drain, and defrost components in the order that avoids wasted parts, then moves straight to sealed-system work if that’s what’s actually failing.
On a typical service call, expect the technician to run the coil and fan check first, test the door gasket, inspect the defrost drain, and, if needed, replace a defrost heater or thermostat on the spot. For sealed-system issues, the tech will diagnose the leak or compressor fault and handle refrigerant work under EPA-608 certification. Before your appointment, snap a few photos of the ice pattern, jot down when it started and how often it returns after you defrost, and have your model number ready, it’s usually on a sticker inside the fridge cabinet. That prep alone speeds up the diagnosis and gets you a more accurate quote. You can book a refrigerator repair appointment online or check the kitchen appliance repair page for brand-specific service details.
Sources
For readers who want to go deeper into specific components before calling anyone:
- Refrigerator not cooling: complete diagnostic guide for every fridge style | ServiceMag
- How to help eliminate condensation and frost | Whirlpool product help
- Fridge
- Why Is There Frost or Moisture in My Refrigerator? Causes and Fixes | Kelly’s Appliance Center
- Freezer ice building up troubleshooting | iFixit
FAQ
How Can I Stop My Fridge From Icing Up?
Keep the fridge within the recommended cool temperature range and the freezer at freezing point, let hot food cool before storing it, and limit how long the door stays open. Check the door gasket with the dollar-bill test regularly, since a failed seal lets in the warm, humid air that causes most frost buildup.
What Are the Signs of a Dying Refrigerator?
Warning signs include the compressor running constantly without the interior getting cold, food spoiling faster than usual, unusual buzzing or clicking from the back panel, and ice returning quickly after a manual defrost. If several of these show up together, especially a compressor that runs nonstop with no cooling, it’s worth having a technician check the sealed system.
What Should I Do if My Fridge Freezes Up?
Unplug the unit and let the ice melt naturally with towels underneath to catch water, then check the door gasket, vents, and defrost drain for the underlying cause once it’s clear. Watch the fridge for three to five days after; if ice returns quickly in the same spot, the defrost heater or thermostat is the likely culprit and needs professional repair.
What Are the Signs of a Clogged Defrost Drain?
Water or ice pooling at the bottom of the freezer, damp crisper drawers, or a puddle forming under the fridge are the clearest signs. Flushing the drain opening with warm water using a turkey baster or syringe often clears it, though a persistent clog may need a professional flush.