
If your dryer takes too long to dry, the culprit is almost always a clogged vent or lint screen restricting airflow. Check and clean both first. If drying stays slow, run a 5-minute heated cycle empty and feel for warmth. No heat after confirming airflow is clear usually means a failed heating element, thermal fuse, or gas valve, and that calls for a licensed technician.
TL;DR:
- Most slow-drying issues are caused by airflow restrictions, which can often be fixed by cleaning vents and lint screens, and most problems are solved with these simple steps.
- Running a 5-minute heated cycle on an empty dryer confirms whether the heating system is working; a lack of warmth indicates a faulty element, fuse, or gas valve requiring professional repair.
- The recommended maintenance schedule includes cleaning the exhaust vent system every 1 to 2 years and checking the outside vent hood during cycles to ensure proper airflow.
- Dryer models with “Check Vent” or AF codes signal airflow blockages that need clearing, and moisture sensor recalculations are normal unless cycle times never decrease below a certain point.
- Repair beyond cleaning, like replacing the heating element, is complex and should only be performed by licensed technicians, especially when no heat remains after airflow checks.
Table of Contents
- Why Your Dryer Takes Too Long to Dry
- Quick Checks to Run Before You Call Anyone
- Step-by-Step Fixes You Can Do Yourself
- When to Stop Troubleshooting and Call a Pro
- Who’s Actually Qualified to Fix This
- The Troubleshooting Order Most Guides Skip
- Get a Licensed Technician on the Vent or Heating Fault
- Sources
- FAQ
Why Your Dryer Takes Too Long to Dry
Airflow problems cause most slow drying complaints, full stop. Manufacturers point to restricted exhaust venting as the number one reason a dryer suddenly runs two or three cycles instead of one, and they recommend cleaning the exhaust vent system every 1 to 2 years, or sooner if you notice performance dropping. Lint builds up inside the duct over time, narrowing the path hot, moist air needs to escape.
A handful of specific mechanical issues tend to show up again and again in service calls:
- Clogged or crushed venting. Lint-packed ducts, kinked flexible hose, too many 90-degree elbows, or a blocked outside vent hood all choke airflow the same way a stuffed nose slows breathing.
- Dirty lint screen or trap housing. Fabric softener residue can coat the screen and the housing cavity beneath it, and this film reduces airflow even when the screen looks clean at a glance.
- A heating fault. Electric dryers rely on a heating element; gas dryers rely on an igniter and gas valve. A blown thermal fuse can also cut heat entirely while the drum keeps tumbling.
- Moisture sensor problems or the wrong cycle. A film of dryer sheet residue on the sensor bars can fool the control into running longer, and settings like Air Dry or EcoBoost intentionally use less heat.
- Mechanical wear. Worn drum seals, sticking rollers, a slipping belt, or low household voltage can all quietly extend drying time without throwing an obvious error.
An AF or “Check Vent” code is the dryer telling you exactly what’s wrong: airflow is restricted somewhere between the drum and the outside vent. The machine will keep running, just poorly, until you clear the blockage.
Pro Tip: If your dryer’s estimated time keeps jumping around mid cycle, that’s usually the moisture sensor recalculating based on how damp the load still is. It’s normal behavior, not a malfunction, unless the time never drops at all.
Quick Checks to Run Before You Call Anyone
Work through these in order. Most take under two minutes each, and together they’ll usually tell you whether you’re dealing with a simple fix or something that needs a professional.
- Check your cycle selection. Air Dry and EcoBoost modes use less heat by design, and Whirlpool notes that Eco modes can add roughly 40 minutes to a cycle. Switch to Normal or Auto Dry and see if that alone fixes it.
- Confirm the load size. A drum packed tight can’t tumble properly, and heavy, damp fabric traps moisture against dry clothes. Aim for the drum roughly half full.
- Pull the lint screen and clean it. Check the trap cavity too, not just the screen itself, for compacted lint or a waxy residue.
- Look at the vent hose behind the machine. Kinks, crushed sections, or long coils of foil ducting all restrict airflow badly.
- Run the 5-minute heat test. Start an empty heated cycle, let it run 5 minutes, then carefully reach in and feel for warmth. LG’s own troubleshooting guidance treats this test as the standard way to confirm whether the heating system is working at all.
- Watch the outside vent hood while the dryer runs. The flap should swing open and you should see a steady push of air and lint. A weak or absent flow points straight back to a blocked duct.
Pro Tip: Do the heat test with the load already removed. A wet towel inside will make the drum feel cooler than it actually is and give you a false reading.
Step-by-Step Fixes You Can Do Yourself
Once you know roughly where the problem sits, most of these fixes take fifteen minutes or less.
Cleaning the lint screen and housing:
- Pull the screen and scrub it with a soft brush under hot water if you see a shiny film. That film is usually fabric softener residue and it blocks airflow even on a screen that looks clear.
- Reach into the housing cavity with a vacuum attachment or a long, flexible brush to pull out compacted lint the screen never caught.
- Do this weekly if you dry a lot of laundry, monthly at minimum.
Cleaning the vent and outside hood:
- Unplug the dryer, pull it away from the wall, and disconnect the exhaust hose.
- Feed a vent brush through the ducting from both ends, then vacuum out what breaks loose.
- If your vent run is long, has multiple elbows, or vents through a roof, longer and more complex runs reduce airflow and encourage lint buildup faster than a short, straight one. That’s a good sign to hire a professional vent cleaner rather than fight it yourself.
- Replace any foil or plastic ducting with rigid or flexible metal 4-inch venting, since flimsy materials collapse under airflow pressure over time.
Sensor and cycle habits that help:
- Wipe the moisture sensor bars inside the drum with a soft cloth and a little vinegar once a month.
- Switch to a timed or automatic cycle for oddly shaped or unusually small loads, since sensors sometimes misread them.
- Toss in a dry towel with a damp small load. It absorbs extra moisture and shortens the cycle.
Electrical testing and heating element replacement are where DIY should stop. If the heat test comes back cold after airflow checks out clean, that’s a job for a licensed technician, not a screwdriver.
When to Stop Troubleshooting and Call a Pro
Some symptoms mean it’s time to put the tools down.
- No heat after confirmed good airflow. This almost always points to a failed heating element, a blown thermal fuse, or a gas valve issue that needs proper diagnostic tools.
- Burning smells, visible smoke, sparks, or a tripped breaker. Stop using the dryer immediately and call a professional.
- Gas smell near a gas dryer. Shut off the gas supply and call a licensed technician right away. Don’t try to inspect the burner yourself.
- Long, complex, or roof-vented duct runs. These often exceed what the manufacturer’s spec sheet allows for safe airflow and usually need a camera inspection to clear properly.
A technician arriving for a slow-drying complaint will typically measure airflow, run a vent-camera check if the duct run is long, test electrical components, and quote any part replacement before starting work.
Who’s Actually Qualified to Fix This
MDTECH’s technicians are licensed and trained specifically in dryer, HVAC, and broader appliance repair, which matters most once a problem moves past cleaning and into wiring or gas lines. A proper inspection covers airflow measurement, a vent-camera check when the duct run is long or hard to access, electrical testing, and safe replacement of failed heating components.
Gas and electrical repairs carry real fire, shock, and carbon monoxide risk, and licensed technicians note that many long-dry service calls turn out to be simple vent clogs that never required opening up the machine at all.
That’s worth remembering before you assume the worst.
The Troubleshooting Order Most Guides Skip
Most advice on a slow dryer jumps straight to “replace the heating element” or “call a repairman,” skipping the airflow check that fixes the majority of cases for free. That’s backwards. Venting problems are cheap, visible, and fixable with a vacuum and ten minutes, so they deserve to be ruled out before anyone touches a part.
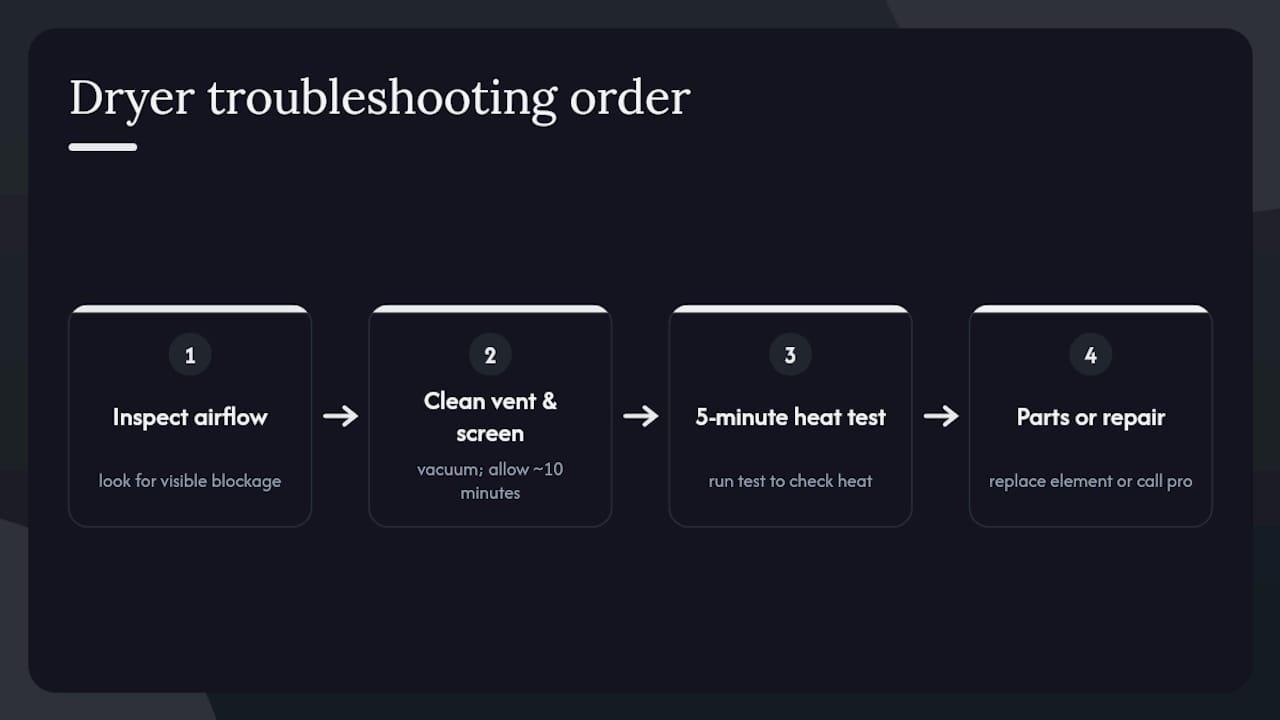
The other thing conventional advice underplays: the 5-minute heat test. It’s the single fastest way to separate “this is a cleaning problem” from “this is a parts problem,” and yet most troubleshooting lists bury it near the bottom instead of leading with it.
What we’d tell any homeowner staring at a dryer that’s run three cycles in a row: clean the vent and screen first, run the heat test second, and only start worrying about the heating element or gas valve if that test comes back cold. Skipping straight to “my dryer is broken” wastes money on parts that were never the problem, and it delays the one fix, a clean vent, that actually works.
— MDTECH
Get a Licensed Technician on the Vent or Heating Fault
Appliancesrepairmdtech gets your dryer diagnosed and fixed by a licensed technician instead of leaving you to guess whether it’s the vent, the sensor, or the heating element. That matters because gas and electrical repairs are exactly the part of this checklist you shouldn’t be doing yourself.
Technicians handle dryer repair, vent cleaning, full diagnostics, and safe gas or electrical fixes in the service area. Booking gets you a technician who checks airflow, tests heating components, and gives you a clear estimate before any repair starts, no guesswork, no leaving a heating element half diagnosed. If your dryer is still running slow after the checks above, book through the appliance repair services page and get a technician out to look at it directly.
Sources
- Long Dry Times – Dryer – Product Help | Whirlpool
- Dryer is not Drying or Experiencing Long Dry Times – Product Help | Maytag
- LG Dryer – Why is my dryer not heating, not drying or taking a long time drying? | LG USA Support
FAQ
Why is my dryer suddenly taking so long to dry?
The most common sudden cause is a clogged lint screen or blocked vent restricting airflow. Clean both first, then run a 5-minute heat test if drying is still slow.
Is 2 hours too long for a dryer?
Yes, for a normal-sized load, 2 hours points to a real problem, usually restricted airflow or a heating fault. A healthy dryer should finish a full load in about 40 minutes.
Why does my dryer go from 40 minutes to 1 minute?
That jump is the moisture sensor recalculating remaining time based on how damp the load still reads, which is normal behavior on sensor-equipped cycles rather than a sign of malfunction.
Is it normal for a dryer to take 4 hours?
No. A 4-hour cycle almost always means a serious airflow blockage or a failed heating component, and it’s worth running the checks above before calling a licensed technician.