
TL;DR:
- Most interior fridge leaks result from a clogged defrost drain that causes water to pool inside.
- Fixing it involves clearing the drain with baking soda solution, inspecting for ice, and checking the drain pan and gaskets.
Most interior fridge leaks trace back to a single culprit: a clogged defrost drain. When that narrow drain hole gets blocked by food debris or an ice plug, meltwater from the automatic defrost cycle has nowhere to go and pools under your crisper drawers. The next-most-common causes are a cracked or misaligned drain pan, a loose water supply line on dispenser or ice-maker models, and a worn door gasket letting warm air in.
Do these three things right now:
- Unplug the refrigerator before touching anything inside.
- Pull out the crisper drawers and look for standing water or ice at the back wall.
- Lay towels on the floor around the unit to protect against further pooling.
If your fridge has a water dispenser or ice maker, also shut off the water supply valve behind the unit before inspecting any lines or fittings. The FDA recommends keeping a thermometer inside so you know when food safety is at risk during extended troubleshooting. GE Appliances and Whirlpool both point to the defrost drain as the first place to check on interior leaks, and Appliancesrepairmdtech technicians confirm it accounts for the majority of service calls about water pooling inside the fridge.
Pro Tip: Move perishables to a cooler with ice if you expect to leave the fridge unplugged for more than two hours.
Table of Contents
- How to find where the water is coming from
- Common causes of interior leaks and the quick DIY fixes
- How to clear a clogged defrost drain yourself
- Red flags that mean you should stop DIY and call a pro
- How long repairs take and what they typically cost
- Key Takeaways
- What our techs actually check when they arrive
- Professional fridge repair in Orange County and Los Angeles County
- Useful sources and further reading
How to find where the water is coming from
Where you see the water is the fastest clue you have. Before you pull anything apart, spend two minutes mapping the leak location, because the location almost always points to the cause.
Inspect these four spots in order:
- Under the crisper drawers (inside the fridge): Water or ice here almost always means a clogged defrost drain.
- Back interior wall: A sheet of ice or frost buildup points to blocked freezer vents or a defrost-system fault.
- Floor in front of the fridge: Dry interior but wet floor often means a cracked or overflowing drain pan underneath the unit.
- Floor behind the fridge: Wet floor at the back with a dry interior points to a supply line, filter housing, or inlet valve issue on dispenser/ice-maker models.
Quick tests you can run:
- Touch the drain area at the back of the freezer floor. If it’s solid ice, you have a frozen drain plug.
- Run a tissue slowly along the full perimeter of the door gasket. If it drags unevenly or passes through a gap without resistance, the seal is compromised.
- On dispenser models, check the filter housing for drips right after a recent filter change.
Pro Tip: The dollar-bill gasket test: close the door on a dollar bill and pull it out. If it slides out with no resistance, that section of the gasket has lost its seal. Test all four sides.
Common causes of interior leaks and the quick DIY fixes
Here are the seven causes you’re most likely dealing with, along with what to check and what to do about each one.
1. Clogged defrost drain
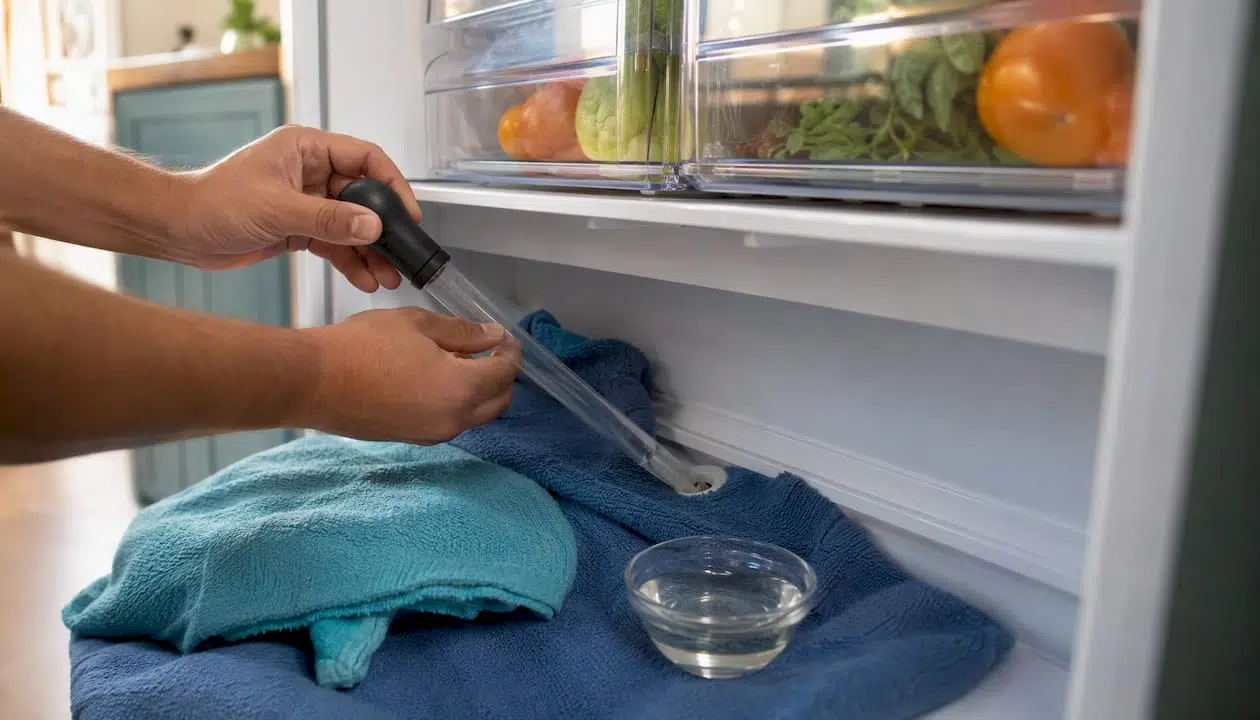
Every refrigerator runs a defrost cycle that melts frost off the evaporator coils. That meltwater flows through a small drain hole into a pan under the unit. When food debris or an ice plug blocks that hole, water backs up and pools inside, usually under the crisper drawers. The full step-by-step fix is in the next section, but the short version: flush the drain with a solution of 1 tablespoon baking soda mixed with 2 cups of warm (not boiling) tap water, using a turkey baster. Tools needed: turkey baster, towels, small bowl.
2. Blocked freezer vents causing frost overflow
If the freezer is packed too tightly, air can’t circulate properly. Frost builds up on the evaporator, the defrost cycle can’t keep up, and ice eventually melts and drips into the fridge compartment. Fix: reorganize the freezer so nothing is pressed against the back vents. Defrost manually if frost is more than a quarter inch thick. Time: typically less than a few hours for a manual defrost.
3. Cracked or misaligned drain pan
The drain pan sits under the fridge and collects defrost water, which normally evaporates from the heat of the compressor. A cracked pan, or one that’s been knocked out of position, lets water spill onto the floor. Pull the fridge out, locate the pan (usually accessible from the front or back), and inspect it. A cracked pan needs replacement; a shifted one just needs reseating. Tools: flashlight, work gloves. Time: under half an hour.
4. Loose or frozen water supply line
On ice-maker and dispenser models, a plastic supply line runs from the wall valve to the fridge. If a fitting is loose or the line has frozen from being pushed too close to the freezer compartment, you’ll get dripping at the back or underneath. Check fittings by hand for tightness. If the line is frozen, unplug the fridge and let it thaw before reconnecting. For water supply line checks and shutoff steps, always turn off the wall valve first. Time: about a quarter to half an hour.
5. Badly seated or incorrect water filter
A filter that isn’t fully locked into its housing, or one that’s the wrong part number for your model, creates a gap where water drips out, especially right after a filter change. Whirlpool’s guidance specifically flags a leaky filter seat as a frequent cause on dispenser models. Remove the filter, inspect the O-ring for damage, and reseat it firmly until it clicks. If the O-ring is cracked, replace the filter. Time: a few minutes.
6. Worn or dirty door gasket
A gasket that’s cracked, stiff, or coated in grime lets warm, humid air into the fridge. That warm air hits the cold interior surfaces and condenses, leaving moisture that looks like a leak. Clean the gasket with warm soapy water and a soft cloth. If it’s visibly cracked or deformed, it needs replacing. A new gasket typically costs a modest amount depending on the model. Time to clean: a short time. Time to replace: under an hour.
7. Fridge not level
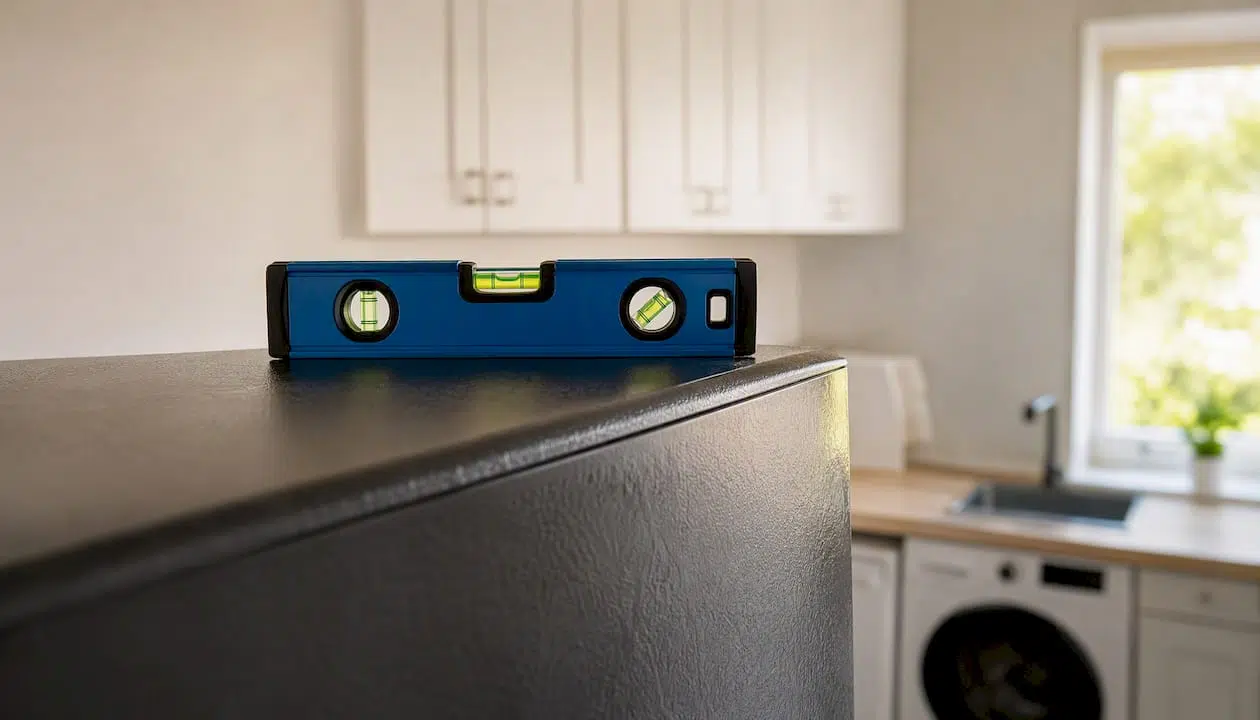
A refrigerator that tilts forward causes defrost water to flow toward the front instead of toward the drain hole at the back. Water then pools inside or drips out the front. Check level with a bubble level on the top of the unit. Most fridges have adjustable front feet; turn them clockwise to raise that corner. Time: approximately a quarter of an hour.
Pro Tip: After any repair, run the fridge for 24 hours and check the drain pan. If it fills faster than normal, something upstream is still wrong.
How to clear a clogged defrost drain yourself
Flush the drain with a solution of 1 tablespoon baking soda mixed with 2 cups of warm (not boiling) tap water, using a turkey baster to force it down the drain hole. Repeat until water flows freely into the drain pan below. That’s the core fix, and it works for most clogs. Here’s the full procedure:
What you’ll need:
- Turkey baster or bulb syringe
- Small bowl
- Baking soda
- Warm tap water (not boiling — boiling water can warp plastic fittings)
- Towels
- Flashlight
- Flexible tubing or a small plumber’s snake (if flushing alone doesn’t clear it)
Step-by-step:
- Unplug the refrigerator. If it has a water dispenser or ice maker, shut off the supply valve at the wall.
- Remove all food from the freezer and set it in a cooler. Check food temperatures with a thermometer per FDA food-safety guidance if the fridge will be off for more than two hours.
- Pull out the crisper drawers and set them aside.
- Locate the drain hole at the back of the freezer floor or the back wall of the fresh-food compartment (location varies by model).
- Remove any visible ice gently with a plastic utensil. Never use a metal probe — it can puncture the drain tube or damage plastic fittings.
- Mix 1 tablespoon baking soda with 2 cups of warm water in a small bowl. GE Appliances recommends this exact ratio and emphasizes warm, not boiling, water.
- Fill the turkey baster and squeeze the solution firmly into the drain hole. You should hear or feel it draining through.
- Repeat 3–4 times until the solution flows freely.
- Pull the fridge out and check the drain pan underneath. If water appears in the pan, the drain is clear.
- If flushing doesn’t work, carefully insert flexible tubing or a small plumber’s snake to dislodge a stubborn blockage. Hoffman Brothers recommends flexible tubing over rigid tools to avoid damaging the drain line.
- Reassemble, plug back in, and monitor for 24 hours.
Total time: between half an hour and one and a half hours.
If the clog comes back within a few weeks, the problem likely isn’t debris. Some models use a small metal drain strap or heater clip attached to the defrost-heater assembly to keep the drain line from freezing. If that strap is missing or misaligned, the drain will keep icing up no matter how many times you flush it. At that point, a technician needs to inspect the defrost system.
Pro Tip: Pour a cup of plain warm water down the drain after reassembly and watch the drain pan. If water appears within a minute or two, you’re clear. If not, the blockage is still there.
Red flags that mean you should stop DIY and call a pro
Some situations are beyond a safe DIY fix. Stop and call a professional if you encounter any of these:
- Cracked or kinked supply line under pressure. Shut off the wall valve immediately and call for a refrigerator repair appointment rather than attempting a pressurized line repair yourself.
When a technician arrives, they’ll check the inlet valve and water pressure, inspect the drain heater and strap, test the defrost thermostat, look for sealed-system faults, and confirm the drain pan is seated and intact. That full diagnostic typically takes 45–90 minutes on-site. Persistent leaks after all DIY checks are a reliable signal that the problem has moved past what a baster and baking soda can fix.
How long repairs take and what they typically cost
The gap between DIY and professional repair comes down to two things: your comfort level and what’s actually broken.
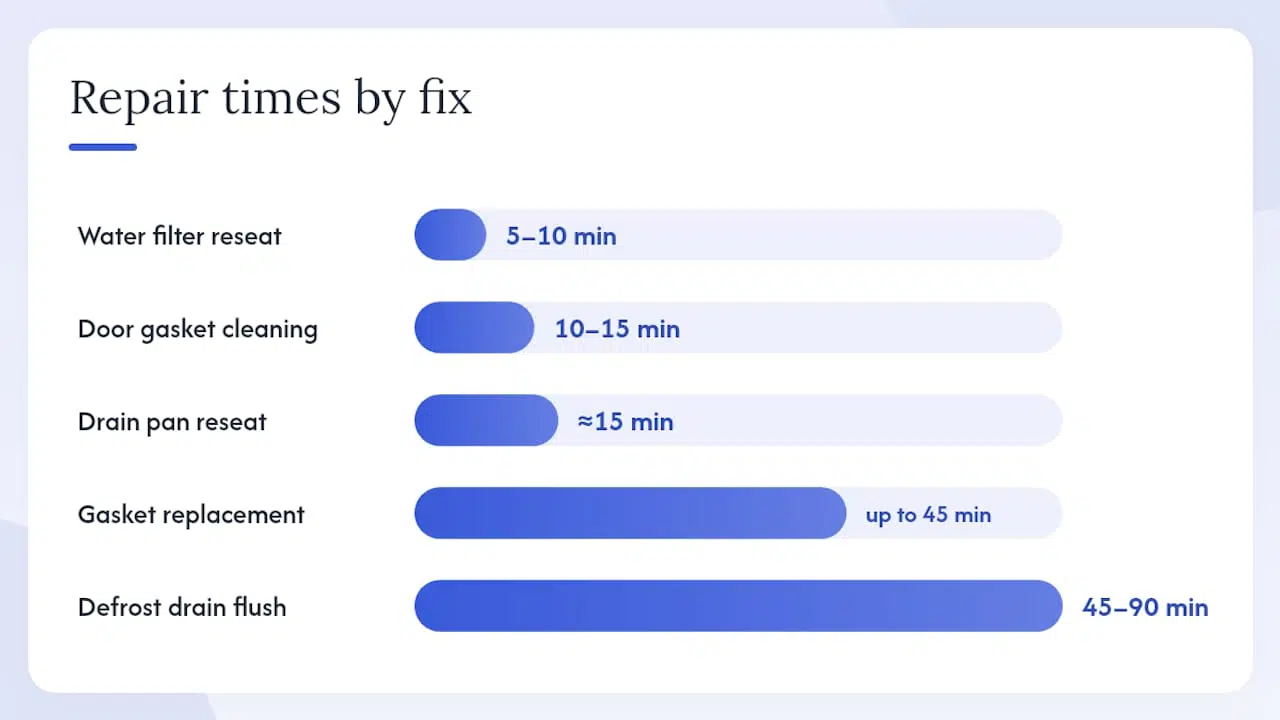
| Fix | Approach | Time | Estimated Cost | Best When |
|---|---|---|---|---|
| Defrost drain flush | DIY | 45–90 min | Under $5 (materials) | Crisper pooling, first occurrence |
| Door gasket cleaning | DIY | 10–15 min | — | Condensation, mild seal issues |
| Gasket replacement | DIY or pro | up to 45 min | a modest amount | Visibly cracked or deformed seal |
| Drain pan reseating | DIY | about a quarter of an hour | — | Pan shifted, no cracks |
| Drain pan replacement | Pro | 45–90 min | Part + labor | Cracked pan |
| Water filter reseat | DIY | 5–10 min | —–$50 (new filter) | Leak after filter change |
| Inlet valve replacement | Pro | 1–2 hrs | Part + labor | Continuous untraceable leak |
| Supply line repair | Pro | 45–90 min | Part + labor | Cracked or pressurized line |
Labor rates vary by region. In Orange County and Los Angeles County, diagnostic fees and hourly labor reflect local market rates. For a realistic estimate before booking, check the repair vs. replacement guide to decide whether a repair makes financial sense for your model’s age.
A DIY drain flush costs almost nothing. A professional service call for an inlet valve or defrost-system repair will run more, but it covers diagnosis, parts, and workmanship. The math usually favors repair over replacement for fridges under 10–12 years old.
Key Takeaways
A clogged defrost drain causes most interior fridge leaks, and a baking-soda flush clears it in under 90 minutes; persistent or pressurized leaks need a licensed technician.
| Point | Details |
|---|---|
| Check location first | Water under crispers = defrost drain; wet floor only = drain pan or supply line. |
| Flush the drain first | Mix 1 tablespoon baking soda with 2 cups of warm tap water; use a turkey baster and repeat until the drain flows freely. |
| Know when to stop DIY | Recurring ice plugs, wet electrical parts, or an untraceable leak all require a pro. |
| Prevent with routine | Flush the drain twice yearly, clean gaskets monthly, and change the water filter on schedule. |
| Appliancesrepairmdtech | Serves Orange County and Los Angeles County; book online for diagnostic and repair of persistent or complex fridge leaks. |
What our techs actually check when they arrive
The conventional wisdom on fridge leaks tends to stop at “clear the drain and you’re done.” That’s true often enough to be useful advice, but it misses a pattern that shows up regularly in the field: the drain was cleared, the fridge ran fine for three weeks, and then the puddle came back.
The reason is almost always upstream of the drain itself. A defrost heater that’s cycling too aggressively, a drain strap that was never installed correctly from the factory, or a door gasket that looks fine but fails the dollar-bill test on the hinge side — these are the things a homeowner can’t easily see on a first pass. The drain is the symptom; the defrost system is often the cause.
When Appliancesrepairmdtech technicians arrive, they check the drain and pan first, then the supply line and filter seat, then the gasket on all four sides, then the level of the unit. If the drain was recently cleared and the clog returned, they go straight to the defrost heater and drain strap. That sequence matters because skipping to parts replacement without confirming the root cause is how a $15 fix turns into a $200 one.
The broader point: a one-time DIY flush is worth trying. If it works and stays clear, you’re done. If the leak returns, the problem has a mechanical cause that a baster won’t reach.
Professional fridge repair in Orange County and Los Angeles County
When the baking-soda flush doesn’t hold, or you’d rather skip the troubleshooting entirely, Appliancesrepairmdtech sends a licensed technician to your door in Orange County or Los Angeles County, often the same day you book.
A service visit covers a full diagnostic: drain, pan, supply line, filter seat, door gasket, inlet valve, and unit level. The technician arrives with common replacement parts, so most repairs are completed in a single visit. No guesswork, no second trip for parts.
Booking takes two minutes online. If you have a Samsung model, the Samsung appliance repair page has model-specific service details. For any other brand, schedule a repair visit directly and a technician will confirm your appointment window.
This article provides general troubleshooting information, not professional appliance or plumbing advice. Confirm current safety guidelines and local code requirements with a qualified technician before attempting repairs that involve pressurized lines or electrical components.
Useful sources and further reading
These resources go deeper on specific topics covered above:
- Side-by-Side Refrigerator — Water on Floor, Repairing a Clogged Defrost Drain
- Why Is My Refrigerator Leaking Water? (Whirlpool blog)
- Refrigerator Leaking Water? Causes & Fixes (Inside & Floor)
- Refrigerator defrost drain clogged (AppliancePartsPros)
- How to unclog the defrost drain in a refrigerator? | Hoffman Brothers
- Clear the Path: How to Unclog the Defrost Drain on Your Refrigerator — AppliancesFirst
- Refrigerator thermometers: cold facts about food safety (FDA)