
Most dishwasher drainage problems come down to a clog you can clear in 15 to 30 minutes. Cut the power at the breaker, run a cancel/drain cycle, and clean the filter before touching anything else. If that fixes it, you just saved yourself a service call. If the pump hums, grinds, or stays silent after that, stop testing and call a technician.
TL;DR:
- If water remains in the dishwasher after cleaning the filter and checking the hose, the issue likely lies downstream or with the electrical components.
- Most drainage failures can be addressed by removing standing water safely and inspecting the drain hose, high loop, and disposal connection for clogs or kinks.
- A humming, grinding, or silent drain pump during operation indicates either debris obstruction, pump failure, or electrical faults that require professional diagnosis.
- Regular maintenance, such as monthly filter cleaning and annual hose inspection, helps prevent drainage issues caused by debris buildup or mineral deposits.
- Avoid using chemical drain cleaners, as they can damage seals and electrical parts; book a repair technician if troubleshooting steps do not resolve the problem.
Table of Contents
- Safety Steps to Take Before You Touch Anything
- How to Remove Standing Water Safely
- How Do You Clean the Dishwasher Filter and Sump?
- Check the Drain Hose, High Loop, and Disposal Connection
- What Does a Failing Drain Pump Sound Like?
- Safe DIY Fixes That Actually Work
- When Should You Call a Dishwasher Repair Technician?
- Preventing Future Drainage Problems
- What We See Most Often on Service Calls
- Book a Dishwasher Diagnostic With MDTech Appliance Repair
- Manufacturer Resources Worth Checking
- Sources
Safety Steps to Take Before You Touch Anything
Cut the power at the breaker before you put your hands anywhere near the tub, filter, or pump. A dishwasher that appears “off” at the door panel can still carry live voltage to the pump motor, and reaching into standing water while it’s powered is not a risk worth taking. Manufacturer guidance backs this up as the first move for any reset-and-drain troubleshooting), not an optional precaution.
If you plan to disconnect the drain hose or check under-sink connections, shut off the water supply valve too. It’s a quick step that prevents a small drainage issue from turning into a flooded cabinet.
Lay towels on the floor in front of the dishwasher and slide a shallow pan or tray under the kickplate area if you’re pulling the unit forward. Standing water almost always sloshes during removal, and a few old towels save you from mopping a kitchen floor twice.
Gather these before you start:
- A bucket or large bowl for scooping water
- Old towels (more than you think you’ll need)
- A flashlight, since the filter and sump area is dim even with the door open
- Needle-nose pliers for pulling hose clamps or debris
- Rubber gloves, since standing dishwasher water carries food residue and bacteria
- A soft-bristle brush for the filter
- A wet/dry shop vacuum or a turkey baster for fast water removal
Pro Tip: Keep your phone camera handy. Snap a photo of the filter and sump area before you remove anything. If a part doesn’t seem to want to go back the way it came out, you’ll have a reference.
How to Remove Standing Water Safely
A small amount of water sitting in the recessed area around the filter after a cycle is normal. That’s normal residual moisture, not a malfunction. Anything beyond that, especially water pooling above the filter screen or covering the bottom of the tub, tells you drainage failed.
Removing it correctly matters because sloppy water removal can push loose food debris further into the pump inlet, turning an easy filter clean into a bigger repair.
- Scoop the bulk of it out first. Use a cup or small bowl to bail water into a bucket, working from the center outward.
- Switch to towels for the last inch. Lay a folded towel flat in the water and let it soak, then wring it into the bucket. Repeat until the basin floor is mostly dry.
- Use a wet/dry vac for speed. If you own one, its hose reaches into the sump corners better than towels and pulls up debris at the same time.
- Try a turkey baster for tight spots. It’s oddly effective for drawing water out from around the filter housing without disturbing sediment.
- Keep towels stacked under the door while you work, since tilting the rack or lifting the filter almost always drips more water onto the floor.
Getting the tub dry isn’t just about cleanup. It lets you actually see the filter, the sump screen, and whatever is sitting at the bottom, which is where most drainage failures start.
How Do You Clean the Dishwasher Filter and Sump?
Pull the lower rack out first. Most filters sit in the center or rear of the tub floor, held by a twist-lock cylinder (turn a quarter turn and lift) or a two-piece assembly with a fine mesh screen over a coarser trap. Check your owner’s manual if you’re not sure which style yours uses, since the release mechanism varies by brand.
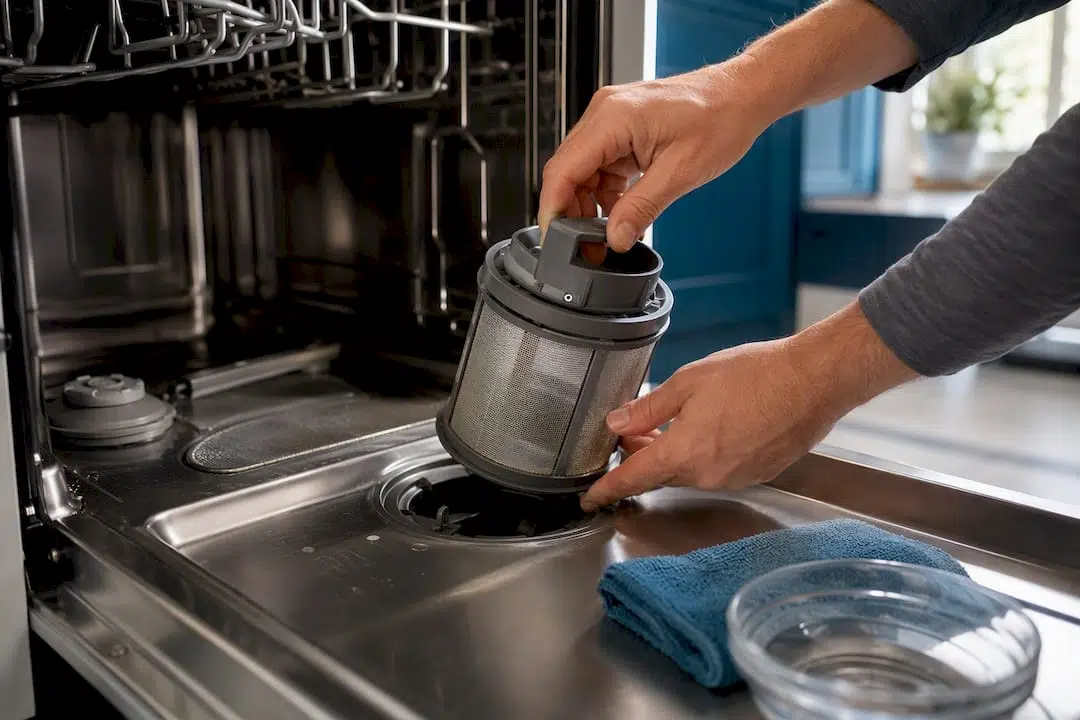
Once it’s out, rinse both pieces under warm running water and scrub the mesh with a soft brush. You’re looking for the usual culprits: produce stickers, popcorn kernels, seeds, small bone fragments, and broken glass. Even filters marketed as self-cleaning need this manual check periodically, because larger items regularly bypass those self-cleaning mechanisms and jam against the impeller instead of washing away.
What to check while the filter is out:
- Look into the sump opening with your flashlight for visible debris sitting on top of the pump screen
- Check the impeller (the small fan-like blade visible through the sump opening) for anything wrapped around it, such as a rubber band or twist tie
- Inspect the filter housing gasket for cracks or gaps that could let unfiltered water bypass the screen
- Wipe down the underside of the lower rack, since food often collects there and drops back in during the wash
Whirlpool and other manufacturers list a clogged filter as one of the most common causes of drainage failure, right alongside sump debris and blocked hoses.
Once the filter is clean and reseated (make sure it locks or clicks into place, since a loose filter will rattle and may not seal properly), run a short cycle or the cancel/drain function and watch the sump area. Water should disappear steadily within a minute or two. If it drains clean now, you’re done. If it’s still slow or standing, move to the hose and disposal checks next. If you’d rather walk through the whole homeowner troubleshooting sequence at once, our dishwasher troubleshooting guide covers filter, hose, and reset steps in one place.
Check the Drain Hose, High Loop, and Disposal Connection
If the filter’s clean, but water still isn’t draining, the blockage is likely downstream, somewhere between the pump and your sink plumbing.
- Pull the dishwasher forward carefully (unplug it first if you haven’t already cut power at the breaker) to access the drain hose running to the sink cabinet.
- Look for kinks or pinches, especially where the hose bends sharply behind the unit or gets pinned against the cabinet wall during installation.
- Check for a high loop or air gap. The drain hose needs to rise above the level of the drain connection before dropping down to the disposal or drain line. This prevents dirty sink water from siphoning back into the dishwasher. If it’s missing entirely, that’s often the actual cause, not a coincidence alongside it.
- Inspect the air gap fitting if your installation uses one (a small cylindrical fitting on the countertop near the faucet). A clogged air gap shows up as water bubbling up around its cap during the wash cycle.
- Find the disposal inlet where the drain hose connects. If you recently installed a new garbage disposal, check for a knockout plug, a small plastic disc that manufacturers leave in place at the factory. Forgetting to remove it after installing a disposal is one of the most frequent installation mistakes that causes total drain failure, not partial.
- Run the disposal for a few seconds with water running. If it’s jammed or full of old food, that backup can prevent the dishwasher from draining at all, even with a perfectly clean filter.
When you flush the hose itself, resist the urge to jam a wire hanger or screwdriver down it. Use a flexible dishwasher-safe brush or garden hose water pressure instead, and do the flushing outside if you can. A rigid tool can puncture the hose wall from the inside, and you won’t know it until you’re mopping up a leak weeks later.
Hard water buildup inside the hose is a slower, quieter cause of the same problem. If you’ve noticed white scale on faucets or glassware, mineral deposits could be narrowing the hose over time. Measuring your water hardness tells you whether that’s a factor worth addressing with a filter or softener.
What Does a Failing Drain Pump Sound Like?
The drain pump sits beneath the tub floor, right behind the sump you just cleaned. Its job is simple: push wastewater out through the hose once the cycle calls for a drain. When it fails, the symptoms are usually loud enough to diagnose from across the kitchen.
A steady humming sound with no water movement usually means the pump motor is running but something is jamming the impeller. This is often the same debris you’d find during a filter check, just lodged deeper.
Grinding or rattling points to a foreign object, glass fragments, a fruit pit, a piece of broken dish, caught in the pump chamber itself. This is a task for a technician in most cases, since the pump housing on many models is sealed and not designed for repeated homeowner disassembly.
No sound at all during the drain phase suggests an electrical issue: a failed pump motor, a broken wire connection, or a control board fault that never sends the signal to run the pump.
Here’s what’s safe to check yourself, and what isn’t:
- Safe: removing the filter and visually inspecting the impeller for visible debris
- Safe: gently spinning the impeller by hand (with power off) to check it moves freely
- Not safe without manufacturer instructions: removing the pump housing itself
- Not safe: repeatedly running cycles hoping the noise resolves on its own
Pro Tip: If you hear grinding even once, don’t run another cycle “to see if it clears itself.” A foreign object caught in the impeller can chip the blade with repeated attempts, turning a $150 pump swap into a full pump-and-motor replacement.
Persistent humming or grinding commonly means the pump needs replacement, or that a technician needs to safely extract an object that’s hazardous to remove without the right tools.
Safe DIY Fixes That Actually Work
Before anything else, try forcing a reset. Most brands let you cancel the current cycle by pressing “Cancel/Drain” and holding it for three seconds, or by opening and closing the door latch three times in a row on models without a dedicated button. This forces the control board to attempt a fresh drain cycle, which clears minor electronic hiccups without touching a single part.
- Run the cancel/drain sequence, then check your manual for the model-specific version, since button labels vary between brands.
- Try a vinegar and baking soda flush for mild grease or mineral buildup: pour a cup of white vinegar into the bottom of the empty tub, let it sit for 15 minutes, then run a hot rinse cycle.
- Follow with a hot water flush if you suspect grease buildup in the hose. Running the hottest wash cycle available helps loosen soap scum and fat deposits clinging to the interior walls.
- Flush the hose and air gap with water pressure rather than a rigid tool, as covered earlier.
- Stop and call a technician if none of this clears standing water after a full cycle attempt.
Chemical drain cleaners can turn a simple clog into a much bigger repair. The caustic chemicals in those products are formulated for pipes, not dishwasher seals, gaskets, and electrical connections, and they can corrode components that were never designed to handle them.
That warning isn’t just industry caution. GE Appliances specifically advises against using chemical drain cleaners in dishwashers, since they can damage seals and electrical parts that a mechanical clean would never touch.
When Should You Call a Dishwasher Repair Technician?
Call a professional when you’ve cleaned the filter, checked the hose and disposal, and run a reset, and the dishwasher still won’t drain. At that point, repeated DIY attempts risk damaging the pump or flooding your kitchen, not fixing anything.
Specific red flags that mean stop troubleshooting and book a visit:
- Water still pools after a full cancel/drain cycle following a clean filter and clear hose
- The pump hums but nothing moves, or grinds on every attempt
- You notice water leaking from under the unit during or after a cycle
- Breaker trips, burning smells, or any other electrical symptom accompanies the drainage problem
- The dishwasher is silent during the drain phase with no pump sound whatsoever
If leaking has joined the drainage problem, that combination usually points to a bigger issue worth reading up on separately in our dishwasher leak guide.
When Bosch’s own troubleshooting reaches the same dead end, a clean filter and pump area with continued drain failure, they point to the drain pump or an electrical fault as the likely cause, which is exactly the threshold where a technician’s tools and testing equipment matter.
A technician’s visit typically covers testing the pump under load with a multimeter, checking wiring harnesses and connectors for corrosion or looseness, verifying the drain valve or solenoid opens and closes on command, and confirming the disposal and sink plumbing aren’t feeding the problem back into the dishwasher. That’s meaningfully more thorough than a visual check, because a pump can look fine and still fail an electrical test.
When you book a service call, have your model number ready (usually inside the door frame), a plain description of the symptoms (humming, standing water, silence), and a quick list of what you already tried. That alone can cut diagnostic time significantly, since it tells the technician which components to rule out before arriving. Our repair workflow breakdown walks through exactly what a diagnostic visit involves, start to finish.
Preventing Future Drainage Problems
Clean the filter monthly, not just when water starts pooling. A five-minute rinse under the tap every few weeks keeps food debris from compacting into a stubborn clog that needs scrubbing.
Scrape large food scraps into the trash before loading dishes, and skip pre-rinsing everything, since a moderate amount of food residue actually helps some detergents work better. What you do want to avoid loading directly: grease-heavy pans without wiping first, paper labels or stickers still stuck to jars, and anything with loose seeds or pits.
Run a monthly hot maintenance cycle, either an empty cycle on the hottest setting or one using a dishwasher-safe cleaning tablet, to dissolve grease and mineral film building up inside the tub and hose walls. Inspect the drain hose and connections once a year, checking for cracks, soft spots, or loosened clamps, especially if your dishwasher sits on hard flooring where vibration can work fittings loose over time.
Load dishes with the spray arm in mind. Tall items or overloaded racks that block the spray arm’s rotation don’t just clean poorly, they also cause water and food particles to redeposit near the filter instead of washing away.
| Habit | How Often | Why It Matters |
|---|---|---|
| Clean the filter | Monthly | Prevents debris buildup before it reaches the pump |
| Run a hot maintenance cycle | Monthly | Dissolves grease and mineral film in the tub and hose |
| Inspect the drain hose | Annually | Catches cracks or loosening before they cause leaks |
| Scrape large food scraps | Every load | Keeps solids from clogging the filter and sump |
Consistent care like this is covered in more depth in our dishwasher care tips guide, which pairs well with the maintenance habits above.
What We See Most Often on Service Calls
Homeowners usually call us after they’ve already cleaned the filter and the water is still sitting there, which tells us the problem is downstream or electrical before we even walk in the door. That sequencing matters: it’s exactly why we ask about model number and symptoms when booking, because it narrows the diagnostic path before a technician even opens the toolbox.
On a typical visit, we’re checking pump access and testing it under load, verifying hose routing has an actual high loop instead of a straight run, confirming any garbage disposal knockout plug was removed during installation, and running a full cycle to watch how the system behaves under real conditions rather than a static inspection.
Here’s the honest split: filter cleaning, hose checks, and disposal inspection are entirely within a homeowner’s reach, and most drainage complaints resolve right there. Where DIY should stop is the pump housing and electrical diagnostics. If you’ve done the cleaning and checking and it’s still not draining, you’re not missing a trick. You’re at the point where the fix requires equipment and access most kitchens don’t have sitting in a drawer.
— MDTECH
Book a Dishwasher Diagnostic With MDTech Appliance Repair
If you’ve cleaned the filter, checked the hose, and the water’s still sitting there, you’ve hit the point where a diagnostic visit is faster than more guesswork. Technicians test the pump under load, verify hose routing and the disposal connection, and confirm the drain valve is actually opening on command, work that takes specialized tools rather than trial and error at home.
Booking online takes a few minutes. Have your model number ready, a plain description of what’s happening (humming, standing water, silence), and a short list of what you’ve already tried, since that information helps the technician arrive prepared rather than starting from zero. Appliancesrepairmdtech covers Orange County and Los Angeles County, and if your dishwasher turns out to need a part rather than a full replacement, our guide to repairing versus replacing can help you weigh the decision before the appointment. Schedule your diagnostic visit through the Appliancesrepairmdtech booking page and get a technician on-site to resolve it properly.
Manufacturer Resources Worth Checking
Every dishwasher brand has its own reset sequence, error codes, and filter design, so your owner’s manual is the fastest way to confirm model-specific steps.
- GE Appliances product support for standing water guidance and drainage basics
- Whirlpool’s dishwasher unclogging guide for common clog causes and cleaning steps
- Bosch’s drainage troubleshooting page for pump and electrical fault signs
Check your specific model’s manual for exact button sequences and error codes before assuming any of these steps apply exactly as written.