
Most refrigerator noise traces back to one of four sources: the condenser or evaporator fan, the drain pan, the ice maker, or the compressor. Start by localizing the sound to the back, bottom, or interior of the unit, and if you catch a whiff of burning or see any smoke, unplug the refrigerator immediately and skip the DIY checks below.
TL;DR:
- The main sources of refrigerator noise include the condenser or evaporator fan, drain pan, ice maker, and compressor, with normal sounds being rhythmic and predictable.
- Unusual or loud noises like scraping, rattling, or constant humming often indicate specific issues such as ice buildup, loose parts, a failing fan, or a struggling compressor.
- Performing simple DIY checks like leveling the unit, cleaning coils, or spinning fans can resolve many noise problems without professional help.
- Homeowners should differentiate compressor from fan noise by texture and the door-open test to avoid costly misdiagnoses.
- If noise persists after basic troubleshooting, it’s best to book a licensed technician to prevent unnecessary part replacements and ensure an accurate diagnosis.
Table of Contents
- What Are the Common Refrigerator Sounds and What Do They Mean?
- Step-by-Step Diagnostic Checklist to Isolate the Noise
- How Do You Tell Compressor Noise From Fan Noise?
- What DIY Fixes Actually Work for a Noisy Fridge?
- When Should You Stop DIY and Call a Professional?
- How Often Should You Maintain Your Fridge to Prevent Noise?
- What Do Technicians See Most Often on Noise Calls?
- Book a Refrigerator Diagnosis With a Licensed Technician
- Sources
- FAQ
What Are the Common Refrigerator Sounds and What Do They Mean?
Not every clunk is a problem. Refrigerators make a rotating soundtrack of noises during normal cycles, and knowing which ones are routine saves you from chasing a repair that doesn’t exist.
Normal sounds tend to be rhythmic and predictable, repeating every few minutes as the system cycles through cooling, defrost, and refrigerant flow. Gurgling or hissing usually means refrigerant is moving through the lines, clicking often comes from the defrost timer switching on or off, and popping is frequently just interior panels expanding or contracting with temperature changes. On self-defrost models, a sizzle or hiss during the defrost cycle is water hitting the defrost heater, which is normal, not a malfunction.
Problem sounds break that pattern. Here’s what to listen for:
- Grinding or metal-on-metal scraping: often a fan blade hitting ice buildup or a failing fan motor bearing. Quick test: open the freezer and listen for the sound to intensify near the back panel.
- Loud rattling or buzzing: usually a leveling issue or something loose near the base grille. Quick test: rock the fridge gently. If it wobbles, it’s not level.
- Continuous harsh humming that won’t quiet down: can point to a struggling compressor or a fan straining against debris. Quick test: check if the sound changes when you open the door (more on that below).
- Rhythmic clicking followed by silence, with the fridge not cooling: often a bad start relay rather than compressor failure.
Step-by-Step Diagnostic Checklist to Isolate the Noise
Before you touch a single part, spend five minutes observing. A structured refrigerator noise diagnosis beats guesswork every time, and it costs you nothing but attention.
- Note the location and pattern. Is the sound coming from the back (compressor, condenser fan), the bottom (drain pan, leveling), or inside the cabinet (evaporator fan, ice maker)? Does it happen constantly or only during certain cycles?
- Run the timing test. Compressors typically run in long, steady intervals of 20 to 40 minutes. If the noise starts and stops erratically or clicks repeatedly without a run cycle, suspect the start relay or a fan, not the compressor.
- Do the door-open test. Open the freezer door. If a whirring noise stops immediately, you’ve isolated the evaporator fan, since most models shut that fan off when the door opens.
- Use a wooden dowel as a stethoscope. Press one end against different panels (back panel, bottom grille, cabinet interior) and the other end near your ear. Sound travels through wood cleanly, and this trick pinpoints the noisiest component fast.
- Feel for vibration with your palm. Place your hand flat against the cabinet near suspected trouble spots. Vibration you can feel but barely hear usually means loose parts or an unlevel unit, not a failing motor.
- Unplug and check safely. With the fridge unplugged, spin the condenser fan blade (usually behind the bottom grille) and the evaporator fan (behind the freezer’s rear panel) by hand. A blade that’s stiff, wobbly, or coated in frost points you toward your fix.
Pro Tip: Keep a phone note of when the noise happens, how long it lasts, and what you’ve already checked. If you end up booking a technician, that timeline alone can cut a diagnostic visit in half.
How Do You Tell Compressor Noise From Fan Noise?
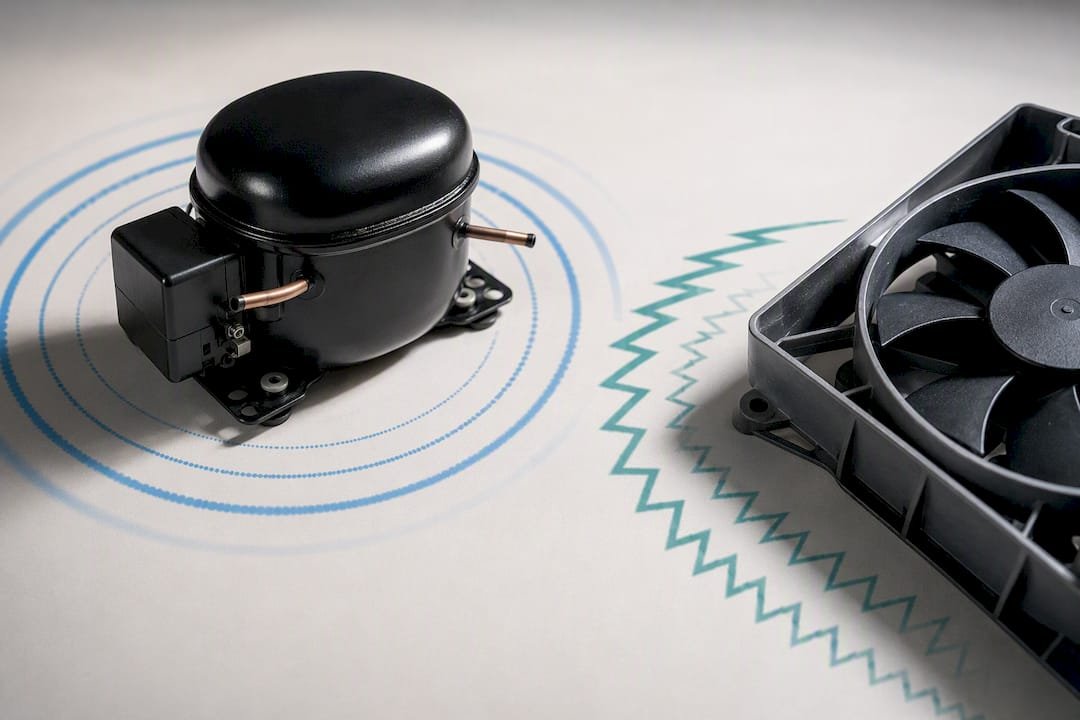
This is where most homeowners go wrong, and it’s an expensive mistake. A struggling fan gets misread as a dying compressor, leading people to replace a sealed system component that never needed to be touched.
Texture matters more than volume here. A low, steady drone usually means the compressor, while a higher-pitched, rhythmic whir or whistle points to a fan blade fighting obstruction or a worn bearing. The door-open test settles most disputes: since the evaporator fan shuts off when the freezer door opens, a whir that vanishes the instant you open that door is fan noise, full stop.
- Compressor: constant, low hum, located at the back bottom, runs in long cycles.
- Fan: variable pitch, often worsens over weeks as debris builds up, stops on door-open test.
- Both can misbehave at once (dirty coils straining the compressor while a fan struggles nearby), so isolate one variable at a time rather than assuming a single cause.
Many owners hear a labored hum near the back and jump to “compressor’s dying” when a dust-clogged condenser fan is straining to spin. Spinning that fan by hand while unplugged is the fastest way to rule it out before you spend money.
What DIY Fixes Actually Work for a Noisy Fridge?
Some of the loudest refrigerator noise issues have the cheapest fixes. Here’s the order to try them in:
- Level the unit. Use a bubble level on top of the fridge and adjust the front leveling legs until it’s dead flat. Unlevel refrigerators rattle against the floor and nearby cabinets constantly.
- Secure the drain pan. A loose pan under the unit buzzes against the compressor housing. Push it firmly into its clips.
- Clean the condenser coils. Unplug the fridge, pull it out, and vacuum the coils on the back or bottom. Dirty coils force the compressor and fan to work harder, which shows up as louder operation.
- Clear fan debris and thaw ice buildup. Remove the rear interior panel (unplugged first) to check for frost choking the evaporator fan blade.
- Test the start relay. A relay that rattles when gently shaken is often bad and typically costs far less to replace than a service call implies.
Pro Tip: Never open the sealed refrigerant system yourself. Anything past the fans, coils, and relay requires EPA-certified handling and specialized tools.
When Should You Stop DIY and Call a Professional?
Some symptoms mean stop troubleshooting and pick up the phone. If the compressor housing is hot to the touch and the interior is warming, the system may be self-protecting against overheating, and continued running risks losing a full fridge of food.
Call a technician right away if you notice:
- A burning smell, smoke, or scorched wiring odor.
- The compressor runs constantly but the interior stays warm.
- Any repair involves refrigerant, the sealed system, or a built-in unit with limited access panels.
Before the call, jot down the model number, when the noise started, its pattern, and which checks you’ve already run. That detail turns a guessing-game visit into a fast, accurate one.
How Often Should You Maintain Your Fridge to Prevent Noise?
A little upkeep prevents most of the noise complaints above from ever starting. Build this into a seasonal habit:
- Clean condenser coils every three months, more often if you have pets shedding nearby.
- Check door gaskets and leveling twice a year, since a sagging gasket forces the compressor to run longer and louder.
- Replace water filters on the manufacturer’s recommended cycle to keep the ice maker from straining.
- If the fridge lives in a garage or unfinished space, give it extra clearance. Cramped, unheated locations trap heat around the coils and amplify vibration against nearby walls.
- Log any new noise the day it appears, along with location and timing, so a pattern shows up before a small issue becomes an expensive one.
For a fuller seasonal rundown, this step-by-step maintenance guide covers the year in more detail.
What Do Technicians See Most Often on Noise Calls?
The most common mistake in the field is homeowners hearing a strained fan or debris rattle and assuming compressor failure. Run the timing and door-open tests before ordering parts. That five-minute check saves the cost of a part you never needed.
— MDTECH
Book a Refrigerator Diagnosis With a Licensed Technician
If you’ve run the checks above and the noise still doesn’t add up, or you’d rather skip the ladder-and-flashlight routine altogether, Appliancesrepairmdtech sends licensed technicians to your door instead of leaving you to order parts based on a guess. That matters because a misdiagnosed compressor replacement can cost far more than the fan motor or start relay that was actually the problem.
Appliancesrepairmdtech technicians diagnose the noise on-site, whether it’s a strained condenser fan, a failing start relay, or a genuine sealed-system issue on brands like Samsung and other major manufacturers. Most first visits end with a clear diagnosis, a straight quote, and the repair completed the same day when the part is on hand. If you’re weighing whether a fix is worth it against replacing the unit, the repair versus replacement breakdown is worth a look first. Ready for a real answer instead of another guess? Book a diagnostic visit through the service website and get a technician on-site.
Sources
- Refrigerator – Normal Sounds and Noises Made
- Rattling or Vibrating Noise – Refrigerator (Whirlpool product help)
- Refrigerator sounds and causes (iFixit troubleshooting)
- LG refrigerator compressor vs fan noise: how to tell them apart
- Refrigerators, freezers, and ice makers (U.S. Department of Energy)
FAQ
When Should You Worry About Refrigerator Noise?
Worry when the sound is new, grinding, or continuous and paired with a warm interior, a burning smell, or a compressor housing that’s hot to the touch. Routine gurgles, clicks, and hums that repeat every few minutes are normal operating sounds.
What Does a Failing Compressor Sound Like?
A failing compressor typically produces a constant, low droning hum from the back of the unit, sometimes accompanied by clicking as it struggles to start. If the fridge isn’t cooling while the compressor runs, that combination is a stronger signal than the noise alone.
Are You Supposed to Hear Your Refrigerator Running?
Yes. A working refrigerator hums, clicks, and occasionally gurgles as it cycles through cooling and defrost. The goal isn’t silence, it’s recognizing when a sound breaks from that normal, repeating pattern.
What Causes a Refrigerator to Make Noise?
The usual suspects are an unlevel unit, a loose drain pan, dust clogging the condenser fan or coils, ice buildup on the evaporator fan, a failing start relay, or, less often, the compressor itself. Running through the diagnostic checklist above narrows it down without guesswork.