
Every gas dryer installation has to clear four non-negotiable hurdles: outdoor venting through 4-inch rigid or listed flexible metal duct with no screens at the termination, a manual gas shutoff within 6 feet of the appliance, a dedicated grounded 120V circuit, and full compliance with the manufacturer’s label instructions. Most jurisdictions also require a permit and inspection for any new or altered gas line. If pressure testing or gas piping is involved and you’re not sure what you’re doing, that’s the moment to call a licensed technician instead of guessing.
TL;DR:
- Proper outdoor venting requires a 4-inch metal duct with a backdraft damper, no screens, and a termination at least 12 inches above ground, with a total length capped at around 35 feet.
- Gas piping must include a manual shutoff within 6 feet of the dryer, be correctly sized, pressure tested, and checked for leaks before connecting the appliance.
- Most jurisdictions require a permit and inspection if gas piping is altered or extended, with a pressure test signed off before connecting the dryer.
- The dryer needs a dedicated 120V grounded circuit, and in garages, it must be elevated about 18 inches off the floor to avoid flammable vapor accumulation.
- While some installation tasks can be done DIY, work involving gas piping, pressure testing, or permits requires licensed professional assistance for safety and code compliance.
Table of Contents
- What Are the Gas Dryer Installation Requirements Step by Step?
- What Are the Gas Line and Shutoff Valve Requirements?
- What Is the Code for Venting a Gas Dryer?
- Do Gas Dryers Have Electrical and Location Requirements Too?
- Do You Need a Permit to Install a Gas Dryer?
- How Do You Test and Verify a Gas Dryer Installation Is Safe?
- How Do You Maintain a Gas Dryer Vent Long Term?
- Why Licensed Work Still Matters for Gas Dryer Installs
- Book a Licensed Gas Dryer Installation With MDTECH
- Primary Sources for Gas Dryer Installation Code
- Sources
- FAQ
What Are the Gas Dryer Installation Requirements Step by Step?
Before you touch a wrench, confirm the install location can actually support outdoor venting, has adequate floor clearance, and meets any garage elevation rule (more on that below). Check the dryer’s model plate, too. It lists the gas type the unit is built for and whether high-altitude installations need a derated orifice.
Tools and supplies you’ll need:
- 4-inch rigid or listed flexible metal duct, plus clamps
- Listed vent termination cap with a built-in backdraft damper
- Approved flexible stainless-steel gas connector, or rigid pipe sized to code
- Manual gas shutoff valve
- Pipe-joint compound rated for gas service, or listed push-fit fittings
- Level, exterior flashing, and vent sealant
Installation sequence:
- Unpack the dryer and check it for shipping damage before moving it into place.
- Level the unit by adjusting the front feet until it sits flat and doesn’t rock.
- Route the vent duct with as few elbows as possible, securing joints with clamps. Never use screws that poke into the airstream. They snag lint and turn into a fire hazard.
- Install the exterior termination cap, respecting the clearance rules covered later in this guide.
- Leave the gas connection for last, and only connect it after the piping has been pressure tested and cleared by whoever performed that test.
- Wire or plug in the electrical connection and verify the circuit is properly grounded.
- Run a short test cycle and check for leaks, unusual noise, or weak airflow at the termination.
That order matters more than it looks. Connecting gas before the line is tested, or before an inspector has signed off on altered piping, is one of the most common code violations homeowners rack up without realizing it. If your project touches existing gas piping in any way, that’s a stop point: schedule the permit and rough inspection first, and don’t connect the appliance until the inspector clears the work.
What Are the Gas Line and Shutoff Valve Requirements?
Every jurisdiction that inspects gas dryer installations checks the same basic things: a valve you can reach, pipe sized for the load, and proof the line doesn’t leak.
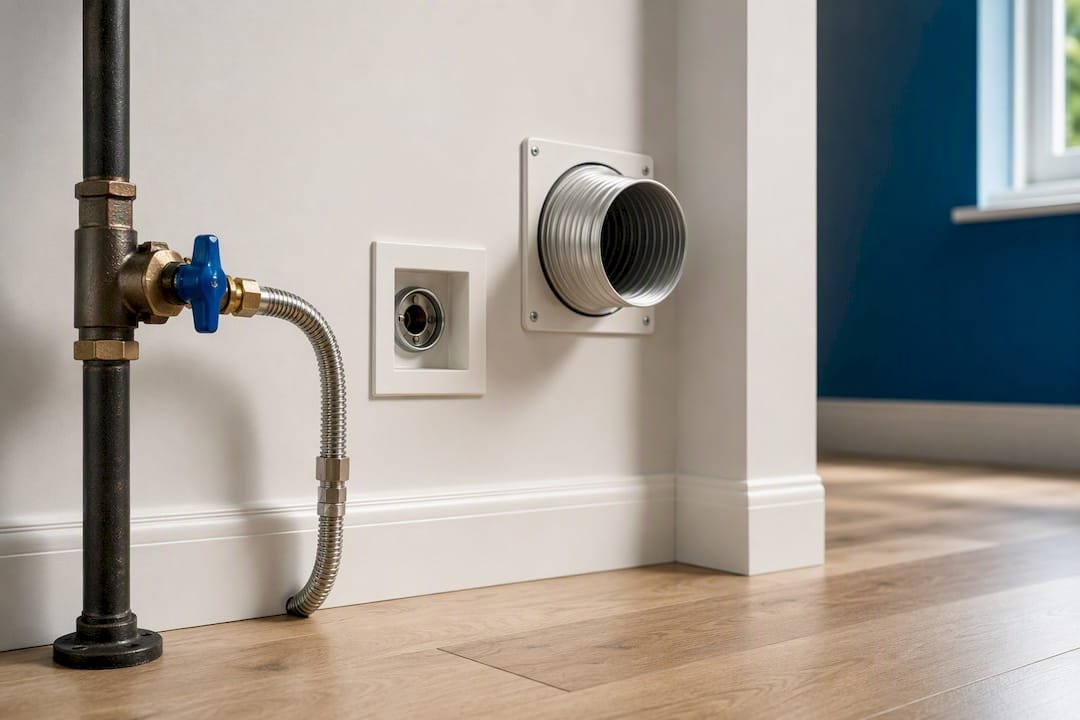
- Shutoff valve location: A manual shutoff must sit within 6 feet of the dryer and stay easily accessible, meaning you shouldn’t have to move the machine or crawl behind storage to reach it.
- Pipe sizing: 1/2-inch NPT pipe is the common recommendation for a standard run. Some manufacturer installation manuals allow 3/8-inch approved tubing on short runs of limited length, but only where your local code and gas supplier permit it.
- Test tapping: Many local codes require a plugged tapping upstream of the connector so an inspector can attach a test gauge during the pressure check.
- Flexible connectors: Use only listed stainless-steel connectors that meet ANSI Z21.24 or CSA 6.10, and replace any old or corroded connector rather than reusing it. Keep the run free of kinks and within its rated length.
- Pressure testing: New or extended gas lines must hold pressure for the duration your local code specifies, and the manufacturer’s instructions require the dryer be disconnected during any test above half a psi.
Pro Tip: Ask your inspector or gas supplier whether a sediment trap is required downstream of the shutoff valve. Many jurisdictions expect one, and it’s a five-minute fix during rough-in that’s a hassle to add later.
What Is the Code for Venting a Gas Dryer?
Venting is where most DIY installs go wrong, and it’s also the part codes are strictest about, because a bad vent run is a fire risk, not just an inconvenience.
- Material and diameter: Duct must be 4-inch nominal smooth-wall galvanized or aluminum rigid metal, or a listed flexible metal product; plastic and foil duct are prohibited outright.
- Equivalent length: IRC Section M1502.3 commonly caps total equivalent length typically capped around 35 feet for 4-inch duct, and every elbow counts as extra equivalent length, not just its physical footprint. A 90-degree elbow can add several feet of equivalent length depending on its angle, so a run with four elbows uses up length fast. If your calculated run exceeds the dryer’s rated maximum, you need a listed booster fan or a shorter, straighter path.
- Termination rules: The vent must exit outdoors, sit at least 12 inches above finished grade, and stay at least 3 feet from doors, windows, or other air intakes. A backdraft damper is required, and screens are banned at the termination point.
- Installation details: Joints should overlap in the direction of airflow, get secured with clamps rather than screws, and stay accessible for future cleaning. Fewer elbows always beats more, even if it means a slightly longer straight run.
The reasoning behind all of this isn’t arbitrary. NFPA identifies lint buildup in dryer vents as a leading cause of dryer-related house fires, and screened terminations clog with lint far faster than open, damper-protected caps. Homeowners who want a closer look at the physical install process can check our dryer vent installation guide for photos of proper duct routing.
Do Gas Dryers Have Electrical and Location Requirements Too?
Gas dryers still run on electricity for the drum motor, timer, and ignition system, and that circuit has its own rules.
- Circuit specs: Gas dryers need a 120V, 60Hz circuit on a 15 or 20 amp fuse or breaker. A dedicated circuit is strongly recommended so the dryer isn’t sharing capacity with other appliances.
- Grounding: The circuit must be grounded per the National Electrical Code, and if you’re using a power cord rather than hardwiring, the outlet needs to sit within 2 feet of the dryer’s side panel.
- Weather exposure: Never install the dryer where it’s exposed to rain, snow, or standing water, including some poorly sealed garages or exterior utility closets.
- Garage clearance: Building code in most jurisdictions requires the dryer be elevated about 18 inches above the garage floor, since gas appliances need to sit above the level where flammable vapors can pool.
- Fuel-appliance closets: Some local codes restrict dryer closets that also house other fuel-burning appliances, so check before finalizing a tight utility space.
Do You Need a Permit to Install a Gas Dryer?
Not always, but the moment your project touches gas piping, the answer usually flips to yes.
Most jurisdictions require a permit whenever you’re moving, adding, or extending a gas line, or converting an appliance from one fuel type to another. Simply swapping an old gas dryer for a new one on existing, unaltered piping often doesn’t trigger a permit, but always verify with your local building department before assuming you’re in the clear.
- Rough inspection: The inspector checks the pressure test on new or altered piping before the appliance gets connected, and expects to see the test gauge, the plugged tapping, and documentation of the hold time.
- Final inspection: This covers the visible vent termination, damper operation, absence of screens, secure duct joints, an accessible shutoff valve, the correct connector type, and proper burner operation.
- Who can pull the permit: In many California jurisdictions, licensed contractors must pull gas permits, though some cities allow homeowner permits for simpler work. Call your local building department before you buy materials, not after.
For any project that involves cutting into existing gas lines, our professional gas line repair guide walks through what licensed work actually involves and why permit coordination saves headaches later.
How Do You Test and Verify a Gas Dryer Installation Is Safe?
Once everything’s connected, don’t just start a load of laundry and hope for the best.
- Check every gas joint with a soapy water solution or an electronic leak detector. Never test with an open flame.
- Confirm the pressure test passed and that the dryer stayed disconnected during that test, then reconnect only after the inspector or technician signs off.
- Run a short cycle and watch the exhaust plume outside. You should see steady airflow and the damper opening and closing properly.
- Clean any lint from the full duct run before the first real load, and set a recurring reminder to repeat that cleaning going forward.
Pro Tip: If you smell gas, notice weak exhaust, or the dryer runs unusually hot after installation, shut off the gas supply immediately and call a licensed technician rather than troubleshooting further yourself.
How Do You Maintain a Gas Dryer Vent Long Term?
A correct installation only stays safe if you keep up with it. Clean the full vent run at least once a year, and check the exterior termination more often for lint buildup or debris that blocks the damper.
- Replace flexible gas connectors that show cracking, corrosion, or kinking. Don’t reuse an old connector on a new appliance.
- Long dry times or a dryer that runs hot to the touch usually points to vent restriction, not a machine problem.
- If cleaning and vent checks don’t resolve slow drying, that’s a sign to call a professional rather than keep running extended cycles.
- Keep a simple log of cleaning dates and any parts replaced. It helps with warranty claims and future inspections.
Our guide on routine dryer vent cleaning covers cleaning frequency and technique in more depth if you want a maintenance schedule to follow.
Why Licensed Work Still Matters for Gas Dryer Installs
The DIY mistakes we see most often aren’t dramatic. They’re small: a termination cap installed too close to a window, 3/8-inch tubing run past its permitted length, or a reused connector that’s already showing corrosion. None of those look dangerous on install day. All of them are exactly what inspectors flag.
Licensed technicians bring pressure testing, permit coordination, and installation warranties that a weekend project simply can’t match. If your job involves cutting gas pipe, running a pressure test, or pulling a permit, that’s the line where DIY should end and a professional call should start.
— MDTECH
Book a Licensed Gas Dryer Installation With MDTECH
Licensed technicians can handle the gas-line connection, vent installation, pressure testing, and permit coordination in one visit, so you’re not juggling separate inspectors and suppliers.
When you book a visit, expect a full inspection of your existing setup, a straightforward quote, help lining up any required permit, and a final pressure test and safety check before the dryer ever runs a load. If you’re also weighing whether to repair an aging unit or install a new one, our repair versus replacement guide can help you decide before you book. Ready to get your gas dryer installed correctly the first time? Schedule your installation with a licensed MDTECH technician today.
Primary Sources for Gas Dryer Installation Code
- IRC 2024 dryer vent termination requirements
- Manufacturer dryer installation instructions
- Building America dryer venting guidance
- NFPA dryer safety tips
- Local gas piping permit guidance
Sources
- Dryer installation instructions (example manufacturer / retailer pdf)
- Proper Clothes Dryer Venting | Building America Solution Center
- Local gas piping permit guidance (example municipal handout)
- NFPA dryer safety tips
FAQ
What Is Required to Install a Gas Dryer?
You need outdoor venting through 4-inch metal duct with a backdraft damper, a manual gas shutoff within 6 feet of the appliance, a grounded 120V circuit, and full compliance with the manufacturer’s installation instructions.
Do You Need a Permit to Install a Gas Dryer?
Usually only when the project involves new gas piping, an extension, or a fuel-type conversion. Simple swaps on unaltered existing piping often don’t require one, but you should confirm with your local building department first.
What Is the Code for Venting a Gas Dryer?
IRC Section M1502.3 requires outdoor termination, a backdraft damper, no screens, at least 12 inches of clearance above finished grade, 3 feet from openings, and a total equivalent duct length typically capped around 35 feet for 4-inch duct.
Does a Gas Dryer Need to Be 18 Inches Off the Ground?
Only in garage installations, where most local codes require the dryer be elevated 18 inches above the floor because gas appliances need to sit above the level where flammable vapors can collect.
Can I Install My Own Gas Dryer, or Do I Need a Professional?
You can often handle venting, leveling, and electrical connection yourself, but any work on gas piping, pressure testing, or permit-required changes should go to a licensed technician like the team at Appliancesrepairmdtech.