
If your microwave runs but won’t heat, start with settings and power. If those check out, a failed high-voltage part, the magnetron, diode, fuse, or door switch, is the most likely culprit. Stop there. Do not open the cabinet. Unplug the unit and call a licensed technician for anything beyond the surface checks below.
TL;DR:
- Most microwave failures are caused by a failed high-voltage component like the magnetron, diode, or door switch, not just settings or user error.
- Basic troubleshooting includes testing the outlet, checking for control lock or demo mode, canceling delay start, and power cycling before calling a technician.
- The magnetron typically shows signs such as abnormal buzzing, a burning smell, or intermittent heating, and requires multimeter testing for confirmation.
- Opening the microwave yourself is dangerous due to high-voltage capacitor risks; only licensed technicians should handle internal repairs.
- Repair makes sense for newer units with small, inexpensive part failures, while replacement is often better for older models or magnetron failures.
Table of Contents
- Why Is My Microwave Running but Not Heating?
- What Part Is Actually Failing?
- Is It Safe to Open the Microwave Myself?
- Should You Repair or Replace It?
- What Happens During a Professional Microwave Diagnosis?
- Our Take on Microwave Repairs
- Get Your Microwave Fixed the Right Way
- Sources
- FAQ
Why Is My Microwave Running but Not Heating?
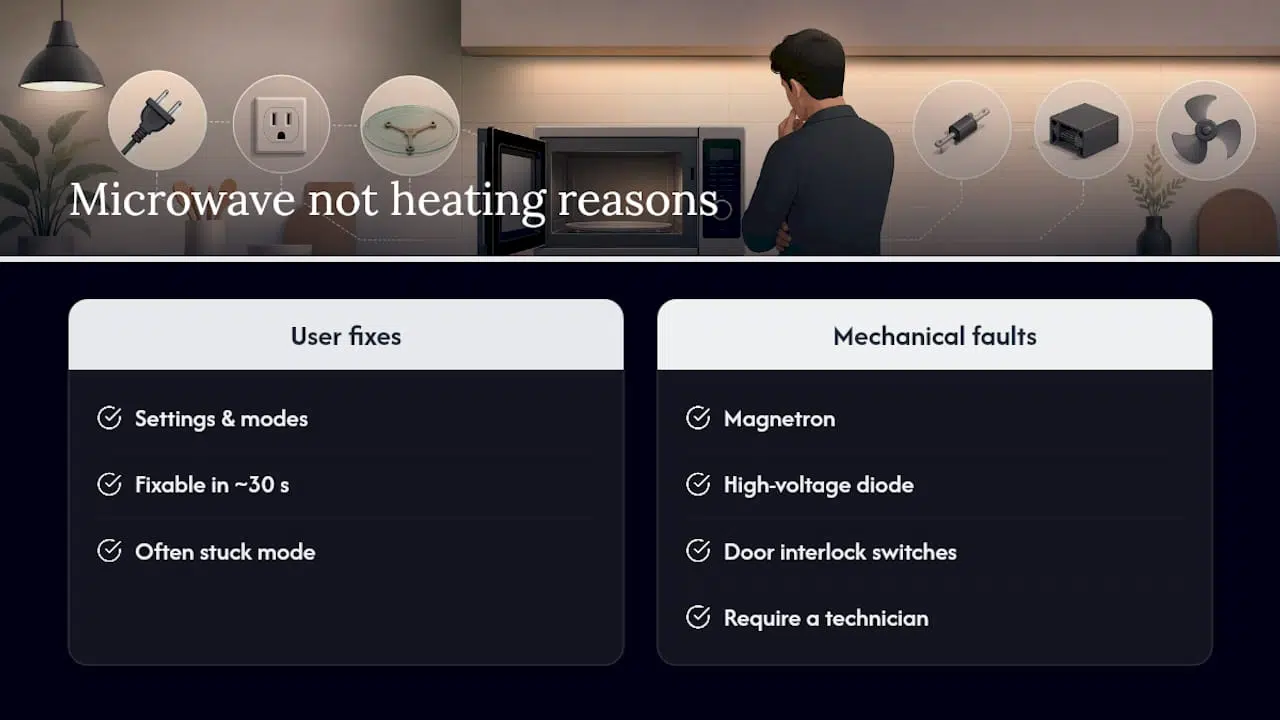
A microwave that hums, spins the turntable, and lights up but leaves food cold is telling you the low-voltage side of the machine works fine. The problem lives in the high-voltage circuit that actually powers the magnetron, the tube that generates microwave energy. According to Whirlpool’s own troubleshooting guidance, the most common causes split into two buckets: settings and modes you can fix in thirty seconds, and mechanical failures in the magnetron, high-voltage diode, or door interlock switches that require a technician.
Before assuming the worst, rule out the cheap explanations. A surprising number of “broken” microwaves are just stuck in a mode nobody remembers activating.
Quick checklist to run right now
- Test the outlet. Plug a lamp or phone charger into the same outlet. If it doesn’t power on, the problem is your circuit, not the microwave.
- Check for Control Lock or Demo Mode. Many models display a lock icon or run a “showroom” mode that spins the turntable and lights the interior without ever energizing the magnetron, according to KitchenAid’s troubleshooting page. Also confirm the power level isn’t set to something low like 3 or 5.
- Cancel any delay start that might be queued.
- Power-cycle it. Unplug for 60 seconds, plug back in, then test with 1 cup of water on high for 1 to 2 minutes. Water should be noticeably hot.
- Look and smell. Scorch marks, a burning odor, or smoke mean stop immediately and unplug. Don’t run another test cycle.
If the microwave still won’t heat after these steps, don’t go further on your own. The next likely causes live behind the cabinet, and that’s not a DIY zone.
Pro Tip: Take a short video of the microwave running (turntable, light, sound) before you call for service. A technician can often narrow down the likely failure just from watching how it behaves, which speeds up the visit.
What Part Is Actually Failing?
Once settings are ruled out, the symptoms usually point to a specific part. Matching what you’re hearing and smelling to the right component saves time on the service call and helps you describe the problem accurately.
- Magnetron failure. This is the single most common mechanical cause of a no-heat microwave. Signs include a loud buzzing or humming that sounds different from normal operation, a burning smell, or heating that works intermittently before quitting altogether. On a multimeter, Repair Clinic’s testing guide notes a healthy magnetron filament reads very low resistance, roughly 0 to 5 ohms, across its terminals. A reading of infinite resistance (open circuit) or continuity to the case (grounded short) both indicate a dead magnetron.
- High-voltage diode. The diode converts AC to the DC pulses the magnetron needs. When it fails, everything else, the light, fan, turntable, keypad, keeps working normally, but the unit produces zero heat. A blown diode is one of the more affordable fixes in this whole category, which is part of why manufacturer guides list it early in their troubleshooting flow.
- Door switches and safety interlocks. These switches confirm the door is fully closed before allowing the magnetron to fire. If one is misaligned or worn out, you might notice the light and fan running fine while heating simply never engages, or the microwave shuts off unpredictably mid-cycle.
- Thermal fuse, control board, or loose wiring. A blown thermal fuse (often triggered by an earlier overheating event) can cut power to the magnetron circuit while leaving everything else untouched. Control board faults and corroded connectors are rarer but show up as erratic behavior rather than a clean, consistent failure.
A word on testing limits: a cold continuity check on a magnetron can look fine and still miss the problem. Appliance Journal’s testing guide points out that some magnetrons pass a resistance test at rest but fail once they’re energized under full load. That’s why a technician weighs meter readings alongside symptoms like noise and intermittent heat, not the multimeter alone.
Is It Safe to Open the Microwave Myself?
No. This is the one place in the whole troubleshooting process where “just take a look inside” turns into a genuinely dangerous idea.
The U.S. Consumer Product Safety Commission has documented electrocution injuries from people attempting DIY microwave repairs. The high-voltage capacitor inside a microwave can retain a lethal electrical charge even after the unit has been unplugged for hours, and touching it directly can deliver a fatal shock.
That single fact should end any temptation to pull the cover off, according to CPSC’s official safety guidance.
Here’s the line between safe and unsafe for homeowners:
- Safe: Unplugging the unit, testing the outlet, checking settings and modes, and photographing any visible scorching or damage for a technician.
- Unsafe: Removing the outer cabinet, touching any internal wiring or the capacitor, or attempting to “discharge” it yourself with tools you found online.
If the microwave is still under warranty, contact the manufacturer’s service line first. Outside of warranty, a licensed technician handles the internal fault safely and correctly the first time.
Should You Repair or Replace It?
This decision usually comes down to three numbers: how old the unit is, what it cost originally, and what the repair will run. Consumer Reports’ repair-or-replace guidance frames it around exactly that math, particularly for over-the-range models, where labor to access internal parts adds to the bill.
Repair generally makes sense when:
- The microwave is relatively new and otherwise in good shape.
- The failed part is small and inexpensive, a door switch, thermal fuse, or diode.
- The unit is a higher-end or built-in model that’s expensive to replace or reinstall.
Replacement tends to win when:
- The magnetron itself has failed on an older or budget-tier unit, since labor plus parts can approach the cost of a new microwave.
- The microwave is already showing other age-related issues (rust, a failing keypad, a worn door seal).
- It’s a countertop model, where replacement is cheap and installation is a non-issue.
Before you call anyone, gather the model and serial number (usually on a sticker inside the door frame), a plain description of the symptoms, and any photos of damage or scorching. That prep alone can cut real time off a service visit, and it’s worth reading more on repair-versus-replace decision guidance if you’re weighing this across multiple appliances at once.
What Happens During a Professional Microwave Diagnosis?
A technician’s visit follows a fairly consistent sequence, and knowing it ahead of time makes the appointment faster and less confusing.
- Intake and symptom review. The technician asks what you’ve already tried, when the problem started, and whether you noticed smells, sounds, or error codes.
- Visual inspection. Checking for scorch marks, loose wiring, and obvious physical damage before touching anything electrical.
- Power and line voltage check. Confirming the outlet and circuit are delivering proper voltage, ruling out an external electrical issue.
- Safe capacitor discharge. This is the step homeowners cannot safely perform themselves, and it has to happen before any internal component is touched, per Repair Clinic’s own safety documentation.
- Continuity testing. Checking the magnetron, diode, and thermal fuse with a multimeter to pinpoint the failed part.
- Written findings and estimate. You get a clear explanation of what failed and what it costs to fix before any repair work begins.
Having your model number, a description of symptoms, and photos ready before the technician arrives speeds up steps one and two considerably. Most diagnostic visits run under an hour for straightforward cases like a bad door switch or diode; a magnetron replacement takes longer since the part usually has to be sourced. You can read more about how diagnostic troubleshooting works before booking.
Pro Tip: If your microwave is a combination convection/microwave unit, mention that when you book. Combo units have extra components and access panels, and flagging it upfront lets the technician bring the right parts on the first visit.
Our Take on Microwave Repairs
Most people jump straight to worrying about the magnetron when the real fix, more often than not, is a setting or mode they never noticed. That’s the gap Appliancesrepairmdtech sees constantly: homeowners assume the worst before checking the simplest thing. Run the settings check first. If it’s genuinely internal, don’t gamble with a capacitor. Book a licensed technician and let the diagnosis, not guesswork, decide what happens next.
— MDTECH
Get Your Microwave Fixed the Right Way
A safer alternative to guessing your way through a cabinet you shouldn’t open is to use professional on-site microwave diagnostics with licensed technicians who handle the high-voltage components homeowners legally shouldn’t touch.
Booking a visit through Appliancesrepairmdtech’s kitchen appliance repair services gets you:
- A diagnostic visit that checks power, settings, and internal components safely.
- A written estimate before any repair work starts.
- Parts sourcing handled for you, including magnetrons, diodes, and door switches.
If your microwave runs but won’t heat and the quick checks above didn’t fix it, schedule your appliance repair appointment and get a technician out to diagnose it properly.
Sources
- Microwave Not Heating: Possible Causes and Fixes | Whirlpool
- How to test a microwave magnetron | Repair Clinic
- Cpsc
- Should you repair or replace a broken over-the-range microwave? | Consumer Reports
FAQ
Why Is My Microwave Running but Not Heating?
The most common causes are an active Control Lock or Demo Mode, a power level set too low, or a failed high-voltage part like the magnetron, diode, or a door switch. Manufacturer guidance from Whirlpool recommends checking settings and modes before assuming a mechanical failure.
How Do I Repair a Microwave That Won’t Heat?
Start with the safe checks: outlet, settings, modes, and a power cycle. If those don’t restore heating, the fix requires opening the unit and discharging the capacitor, which isn’t a homeowner task, so book a licensed technician for the internal repair.
How Do I Know if My Microwave’s Magnetron Is Broken?
Listen for unusual buzzing or humming, a burning smell, or heating that starts and then quits mid-cycle. A technician confirms it with a multimeter test; a healthy magnetron reads roughly 0 to 5 ohms of resistance across the filament, while an open or grounded reading confirms failure.
How Do I Reset a Microwave That’s Not Heating?
Unplug the microwave for a full 60 seconds, then plug it back in and run a test with 1 cup of water on high for 1 to 2 minutes. If it’s still cold afterward and settings are correct, the issue is mechanical, not a reset problem.
Does Appliancesrepairmdtech Repair Microwaves?
Yes, Appliancesrepairmdtech provides on-site microwave diagnostics and repair with licensed technicians across Orange County and Los Angeles County. Pricing is available through the appliance repair services page since costs depend on the specific part that failed.